Showing posts with label 5x. Show all posts
Showing posts with label 5x. Show all posts
Thursday, July 28, 2016
Guide How to Install Custom Recovery on Android LG Nexus 5X
[Guide] How to Install Custom Recovery on Android LG Nexus 5X.
Install Custom Recovery LG Nexus 5X. This guide will explain to you How to Install Custom Recovery on Android LG Nexus 5X. By installing custom recovery on your LG Nexus 5X device youll able to create and restore device backups, also you can install custom ROMs on this device. To install custom recovery on LG Nexus 5X your bootloader must unlocked.You can see this guide to Unlock Bootloader on Android LG Nexus 5X. Before we do it, I would to introduce what is detail spesification and feature of this device. LG Nexus 5X is the smartphone released on September, 2015. with 5,2 Inchi wide IPS LCD capacitive touchscreen, 16M colors, work on Android OS, v6.0 (Marshmallow) and supported with chipset Qualcomm MSM8992 Snapdragon 808, Processor Quad-core 1.44 GHz Cortex-A53 & dual-core 1.82 GHz Cortex-A57, GPU Adreno 418, combined with 2 GB of RAM, 12,3 MP on primary camera and 5 MP on secondary camera.
How to Install Custom Recovery on Android LG Nexus 5X.
- Make sure ADB or fastboot installed correctly on your computer. See this guide for more instruction.
- Download the TWRP Recovery.
- twrp-3.0.2-0-bullhead.img 16.1M
- twrp-3.0.1-0-bullhead.img 16M
- twrp-3.0.0-1-bullhead.img 16M
- twrp-3.0.0-0-bullhead.img 16M
- twrp-2.8.7.2-bullhead.img 15.9M
- twrp-2.8.7.0-bullhead.img 15.9M
- Make sure your Bootloader Unlocked. see this guide.
- Make sure you check the md5 to verify its integrity.
- Then, put your file into your fastboot folder.
- Fastboot folder is where the fastboot.exe located in your computer.
- Then, Open a command prompt from within your fastboot folder.
- To start this command prompt just hold shift + right click, select open command prompt here.
- Now type this command.
- fastboot flash recovery <filename>.img
- You can change filename depending on which recovery youre flashing.
- Now, use volume button to scroll and power button to select the Reboot Bootloader option.
- Now your LG Nexus 5X booted, then back into the bootloader.
- Now, you can use the volume button to scroll and the power button to boot into your newly flashed recovery.
- Once everything finished, its now safe to disconnect your LG Nexus 5X device from computer.
- At the first TWRP boot up, youll be asked whether you want to allow.
- system modifications or
- keep it read-only.
- Therefore, choose to allow system modifications.
- Finish.

Sunday, July 24, 2016
Guide How to Flash the Factory Images and Return to Stock LG Nexus 5X
[Guide] How to Flash the Factory Images and Return to Stock LG Nexus 5X.
Flash the Factory Images LG Nexus 5X. This guide will explain how to Flash the Factory Images and Return to Stock LG Nexus 5X, by following this guide you can return the phone to be like it was when it came out of the box. Make sure always backup your personal data and file stored on your internal memory, cause this action will erase or wipe everything. Actually you can flash your LG Nexus 5X without wiping your personal data, but it would be written in the next article. Now following this guide below carefully, to avoid damage or broken your LG Nexus 5X device.
Prerequisite.
Before you perform this task, make sure your Bootloader is Unlocked. for more instruction guide you can see this guide.
Guide to flash LG Nexus 5X.
- Switch On your LG Nexus 5X device.
- Then perform factory data reset.
- Go to Settings
- Then Backup and Reset.
- Then follow all instruction shown on screen.
- Be ware. This action will remove all of your user data from the LG Nexus 5X device (apps, settings, photos, music, etc).
- Once it done, now download the appropriate factory images for your model here.
- Extract the bullhead-xxxxxx-factory-xxxxxxxx (xs replace variables) into a directory on your computer. You can use 7zip to extract this file.
- You can create folder on drive C:
- C: ullhead
- Once extract finished, Open it and move the following files to a new directory.
- C: ullheadimages:
- This is your file content.
- bootloader-bullhead-bullhead-xx.xx.img
- radio-bullhead-bullhead-xx.xx.img
- flash-al-sh
- flash-base.sh
- flash-al

Flash the Factory Images and Return to Stock LG Nexus 5X - Within C: ullhead ullhead-xxxxxx youll see another zip archive named image-bullhead-xxxxxx.

Flash the Factory Images and Return to Stock LG Nexus 5X - Now, extract the content of zip into folder.
- C: ullheadimages
- Then, within C: ullheadimages you should have the following files:
- android-info.txt
- boot.img
- bootloader-bullhead-bullhead-xx.xx.img
- cache.img
- radio-bullhead-bullhead-xx.xx.img
- recovery.img
- system.img
- userdata.img
- vendor.img

Flash the Factory Images and Return to Stock LG Nexus 5X - Connect your LG Nexus 5X device to the computer using USB cable.
- Now, Open a command prompt from within your fastboot folder.
- To start this command prompt just hold shift + right click, select open command prompt here.
- Then type;
- adb reboot bootloader
- Now, enter this command to flash your LG Nexus 5X device.
fastboot flash bootloader C: ullheadimages ootloader-bullhead-bullhead-xx.xx.img
fastboot reboot-bootloader
fastboot flash radio C: ullheadimages adio-bullhead-bullhead-xx.xx.img
fastboot reboot-bootloader
fastboot flash boot C: ullheadimages oot.img
fastboot erase cache
fastboot flash cache C: ullheadimagescache.img
fastboot flash recovery C: ullheadimages ecovery.img
fastboot flash system C: ullheadimagessystem.img
fastboot flash vendor C: ullheadimagesvendor.img- Once all commands or flashes process are complete you can reboot the LG Nexus 5X device:
- To reboot this device, type.
- fastboot reboot
- Finish.


How to Update Honor 5X Kll L21 to Marshmallow 6 0 1 KII L21C185B301 build
If you are still waiting for the Marshmallow OTA update for your Huawei Honor 5X, then we’ve got some good news for you. It’s a download actually, and is of none other then the Marshmallow OTA you are craving for.
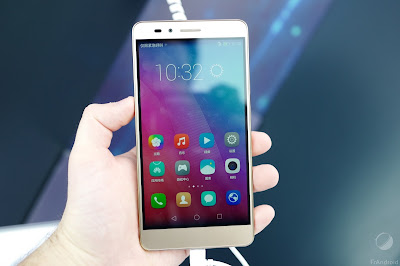
Just download the Marshmallow OTA provided below, and then follow the instruction given below to install the OTA update manually.
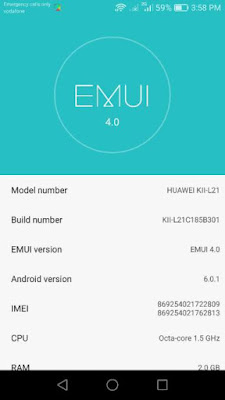
÷ Firmware Details:
•Model Number: HUAWEI Kll-L21
•Build Number: Kll -L21C185B301
•EMUI Version: EMUI 4.0
• Android version: 6.0.1
• IMEI: 869254021722809
869254021762813
•CPU : Octa- Core1.5 GHz
•RAM: 2.0GB.
Just download the Marshmallow OTA provided below, and then follow the instruction given below to install the OTA update manually.
÷ Firmware Details:
•Model Number: HUAWEI Kll-L21
•Build Number: Kll -L21C185B301
•EMUI Version: EMUI 4.0
• Android version: 6.0.1
• IMEI: 869254021722809
869254021762813
•CPU : Octa- Core1.5 GHz
•RAM: 2.0GB.
View my Flipboard Magazine.
÷ Prerequisites:
•This Update can be installed only on Huawei Honor 5X (Kll-L21)
*Disclaimer:
Android Custom ROM fix ® provide various Firmware Updates and Rooting process along with Custom ROM,Modes,file are all belong to their owners/developers. The autor of this site or the developers are not responsible, if you damage or brick your device.Do it on your own risk and follow the instruction properly.
* Important:
Backup important files stored on your device before proceeding with the steps below, so that in case something goes wrong you’ll have backup of all your important files.
÷ How to Update Honor 5X (Kll-L21) to Marshmallow 6.0.1 KII-L21C185B301 build.
1-Download the Kll-L21 OTA file.
2-Next, create a folder called dload on your device, and transfer the update.zip file to this folder on your Honor 5X.
3- Now, disconnect the device, and go to Settings > Update > Local update.
4- Now, select the update.zip file.
5- Your Honor 5X will verify the update.zip file and install it when everything it wanted to match matches.
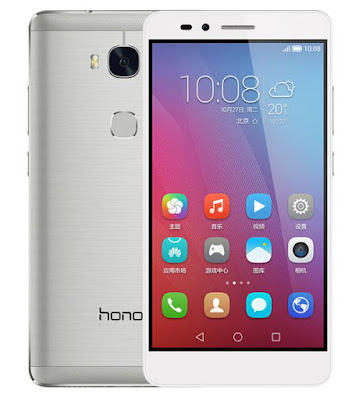
That’s it! Your Huawei Honor 5X should now have Marshmallow 6.0.1 on your phone! Go to Settings > About phone to verify.
Like this post? PLZ Hit the share buttons below to share this article with your friends on Facebook, Google + and Twitter.
PLZ Follow Us On Flipboard 4 More Huawei Honor 5X Latest Updates.
PLZ Use the comment box below to contribute more ideas & Suggestions .
Best Regards.
÷ Prerequisites:
•This Update can be installed only on Huawei Honor 5X (Kll-L21)
*Disclaimer:
Android Custom ROM fix ® provide various Firmware Updates and Rooting process along with Custom ROM,Modes,file are all belong to their owners/developers. The autor of this site or the developers are not responsible, if you damage or brick your device.Do it on your own risk and follow the instruction properly.
* Important:
Backup important files stored on your device before proceeding with the steps below, so that in case something goes wrong you’ll have backup of all your important files.
÷ How to Update Honor 5X (Kll-L21) to Marshmallow 6.0.1 KII-L21C185B301 build.
1-Download the Kll-L21 OTA file.
2-Next, create a folder called dload on your device, and transfer the update.zip file to this folder on your Honor 5X.
3- Now, disconnect the device, and go to Settings > Update > Local update.
4- Now, select the update.zip file.
5- Your Honor 5X will verify the update.zip file and install it when everything it wanted to match matches.
That’s it! Your Huawei Honor 5X should now have Marshmallow 6.0.1 on your phone! Go to Settings > About phone to verify.
Like this post? PLZ Hit the share buttons below to share this article with your friends on Facebook, Google + and Twitter.
PLZ Follow Us On Flipboard 4 More Huawei Honor 5X Latest Updates.
PLZ Use the comment box below to contribute more ideas & Suggestions .
Best Regards.
Thursday, July 21, 2016
Guide how to Unlock Bootloader Android LG Nexus 5X
[Guide] how to Unlock Bootloader Android LG Nexus 5X.
Unlock Bootloader LG Nexus 5X. On this guide we will show you how to Unlock Bootloader Android LG Nexus 5X. By unlocking your bootloader allows you to put custom ROMs on your device. LG Nexus 5X is the smartphone released on September, 2015. with 5,2 Inchi wide IPS LCD capacitive touchscreen, 16M colors, work on Android OS, v6.0 (Marshmallow) and supported with chipset Qualcomm MSM8992 Snapdragon 808, Processor Quad-core 1.44 GHz Cortex-A53 & dual-core 1.82 GHz Cortex-A57, GPU Adreno 418, combined with 2 GB of RAM, 12,3 MP on primary camera and 5 MP on secondary camera.
Now following this guide carefully,
Unlock Bootloader LG Nexus 5X.
- Make sure ADB or fastboot installed correctly on your PC. see this guide.
- From your LG Nexus 5X device.
- Go to Settings.
- About phone.
- Scroll down and tap on “build number" continuously (7 times).
- Then you will see a notifications that say youve enabled Developer Options.
- Now, go back to your Settings menu and tap Developer Options.
- Then, scroll down and tap on the “Enable OEM Unlock” checkbox.
- Also make sure youve enable USB Debugging.
- Now, Power Off your LG Nexus 5X device.
- Then, boot your device into bootloader,
- How to boot your device into bootloader ?
- Power Off your device.
- Then press and hold power + volume down (its should work on most android device)
- Now, connect your LG Nexus 5X device to your PC via original USB cable.
- Open a command prompt from within your fastboot folder.
- To start this command prompt just hold shift + right click, select open command prompt here.
- Now type,
- fastboot devices
- The result, It should return your device serial number, if so, fastboot is working. if not, make sure ADB or fastboot installed correctly.
- Once youve confirmed your fastboot connection. Now type.
- fastboot oem unlock
- Warning. This command will erase/delete all user data on your LG Nexus 5X device.
- On your LG Nexus 5X screen you will also see a notification that ask you to confirm this action.
- use the volume button to scroll
- use the power button to confirm if youre sure you want to proceed.
- Now type this command to complete this task.
- fastboot reboot
- Once everything is done, you can disconnect your LG Nexus 5X device from computer.
- Finish.
Monday, July 18, 2016
Guide How to Root Android LG Nexus 5X
[Guide] How to Root Android LG Nexus 5X.
Root LG Nexus 5X. On this guide we will show you how to to Root Android LG Nexus 5X. By performing root on your LG Nexus 5X device you can get some of these benefit, Unlock Hidden Features and Install "Incompatible" Apps, Boost Your Phones Speed and Battery Life, Block Ads in Any App, Remove Preinstalled Crapware, Flash a Custom Kernel, and many other benefits. So, if now you want try to root your LG Nexus 5X device, you can follow this guide below.
Before we proceed to root this device, here is some detail spesifications of LG Nexus 5X, this device is the smartphone released on September, 2015. with 5,2 Inchi wide IPS LCD capacitive touchscreen, 16M colors, work on Android OS, v6.0 (Marshmallow) and supported with chipset Qualcomm MSM8992 Snapdragon 808, Processor Quad-core 1.44 GHz Cortex-A53 & dual-core 1.82 GHz Cortex-A57, GPU Adreno 418, combined with 2 GB of RAM, 12,3 MP on primary camera and 5 MP on secondary camera. And special thanks to Heisenbergs on XDA for this guide.
Prerequisites.
- Unlock Bootloader LG Nexus 5X device. see here
- Install TWRP Recovery on this device. see this guide.
How to Root Android LG Nexus 5X.
- Download the latest SuperSU.
- Put the SuperSU file into internal storage of your device.
- Now, Boot into TWRP recovery and enter the install menu.How to do it ?
- Power Off your LG Nexus 5X device.
- Then, hold simultaneously the Power button and the Volume down button for a few seconds.
- Then, release all button if you see a list with options.

twrp - Root Android LG Nexus 5X. - Then, Navigate to where you have SuperSU stored on your internal storage and select it.
- Now, Swipe to install.
- Then choose wipe cache/dalvik
- Now, choose reboot to reboot system
- Once your Nexus 5 has rebooted, go to the Google Play Store and install Root Checker to verify you now have root.
- When you get a green pass message, youre done.

root checker- root lg nexus 5x - Finish.


Guide Flash the Factory Images and Return to Stock LG Nexus 5X Without Wiping Your Personal Data
[Guide] Flash the Factory Images and Return to Stock LG Nexus 5X (Without Wiping Your Personal Data).
Flash the Factory Images LG Nexus 5X. This guide will explain [Guide] Flash the Factory Images and Return to Stock LG Nexus 5X (Without Wiping Your Personal Data), by following this guide you can return the phone to be like it was when it came out of the box. This is a second method you can use to flash LG Nexus 5X device, on this method your personal data is safe, because the process is Leaving Internal Storage Intact. So you dont need to worry if your personal data is lost.
Prerequisite.
- Before you perform this task, make sure your Bootloader is Unlocked. for more instruction guide you can see this guide.
- TWRP Recovery installed on your LG Nexus 5X device. see this guide
Guide to flash LG Nexus 5X.
- Switch On your LG Nexus 5X device.
- Then perform factory data reset.
- Go to Settings
- Then Backup and Reset.
- Then follow all instruction shown on screen.
- Be ware. This action will remove all of your user data from the LG Nexus 5X device (apps, settings, photos, music, etc).
- Once it done, now download the appropriate factory images for your model here.
- Extract the bullhead-xxxxxx-factory-xxxxxxxx (xs replace variables) into a directory on your computer. You can use 7zip to extract this file.
- You can create folder on drive C:
- C: ullhead
- Once extract finished, Open it and move the following files to a new directory.
- C: ullheadimages:
- This is your file content.
- bootloader-bullhead-bullhead-xx.xx.img
- radio-bullhead-bullhead-xx.xx.img
- flash-al-sh
- flash-base.sh
- flash-al
Flash the Factory Images and Return to Stock LG Nexus 5X - Within C: ullhead ullhead-xxxxxx youll see another zip archive named image-bullhead-xxxxxx.
Flash the Factory Images and Return to Stock LG Nexus 5X - Now, extract the content of zip into folder.
- C: ullheadimages
- Then, within C: ullheadimages you should have the following files:
- android-info.txt
- boot.img
- bootloader-bullhead-bullhead-xx.xx.img
- cache.img
- radio-bullhead-bullhead-xx.xx.img
- recovery.img
- system.img
- userdata.img
- vendor.img
Flash the Factory Images and Return to Stock LG Nexus 5X - Now, Boot into TWRP recovery and enter the wipe menu,
- Then select advanced wipe, check only the data box and swipe to wipe.
- Now, Go to the TWRP main menu,
- Then, enter the reboot menu, select bootloader.
- The LG Nexus 5X device will now boot into the bootloader.
- Its time to connect your LG Nexus 5X device to the computer using USB cable.
- Now, Open a command prompt from within your fastboot folder.
- To start this command prompt just hold shift + right click, select open command prompt here.
- Now, enter this command to flash your LG Nexus 5X device without Wiping Your Personal Data.
fastboot flash bootloader C: ullheadimages ootloader-bullhead-bullhead-xx.xx.img
fastboot reboot-bootloader
fastboot flash radio C: ullheadimages adio-bullhead-bullhead-xx.xx.img
fastboot reboot-bootloader
fastboot flash boot C: ullheadimages oot.img
fastboot erase cache
fastboot flash cache C: ullheadimagescache.img
fastboot flash recovery C: ullheadimages ecovery.img
fastboot flash system C: ullheadimagessystem.img
fastboot flash vendor C: ullheadimagesvendor.img- Once all commands or flashes process are complete you can reboot the LG Nexus 5X device:
- To reboot this device, type.
- fastboot reboot
- Finish.
Subscribe to:
Posts (Atom)