Showing posts with label your. Show all posts

Friday, July 29, 2016

4 Reasons You Should Start a Blog For Your Business

People are used to running a website for their individual brand, companies, church and association but the internet as grown beyond what we can ever imagine or neglect, if you want your business to skyrocket and reach more people with less advertising effort, then the internet is a good place to achieve this.
The world Richest man once said that:
"If your business is not on the Internet, then your business will be out of business."
So with this, I think you should try to elevate your business by putting it online.
work-at-home-mom
Technology on the web today as advance from beyond what it use to be many years ago, if you are running a company, its not enough to have a website but you must also run a small business blog to rank for some local keywords that will bring in the right kind of traffic which can turn out into the right audience.
The simple differences between a blog and a website is that Blogs are updated with articles every now and then, but after designing and creating your website, you can decide not to update it that much and it will be fine but in the case of blog, for your blog to be relevant, gian audience and be search engine friendly, you must write various keyword article in a niche on it and update it often.
Today I want to give you 4 important reasons why yoou should create a blog for your local business.
In the United state right now, blogging is a super thing, many local business now host their blogs online to facilitate their promotion and gain more recognition, attract more customers and make more money.
Below are the 4 reasons;
  1. To Build a Brand : Building a good brand for your business is a necessity, the more quality brand you have, the more customer build trust and credibility in you and they will tend to patronize you the more. For instance; if you are into “catering services” you can make some articles on catering related services on your blog and it will rank for people searching for those interest on google and you will be contacted, that is the power of blogging in building solid brand, you tend to get more customers calling for consultancy without knowing you before all because they have gone through your blog.
  2. Make More Money : With blogging you can make more money; i will explain how this works, as a web designer, a wedding and event planner, you can put up some nice article in your field and customers searching for ” web designer” “wedding and event planner” will come across your blog, read the article, which must be interesting to them, then they will contact you and can even give you contract, all because they saw your credibility on your content creation.
  3. Gain More Relevance : Blogging can help you gain more relevant, people like the governor of Kwara state in Nigeria, runs a blog and right there he shares issues going on in the state and the measure they have been taking as a government to address it. Now as a business owner and as a company, you can also share your opinion about what is happening in your located country and share the way out with the world, as whenever there is a big breaking news and event in a nation, 70% of the people get to the internet to search what is going on. By the time you have shared your own opinion and your suggestion towards the development of the nation, your business will gain more relevant as a resource of your opinion that you shared on your blog.
  4. Reaching More Customers and Potential Clients across the world : If you have an electronic material like book and so on, blogging is a good way to get your voice out there to the world, you can say your mind and let them all know what you’ve gat and what you’re capable of doing.              If you run a recruitment firm or a consultancy service, by the time you shared some powerful tips on a particular field on your blog, your readers will be convince that this is a great professional in this world, as the internet give the best information in our world today. and you will attract ore customers and clients around the world.
These are some of the important reasons why you should start a business blog to support to your local business and country advancement.
Are you interested in creating a blog for your business but dont know how? We can do that for you. Hire us us today.
If you have questions, you can drop them below.


Get

Read more »

Wednesday, July 27, 2016

How to Jailbreak your iDevices Using Evasi0n7

 
As Rooting is to Android Devices, Jailbreaking is also to iOS Devices. So,if you are thinking of a way to jailbreak your iDevice, be it iPhone, iPad or iPOd, you should consider Evasi0n7 as your number one (1) windows program for jailbreaking iDEvices.

Evasi0n7 is one of the most commonly used windows program for jailbreaking iDevices from the earliest version upto version 7.0.4 as at this moment.
Speaking of the procedures and the time Evasi0n7 takes to complete a jailbreak process on an iDEvice, it could be said to be as simple relaxing!
What is Jailbreaking?
 Some iPhone users like to "jailbreak“ their device after purchasing it, as it allows you to perform things on the iPhone that you cant do when its not jailbroken. So what is jailbreaking? Jailbreaking is the process of removing software restrictions put into place by Apple on devices that run the iOS operating system.

How to Jaibreak AN iDEvice using Evasi0n7


It would seem very simple to Jailbreak an IDevice using the Evasi0n7. All you need to do is follow the 1,2,3... steps given below.
1- Download and install iTunes: evasi0n7 cannot actually run on your windows PC without iTUnes being installed already meanwhile, it is fully dependent of iTunes and as result, you need to have iTunes installed on your PC. It could be latest release of iiTunes or not but, it has to be very recent version of iTunes to support all the iDEvices.

2- Download And Run Evasi0n7: download evasi0n7 from this link on to your PC and run it. Please, note that you need internet connection to run evasi0n 7 and until the Jailbreak process is complete.

3- Connect your iDEvice: connect your iDEvice to the PC using your compatible USB Cord. Before you connect your iDEvice to the PC, make sure that you have closed all the programs running iTunes on your PC and close iTunes itself.

4- Evasi0n7 Sees your Device: almost immediately, Evasi0n7 should identify your iDEvice and display some info about the device.

5- Jailbreak!: now, the jailbreak button on the Evasi0n7 becomes clickable. Click the "Jailbreak" button and follow the rest of the instructions that follow, both on the Evasi0n7 GUI (Graphical User INterface) and on the iDEvice.

Please note that you are expected to do a complete backup of your device before you the Jailbreak incase anything goes wrong.


For any comments or questions over this article please, use the comment box bellow or contact us Via This Link. And if your questions is not about this article and needs our help over something related, Find Us on Facebook. Got any other info you want us discuss? Share it with us using the comment box or contact us!

Get

Read more »

How Activate Your Etisalat 4GB Data

For those that did not get this free 4gb data, today is another day and you can get yours too. But this time around is selecting sim card.

Please dont say is not working, because I did it today and I received a positive respond.


HOW TO GET FREE 4GB ETISALAT DATA


Dial *8186*1# on your Etisalat sim card

If you get a respond like Your request is processing...... That is a positive respond, Just keep calm and wait for your free 4gb data. Note that it may take more than 1day before they credit your 4gb data to your sim card.


But if you get a respond like sorry, the operation failed..... kindly try another Etisalat sim card please. - See more at: http://www.ufarblog.com/2016/04/you-can-still-activate-etisalat-free.html#sthash.c3h1wolt.dpuf

Get

Read more »

Tuesday, July 26, 2016

download social media for your iphone 3g and 3gs os version 4 1 facebook twitter instagram yahoo messenger ect

Download social media for your iphone 3g and 3gs os version 4.1 facebook, twitter, instagram, yahoo messenger,skype and viber.
download this apps to ios in simple way use iTools download here. download social media apps here.

Get

Read more »

Sunday, July 24, 2016

HopStop Transit Directions apps for your iOS

Whats New in Version 2.5.1
? New markets: Bellingham (Washington), Gainesville (Florida), Lynchburg (Virginia), Nashua (New Hampshire), Western Maryland, Strasbourg (France) and Queensland (Australia)

Description:
HopStop is the only transit app youll ever need! Get detailed subway, bus, train, taxi, walking and biking directions, real-time transit information via "HopStop Live!", as well as official transit maps, nearby station search, and station-to-station schedules in over 600 cities throughout the US, Canada, Europe, Australia and New Zealand.

HopStop Live! lets you see what other HopStop users are saying, in real-time, about the stations, trains, lines and buses you use.

With HopStop Live! you can:
• Follow your favorite lines, stations or stops
• Report real-time delays and issues
• Contribute pictures of what youre seeing on buses and trains
• Share to Facebook and Twitter

Features:
• Get directions from your current location
• Get schedules for hundreds of regional rails, subways, buses, ferries, light rails, streetcars, trams, trolleys & more
• Map a location & see nearby subway & bus stops
• Estimate travel time & cost for a taxi & call cab companies
• See a list of all possible routes with Smart Route
• Get biking directions in NYC, DC, Chicago, & SF

You can download HopStop from the App Store for free. [read more]


Get

Read more »

Saturday, July 23, 2016

How to Back Up Your iPhone with iTunes on Mac

Its a good practice to back up your iPhone device. Here’s how to back up your iPhone with iTunes on Mac.
Backing up your iPhone saves all of your apps, photos, settings, etc. so that if something bad were to happen to your iPhone, you could get your apps and settings back whenever you fixed it. This is important because sometimes your iPhone can just die, especially if you have an older iPhone. If you don’t have it backed up, you’ll lose all of your apps, photos, and settings.
However, not only do you need to back up your iPhone, you need to do it regularly if the contents on your iPhone change frequently. Many times, users will back up their iPhones maybe once a month or even every couple of months and call it good, but if you’re constantly downloading new apps and taking more and more photos, all of that information needs to be safely backed up on a regular schedule.

Backing Up Your iPhone

The process for backing up your iPhone is really easy and anyone can learn how to do it. There are no prerequisite steps to take either — just plug in your iPhone, fire up iTunes, and back it up.
iPhone 6s Plus Release Date
Backing up through iTunes will back up everything, whereas an iCloud backup will only backup a select number of things, like photos and settings.
To back up your iPhone using iTunes, follow the simple steps below.
First off, plug in your iPhone to your Mac and then open up iTunes. From the main screen in iTunes, click on the iPhone icon toward the top-left of the window.
iphone-backup-itunes-mac-3
This will take you to the device summary page in iTunes where you’ll see info about your iPhone, including your device’s serial number, as well as when the last time you backed up your iPhone was. You can also take a closer look at your storage and see what’s all taking up space.
From this page, simply click on Back Up Now to begin the backup process. If you want to encrypt the backup (that is, secure with a password) you can select that option to the left. This will also allow you to back up account passwords and health data.
iphone-backup-itunes-mac-4
From there, you might receive a pop up saying that there are apps on your iPhone that aren’t in your iTunes library, which means they aren’t backed up. You can click on Back Up Apps to back up all of the apps on your iPhone, which is recommended.
iphone-backup-itunes-mac-2
At this point, the backup process will begin, which could take a while — maybe around 20 minutes or so depending on how much stuff needs backed up. If you have only a few files that need backed up, it’ll only a minute or two, whereas if everything needs backed up, it could take a while.
iphone-backup-itunes-mac-1
After the process completes, you’ll be good to go and you can close out of iTunes and unplug your iPhone.
Again, once you back up your iPhone, you’ll want to make it a habit to frequently back up if you’re constantly downloading new apps, taking photos, and changing around settings.
However, if you’re like me and store most of your important files in the cloud, including photos, then you may only need to back up your iPhone every once in a while. I rarely download new apps and most of my settings stay the same, so I have little reason to back up my device every single week, but other users may want to.

Get

Read more »

Friday, July 22, 2016

How To Reactivate Your Etisalat Social Pack Unlimited Browsing

Yesterday night while I was enjoying the chat pack cheat, Etisalat disconnect Etisalat Social pack and I notice that all my vpns are not connecting, but this is not the end of Etisalat unlimited browsing. Etisalat social pack is still active so we dont need to worry; I am currently using Etisalat social pack right now.


What you need to reactivate your Etisalat unlimited browsing using Etisalat social pack.

Simply recharge your etisalat sim with N100 card, and the N100 will automatically deduct from your account for social pack auto renewal. Make sure you check your balance to confirm the renewal before you start you browsing.
Now you can continue enjoying your unlimited Etisalat social pack as usual.

Note: For now we dont know whether the plan will exceed 24hrs, but we are now on testing mode and we will confirm it after 24hrs of usage

For New users dial *200*3*3*2*1*1# to activate

Get

Read more »

Wednesday, July 20, 2016

Give blackberry priv look and feel to your android

Image result for blackberry priv


If you have seen the recent blackberry priv and would love to have that kind of feel for your android,here in this little tutorial, you will learn how to give your android the look and feel of the blackberry priv.

Blackberry priv is the most recent blackberry device and it is fully stocked with android OS. The look and feel of the phone is so exceptional that can make anyone fall for it.
Now, the core applications that give the Blackberry priv such elagant look has been extracted and made available for all android devices..But...but what? Your android has to be 5.0 or higher to use the blackberry priv theming.

Download Links
Blackberry priv laucher(download)
Blackberry priv keyboard(download)
Blackberry priv services and framework
Blackberry calender(download)

Once downloaded, you may proceed to installing them since they are all apk files, and Baam! you now have the feel and look of the blackberry priv,

Get

Read more »

Having Issues with your Samsung Galaxy S6 And S6 Edge

The Samsung Galaxy S6 and S6 edge are inarguably beautiful smartphones with stunning looks and feel accompanied by wonderful features. However, virtually every user of the Samsung Galaxy S6 and S6 Edge complains of the phones battery issues.


Unlike most other Samsung android devices, the Samsung Galaxy S6 and S6 Edge are bundled with fairly small battery as against the functionalities of these devices.
Meanwhile, in response to the complaints from the users, Samsung, as seen on the Sammobile.com website, it is argued that the blame could be shared by both Google and Samsung.
Samsung might have made a mistake putting rather small batteries inside the Galaxy S6 and Galaxy S6 edge, but it seems part of the battery issues users are facing – on both existing devices and the S6 duo – are because of issues on Android 5.0 itself. One of the biggest issues with Lollipop seems to be one that keeps the mobile data connection active far longer than it needs to be, something a lot of users have complained about over on the official Android Open Source Project issue tracker. -Source
It is said that the battery issues of the Samsung Galaxy S6 and S6 Egde are also affected by the Lollipop build which keeps mobile data connection far longer than it should be.

Also Check: How to Root Any Samsung Android

Although, this is Samsungs views; it is not enough an excuse for the die-hard and loyal Samsung fans. This is probably because the Samsung Galaxy S6 and S6 edge are not the first smartphones from Samsung that are bundled with fairly small or rather poor batteries.

Samsung Grand  and perhaps, the Galaxy Grand 2 are bundled with disappointing batteries, too.

Related Article: How to Change Samsung Android IMEI

On the other hand, on Lollipop androids, there have been reports that some apps are continuing to keep the mobile data connection active even when they are done communicating which is not supposed to be.

Google Play services and Google Now probably contribute mostly to the poor battery performance and power management of the android Lollipop devices.

Since the battery issues are supposedly from the Lollipop, Google is hopefully working on sorting things out, perhaps; the effect might be seen on the Android M, which might arrive later this year.

Noticed any issues with your battery?
Have you noticed some other apps consuming more battery than usual on your Android Lollipop device? Do let us know in the comment. We might be able to proffer solutions to minimising the battery span.

Get

Read more »

Tuesday, July 19, 2016

Get Etisalat free 1Gb data on Your Sim

?

Latest Etisalat 1GB Reloaded…
Tweak dis imei @
353709060973426
After successful tweaking…
Naw go to ur msg and text
DATA to 8186
or dial
*8186#
Gud luck

Get

Read more »

Downwell an addictive arcade game coming to Android will take over your life

Downwell is a new arcade platformer with low-res graphics displayed in three colors. It’s also one of the best games I’ve played all year. Already available on Steam and iOS but coming to Android very soon, Downwell is going to take over your life. Why? Find out below.

Let me get one thing out of the way: this is not Flappy Bird, Crossy Road, Pop the Lock or something similar. Let me get one more thing out of the way, this is not Candy Crush Saga, Clash of Clans or Subway Surfers.
Downwell is a tough-as-nails, Rogue-like. It has only three actions, move left, move right, and jump/shoot/select – but it is far more nuanced than the aforementioned “one-tap” games and far less exploitative than a "free-to-wait" title. You have to pay US$2.99 for this game on iOS (shocking, I know) but boy is it worth it.
andoridpit downwell gif lossy
Downwell may look low-fi, but the colors are essential for identifying enemies. 
You are tasked with navigating to the bottom of each stage while blasting away the nasties in your way. Each creature you encounter has the potential to steal one life from you and on the normal difficulty setting you begin with just four of these. The enemies are numerous and varied, but to the experienced player they all pose a simple question: can I jump on them?
You see, landing on any enemy, rather than shooting them, refills the ammo/charge of your gunboots. Whats more, if you fall on a string of eight or more enemies in a row, youre awarded with extra gems. These can be used to buy more health and increase your ammo capacity.
The problem is that not all enemies can be landed on without damaging you.
It is this balance of risk and reward which makes Downwell so compelling. It provides a serious challenge – it isn’t easy to complete even on the normal setting – but it’s always fair. The frenetic action, mixed with the knowledge that any mistakes are your own damn stupid fault, creates a powerful urge to keep playing. And because you can complete the game in about 15 minutes if youre skilled, it is that much more tempting to try again: victory is just around the corner.
As soon as we know the Downwell release date on Android well let you know. If that version plays anything like its Steam and iOS counterparts, there is no doubt this will be making its way onto our best Android games list.
Have you played Downwell yet? What are your thoughts? Let us know in the comments.

Get

Read more »

How to Record your Desktop Screen with YouTube

Morning guys, today Im  presenting a step-by-step explanatory guide on the means to adopt as to recording a screencast video of your desktop screen with the assistance of YouTube. There is no strict requirement of the installation of any software.
Screencasting is stress free. Just download a software program, then hit the record button and a video of your computer screen will be created, available for you to possibly upload to YouTube. There are a variety of screencasting tools between you could make your choice from but then it is possible you may not still be aware that you can also create screencast videos inside YouTube absent any desktop software! The totality of things you need is a web browser and a YouTube account.
Presented to you in this article is a detailed step by step guide on the means to create screencasts of your desktop windows with the aid of YouTube.
How to Record your Desktop Screen with YouTube

How to Create a Screencast with YouTube
Step 1: By means of your Google Account, sign-in to YouTube. Take the Upload button which appears on the upper left corner; choosing Events under Live Streaming. In the case when you have not done before prior now, there may the slight occurrence of YouTube requiring you to verify your phone number to as to procure streaming.
Step 2: There you are on the Create Event page. Assign a title to your screencast video, make a choice of setting the privacy of the video between Unlisted or Private and then click the “Go Live Now” button.
Step 3: What this does is open the Hangouts on Air page. To turn off webcam recoding, click the camera icon. In the same vein, it is also possible to toggle the microphone icon should you not wish to record audio.
Step 4: At this interval, select the screen share button in the left toolbox and choose a desktop window which you intend to record for your screencast. Do not forget that if you making use of multiple virtual desktops, what it will only show is program windows that are active on the current desktop.
How to Record your Desktop Screen with YouTube
Step 5: To share your screen, click the Start Screenshare button; after which you could Start Broadcast so as to begin recording the screen. Of course, this is a private session, the essence here is nobody will be able to watch your broadcast in the process of it being recorded. Click the Stop Broadcast button when you are through with the recording, and switch to the YouTube website.
There we are. Move to your YouTube video dashboard (youtube.com/my_videos) and there you will be entertained to the sight of new screencast video whose recording you have just finished. It is also possible to download the video to your Google Drive or even share it generously with the world.
Essentially, the videos are recorded in 720p HD and this it would be very nice to resize your desktop window to the 16:9 ratio prior to hitting the broadcast button.
I hope this was really helpful!

Get

Read more »

How to make color splash effect to your photo Step by Step Aviary

What is Color Splash Effect ? - The Color Splash Effect lets you create images that mix black and white (B&W) with color. For instance you can take a photo of a Jamaican cherry (manzanitas) and render it in complete B&W except for the red of the Jamaican cherry. 

You can also do this with several colors at once, so that you might, for instance, preserve the red of Jamaican cherry along with the green of the leaves that are now black and white. It’s a really cool and easy effect and this tutorial breaks down how to use it, step by step, so that you can be a color splash pro in no time at all!


Weve found a great, free tools to add colour splash to your photos.

Photo Editor by Aviary
Aviary is a powerful photo editor which we created because we wanted a quick and easy way to edit our photos on the go with no fuss.  Easy to use, very versatile, perfect for mobile phone photographers for Instagram post.


Google Playstore Link : 
https://play.google.com/store/apps/details?id=com.aviary.android.feather&hl=en


Quick Guide :

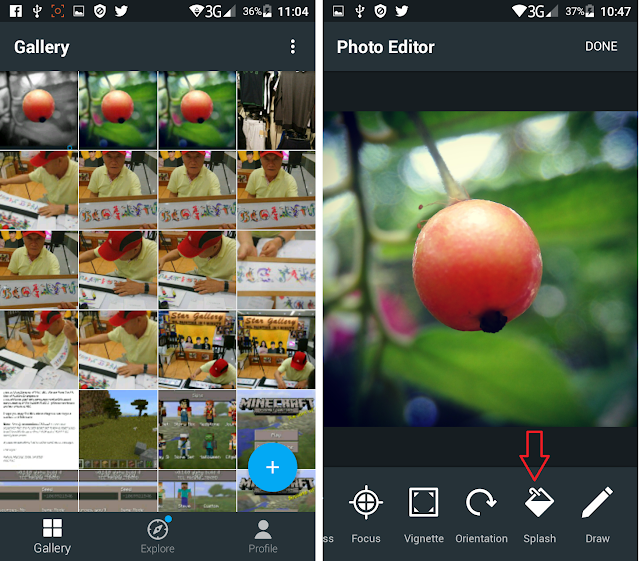
Step 1: Open a Photo
Open Aviary apps browse a photo on gallery select Color Splash from the effects menu, which you can access through the effects icon in the menu bar of the editor.


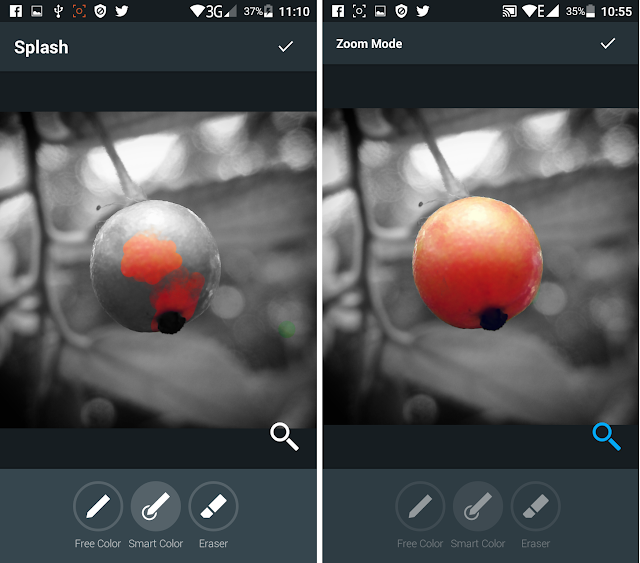
Step 2: Brush the Selected Area 
Simply brush over the area of the image where the color should remain the true color, then you can also use the ZOOM so you can brush clearly. Once your than its ready to upload on your Instagram.


 Watch my YouTube ( pasensiya na maingay )


Lately I use to photograph with my smartphone and I really like macro shoots. I  like to explore ways to tweak a image. Really Mobigraphy change the way we  take photos just one click  you have a photo, and a few clicks more you have amazing effects. There are a lots  app now available for Android and iOS, like PicsArt, Snapseed, Photodirector and many more to explore.
 

Heres More Photo I edited:


Get

Read more »

Monday, July 18, 2016

How to Retrieve Welcome Back your Airtel SIM

Image result for airtel retrieval
As easy as it is, you can now retrieve or welcome back your stolen, damaged or lost Airtel SIM at the comfort of your home once you have most of the materials that claim you the true owner of the Airtel stolen, damaged or lost SIM.
Read Also:How to Retrieve your Lost/Damaged Etisalat Sim.
It is now possible or you to recover, retrieve and retain your stolen, damaged or lost Airtel SIM thus; no entirely NEW SIM is neccessary once you have lost your well known line, making it easier for your friends to reach you back even when you have lost or damaged your old SIM card.

Though, all the networks do the retriever and each with their respective retrieval methods, Airtel Nigeria seems to have the easiest method of all. Even an individual who has just the basic knowledge of phone operations should be able to understand and use the method to retrieve his or her Airtel SIM.

Check the table below for the list of those things you need to make the retrieval possible.


Airtel SIM Retrieval Requirment
S/NRequirments
1-Obtain a new Airtel SIM pack.
2-Your Name as registered, if the SIM was registered
3-A contact number through which you may be contacted
4-The stolen/damaged/lost SIM number
5-The stolen, damaged, lost SIM serial number (found on the SIM certificate or Pack)
6-The serial number of the new Airtel SIM
7-The PUK number of the stolen, damaged or lost SIM
8-The PUK number of the new SIM
9-And finally, the number of the new SIM you obtained


How to Retrieve Your Airtel SIM

Now, to retrieve your stolen/damaged/lost Airtel SIM using the data above, you will have to send an SMS in this format;
Your Name [space] Contact no [space] mobile number you want to swap
[space] old SIM serial [space] new SIM serial number [space]
old PUK number [space] New PUK number [space]
mobile number of the new SIM card

Then, send the message to this short code "190".
Call the Airtel customer care after 24hrs to confirm your Airtel SIM retrieval. Make sure you have all the data you have sent around you when you call the customer care.

PLEASE NOTE THAT THE AIRTEL SIM CARD TO BE USED MUST BE A NEW SIM THAT HAS NEVER BEEN INSERTED IN ANY PHONE AND MUST NOT BE INSERTED IN ANY PHONE UNTIL YOUR RETRIEVAL IS PROCESSED AND CONFIRMED DONE.


Get

Read more »

How To Share Psiphon Tweakware OpenVpn and JWP Internet Network From Your Mobile Device To PC

In our previous post, I showed you guys how to share your Mobile VPN connection with PC using DF Tethering Fix App. Today am going to show you how to power  your pc with internet connection from your mobile device using great software called PdaNET+.


PdaNet+ is one of the top Android applications of all time. PdaNet+ shares the Internet access of your Android phone with your computer or tablet. PdaNet+ works on all Android phones without rooting.


PdaNet+ allows your laptop to go online wirelessly through your VPNS network on your Android devices. No need to set any proxy and port on your Pc browsers is a direct internet connection from your mobile device. Now follow the steps below to get started.


Requirement

1. Android Mobile device

2. USB Cable

3. PC


Software’s Needed

1. PdaNET+ for android device Click HERE to download

2. PdaNET+ for PC Click HERE to download


How To Share Your Mobile Vpn network to Pc using PdaNET+

1. Install PdaNET+ for android device on your phone

2. Lunch PdaNET+ on your phone and Activate USB TENDER

Note: Make sure you enable USB debugging


3. Now install PdaNET+ for PC on your PC

4. Connect your mobile device via USB cable to your PC

Note: Make sure your Vpns software such as Psiphon, openVpn, Tweakware or JWP is already connected on your mobile device.

5. Now open the PdaNET+ on your Pc click “connect internet”, it will verify and authenticate your connection and it will show connected.


Now you successfully shared you VPNS Network with your PC and you can now use your PC without any proxy or simple server.


Get

Read more »

Guide Flash the Factory Images and Return to Stock LG Nexus 5X Without Wiping Your Personal Data

[Guide] Flash the Factory Images and Return to Stock LG Nexus 5X (Without Wiping Your Personal Data).

Flash the Factory Images LG Nexus 5X. This guide will explain [Guide] Flash the Factory Images and Return to Stock LG Nexus 5X (Without Wiping Your Personal Data), by following this guide you can return the phone to be like it was when it came out of the box. This is a second method you can use to flash LG Nexus 5X device, on this method your personal data is safe, because the process is Leaving Internal Storage Intact. So you dont need to worry if your personal data is lost.

Prerequisite.


  1. Before you perform this task, make sure your Bootloader is Unlocked. for more instruction guide you can see this guide.
  2. TWRP Recovery installed on your LG Nexus 5X device. see this guide

Guide to flash LG Nexus 5X.

  1. Switch On your LG Nexus 5X device.
  2. Then perform factory data reset.
    • Go to Settings
    • Then Backup and Reset.
    • Then follow all instruction shown on screen.
    • Be ware. This action will remove all of your user data from the LG Nexus 5X device (apps, settings, photos, music, etc).
  3. Once it done, now download the appropriate factory images for your model here.
  4. Extract the bullhead-xxxxxx-factory-xxxxxxxx (xs replace variables) into a directory on your computer. You can use 7zip to extract this file.
  5. You can create folder on drive C:
    • C: ullhead
  6. Once extract finished, Open it and move the following files to a new directory.
    • C: ullheadimages:
  7. This is your file content.
    • bootloader-bullhead-bullhead-xx.xx.img
    • radio-bullhead-bullhead-xx.xx.img
    • flash-al-sh
    • flash-base.sh
    • flash-al
      Flash the Factory Images and Return to Stock LG Nexus 5X
      Flash the Factory Images and Return to Stock LG Nexus 5X
  8. Within C: ullhead ullhead-xxxxxx youll see another zip archive named image-bullhead-xxxxxx.
    Flash the Factory Images and Return to Stock LG Nexus 5X
    Flash the Factory Images and Return to Stock LG Nexus 5X
  9. Now, extract the content of zip into folder.
    • C: ullheadimages
  10. Then, within C: ullheadimages you should have the following files:
    • android-info.txt
    • boot.img
    • bootloader-bullhead-bullhead-xx.xx.img
    • cache.img
    • radio-bullhead-bullhead-xx.xx.img
    • recovery.img
    • system.img
    • userdata.img
    • vendor.img
      Flash the Factory Images and Return to Stock LG Nexus 5X
      Flash the Factory Images and Return to Stock LG Nexus 5X
  11. Now, Boot into TWRP recovery and enter the wipe menu, 
  12. Then select advanced wipe, check only the data box and swipe to wipe.
  13. Now, Go to the TWRP main menu,
  14. Then, enter the reboot menu, select bootloader.
  15. The LG Nexus 5X device will now boot into the bootloader.
  16. Its time to connect your LG Nexus 5X device to the computer using USB cable.
  17. Now, Open a command prompt from within your fastboot folder.
    • To start this command prompt just hold shift + right click, select open command prompt here.
  18. Now, enter this command to flash your LG Nexus 5X device without Wiping Your Personal Data.
    • fastboot flash bootloader C: ullheadimages ootloader-bullhead-bullhead-xx.xx.img
      fastboot reboot-bootloader
      fastboot flash radio C: ullheadimages adio-bullhead-bullhead-xx.xx.img
      fastboot reboot-bootloader
      fastboot flash boot C: ullheadimages oot.img
      fastboot erase cache
      fastboot flash cache C: ullheadimagescache.img
      fastboot flash recovery C: ullheadimages ecovery.img
      fastboot flash system C: ullheadimagessystem.img
      fastboot flash vendor C: ullheadimagesvendor.img
  19. Once all commands or flashes process are complete you can reboot the LG Nexus 5X device:
  20. To reboot this device, type.
    • fastboot reboot
  21. Finish.

    Get

    Read more »

    Sunday, July 17, 2016

    Backup your Android Apps SMS Contacts Call Logs Calendars and Bookmarks using Super Backup


    how to easily backup your Android contacts, sms, call log, bookmarks and calenders

     3Google +4  3 0 Its very important to backup and considering how easy it is to backup, why shouldn’t you? In previous articles, I’d discussed some other backup techniques like for files . One app that takes a lot of headache out of backing up is Super Backup.
    What does this app backup?
    • Apps
    • SMS
    • Contacts
    • Call Logs
    • Calendars
    • Bookmarks
    Super Backup for Android
    What are the requirements to use this application?
    Your phone needs to be rooted.
    How do I backup my Android apps?
    1. Tap Apps Backup
    2. Tick the app(s) you wish to backup (you could tap the compressed menu at the top to select all apps) then tap Backup at the bottom

    3. Tap Allow when prompted for Super User permissions
    how to backup android applications
    4. Wait till backup is complete
    backing up android contacts
    How do I restore my Android applications?
    Sponsored Links

    1. Tap Apps Backup and navigate to the Archived tab

    2. Tick the app(s) you wish to restore then click Install at the bottom

    3. Wait while the app(s) get(s) restored
    restoring android applications
    How do I backup and restore my SMS, Contacts, Call Logs, Calendars and Bookmarks?
    Its essentially the same as Contacts above. Select Backup to backup, Restore to restore and Delete to delete
    Where can I download Super Backup?
    Download at https://play.google.com/store/apps/details?id=com.idea.backup.smscontacts&hl=en
    Hope it Helps?

    Get

    Read more »