Showing posts with label pc. Show all posts
Showing posts with label pc. Show all posts
Thursday, July 28, 2016
Flash or Update Sony Xperia Z5 Dual Using Sony PC Companion
Flash or Update Sony Xperia Z5 Dual Using Sony PC Companion.
Flash or Update Sony Xperia Z5 Dual. This guide will show you how to flash or Update Sony Xperia Z5 Dual using Sony PC Companion. Sony Xperia Z5 released on 2015, September, This device comes with 5,2 Inches IPS capacitive touchscreen, 16M colors LCD , Run on Android OS, v5.1.1 (Lollipop), upgradable to v6.0 (Marshmallow), and supported with Qualcomm MSM8994 Snapdragon 810, Quad-core 1.5 GHz Cortex-A53 & Quad-core 2.0 GHz Cortex-A57 CPU, GPU Adreno 430, combined with 3 GB of RAM as their engine. And you can enjoy exciting 23 MP on main camera, and 5,1 MP on secondary camera. This version has Dual SIM (Nano-SIM, dual stand-by).
By using Sony PC Companion you can do the following task below on your Sony Xperia Smartphone.
- Change the firmware on your Xperia Device
- Remove forgot Password, PIN, Pattern, Screen Lock.
- Performing Hard Reset or Factory Reset.
- Install the latest firmware.
Please always backup all data stored on your Xperia device. Now following this guide below.
- Download the latest Sony PC Companion Here.
- To run this software, your PC must meet a minimum requirements.
- Microsoft® Windows XP™ SP3 (32 bit),
- Vista (32/64 bit),Windows 7 (32/64 bit),
- Windows 8/8.1 (32/64 bit) or
- Windows 10*
- At least 2 GB of RAM
- 5 GB of free hard disk space.
- Intel® Pentium® 4, 3.6 GHz or equivalent AMD processor.
- Stabil internet connection or Internet broadband connection.
- One available USB 2.0 or USB 3.0 port and USB cable.
- Not password locked phone.
- Best tips to flash or update Sony Xperia Z5 Dual
- Use the original USB cable that came with your device.
- Connect your device directly to the computer without USB hubs in between.
- Dont disconnect your device during the update process.
- Dont connect or disconnect any other USB device during the update process.
- Dont transfer files between the computer and other USB device during the update process.
- Dont use or move your device during the update process.
- Close any program on your computer that youre not currently using.
Guide Flash or Upgrade Sony Xperia Z5 Dual.
- Install Sony PC Companion in your computer.
- Then launch this program.
- Actually, From here you can update your firmware, but when you connect the Sony Xperia Z5 Dual, it must be switched on and not in security or password screen.
- Then at the support zone click Start.
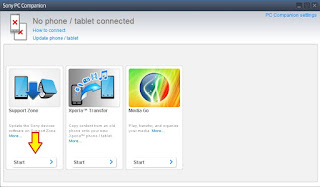
flash Sony Xperia Z5 Dual - If this is the first run, PC Companion will download some files.
- Once step 2 passed, your window will appear like this picture shown below.
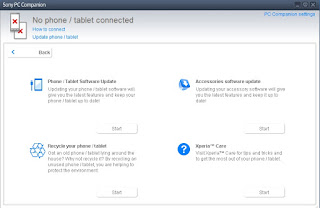
flash Sony Xperia Z5 Dual - On this window, select Phone / Tablet Software Update. then click Start.

flash Sony Xperia Z5 Dual - On the pop up window, select repair my phone/ tablet.
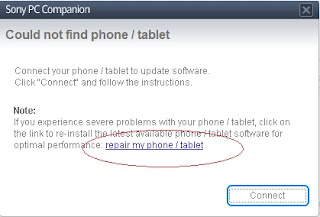
flash Sony Xperia Z5 Dual - If you using laptop or notebook, Connect your laptop to power supply since the update process.
- On the next screen, give tick on "I Understand that I need to know....", then click Next

flash Sony Xperia Z5 Dual - A warning window appears on screen, that say Data (Contact, Messages, Bookmarks,Calendar events, and setting) stored on Internal storage will be lost. So you must always backup all data and file. When you ready, click Continue.
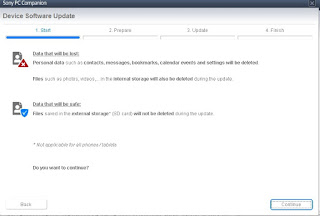
flash Sony Xperia Z5 Dual - On the next step, give tick the box and press Next to continue.
- Now PC Companion is preparing.
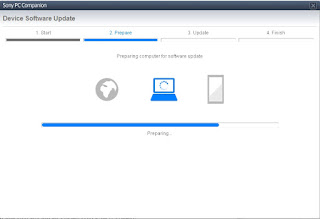
flash Sony Xperia Z5 Dual - On the next screen, give tick on "I have read and understood ...." then click Continoue.
- Then click Next.
- Now select phone / tablet model. you can search it on search box by type your phone model (Sony Xperia Z5 Dual).

flash Sony Xperia Z5 Dual - Then click Next.
- Following the instruction step to prepare the phone / tablet for the update.

flash Sony Xperia Z5 Dual - Disconnect the USB cable from your Sony Xperia Z5 Dual device and the computer.
- Turn Off your device and wait for 5 seconds.
- Connect the USB cable to the computer.
- Press and hold the volume down key on your device while connecting the USB cable.
- Wait until application automatically proceed to next step.
- Once your Sony Xperia Z5 Dual device detected by PC Companion downloading process will start automatically. then upload the new firmware to your Sony Xperia Z5 Dual device.
- When PC Companion finished with update process, disconnect the Sony Xperia Z5 Dual device and switch it on.
- Now your Sony Xperia Z5 Dual device is in factory condition,
- The custom data is erased and password protection is removed.
- Congratulation, your Sony Xperia Z5 Dual firmware is update now.


How to Change HTC Android Device IMEI without PC Complete How to
For some years, the need to changing Android devices IMEI is becoming necessary in Nigeria. I believe you already know the reason why Android devices IMEI is being changed if you are reading this article.
So far, we have discussed so many methods that can be used to changing different Android devices IMEI. Some methods are straight forward and simple while some are not.
In this tutorial, I discuss a simpler method of changing all HTC androids IMEI. With this tutorial, you no longer need to use the Fastboot command line to write IMEI on HTC androids.

NOTE: with this method, most HTC Android devices whose IMEI seemed not changeable can be changed.
I have successfully changed and written HTC One V, One X and HTC One M8 IMEI using this method.
Disclaimer:
Changing of IMEI is illegal in some countries and this publication is ONLY for tutorials purposes therefore; you are solely responsible for your actions.
2. Xposed installer: you need to have Xposed Installer installed on your HTC android device. You may download Xposed Installer here.
3. IMEI Changer: you may download the IMEI changer from Play Store here.
The IMEI Changer linked above is the specific IMEI Changer needed for this method to work because it is an Xposed module.
2. Click on Framework, then click on install/update.
3. When it is successfully updated, reboot your device.
4. Install IMEI changer.
5- Open xposed Installer and click on modules. From the list, select and tick IMEI changer then, click on the IMEI Changer from within the Xposed Installer to lunch IMEI changer.
7. Generate your blackberry IMEI and input it in the space provided and click Apply.
8. Reboot your device and dial *#06# to confirm that your IMEI was successfully changed.
NOTE:
Please be informed that Xposed Installer bricks some android devices. I advised you not to proceed with this guide if you DO NOT have custom recovery flashed on your Samsung android device. Learn how to flash custom recovery on Samsung android devices here.
Good luck.
If you have any questions, use the comment box below. Also, dont forget to comment if this method works for you.
So far, we have discussed so many methods that can be used to changing different Android devices IMEI. Some methods are straight forward and simple while some are not.
In this tutorial, I discuss a simpler method of changing all HTC androids IMEI. With this tutorial, you no longer need to use the Fastboot command line to write IMEI on HTC androids.
NOTE: with this method, most HTC Android devices whose IMEI seemed not changeable can be changed.
I have successfully changed and written HTC One V, One X and HTC One M8 IMEI using this method.
Disclaimer:
Changing of IMEI is illegal in some countries and this publication is ONLY for tutorials purposes therefore; you are solely responsible for your actions.
Requirements for Changing your HTC Android IMEI
1. ROOT Access: your HTC Android device must be rooted to successfully change the IMEI using the guides explained here.2. Xposed installer: you need to have Xposed Installer installed on your HTC android device. You may download Xposed Installer here.
3. IMEI Changer: you may download the IMEI changer from Play Store here.
The IMEI Changer linked above is the specific IMEI Changer needed for this method to work because it is an Xposed module.
Guides for Changing your HTC Android IMEI
1. Install Xposed installer and launch it.2. Click on Framework, then click on install/update.
3. When it is successfully updated, reboot your device.
4. Install IMEI changer.
5- Open xposed Installer and click on modules. From the list, select and tick IMEI changer then, click on the IMEI Changer from within the Xposed Installer to lunch IMEI changer.
7. Generate your blackberry IMEI and input it in the space provided and click Apply.
8. Reboot your device and dial *#06# to confirm that your IMEI was successfully changed.
NOTE:
Please be informed that Xposed Installer bricks some android devices. I advised you not to proceed with this guide if you DO NOT have custom recovery flashed on your Samsung android device. Learn how to flash custom recovery on Samsung android devices here.
Good luck.
If you have any questions, use the comment box below. Also, dont forget to comment if this method works for you.
| Click here to SUBSCRIBE to this Blog to Receive future updates.. |
Wednesday, July 27, 2016
Flash or Update Sony Xperia E4 Using Sony PC Companion Guide
Flash or Update Sony Xperia E4 Using Sony PC Companion [Guide].
Flash or Update Sony Xperia E4. This guide will show you how to flash or Update Sony Xperia E4 using Sony PC Companion. Sony Xperia E4 released on 2015, February, This device comes with 5,0 Inches IPS capacitive touchscreen, 16M colors LCD , Run on Android OS, v4.4.4 (KitKat), and supported with Mediatek MT6582 chipset, Quad-core 1.3 GHz Cortex-A7 CPU, GPU Mali-T760MP2, combined with 1 GB of RAM as their engine. And you can enjoy exciting 5 MP on main camera, and 2 MP on secondary camera.
By using Sony PC Companion you can do the following task below on your Sony Xperia Smartphone.
- Change the firmware on your Xperia Device
- Remove forgot Password, PIN, Pattern, Screen Lock.
- Performing Hard Reset or Factory Reset.
- Install the latest firmware.
Please always backup all data stored on your Xperia device. Now following this guide below.
- Download the latest Sony PC Companion Here.
- To run this software, your PC must meet a minimum requirements.
- Microsoft® Windows XP™ SP3 (32 bit),
- Vista (32/64 bit),Windows 7 (32/64 bit),
- Windows 8/8.1 (32/64 bit) or
- Windows 10*
- At least 2 GB of RAM
- 5 GB of free hard disk space.
- Intel® Pentium® 4, 3.6 GHz or equivalent AMD processor.
- Stabil internet connection or Internet broadband connection.
- One available USB 2.0 or USB 3.0 port and USB cable.
- Not password locked phone.
- Best tips to flash or update Sony Xperia E4
- Use the original USB cable that came with your device.
- Connect your device directly to the computer without USB hubs in between.
- Dont disconnect your device during the update process.
- Dont connect or disconnect any other USB device during the update process.
- Dont transfer files between the computer and other USB device during the update process.
- Dont use or move your device during the update process.
- Close any program on your computer that youre not currently using.
Guide Flash or Upgrade Sony Xperia E4.
- Install Sony PC Companion in your computer.
- Then launch this program.
- Actually, From here you can update your firmware, but when you connect the Sony Xperia E4, it must be switched on and not in security or password screen.
- Then at the support zone click Start.
flash Sony Xperia E4 - If this is the first run, PC Companion will download some files.
- Once step 2 passed, your window will appear like this picture shown below.
flash Sony Xperia E4 - On this window, select Phone / Tablet Software Update. then click Start.
flash Sony Xperia E4 - On the pop up window, select repair my phone/ tablet.
flash Sony Xperia E4 - If you using laptop or notebook, Connect your laptop to power supply since the update process.
- On the next screen, give tick on "I Understand that I need to know....", then click Next.
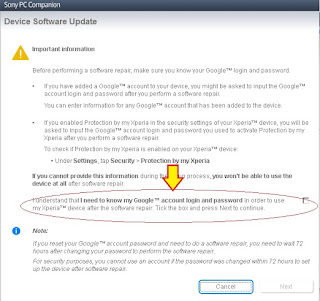
flash Sony Xperia E4 - A warning window appears on screen, that say Data (Contact, Messages, Bookmarks,Calendar events, and setting) stored on Internal storage will be lost. So you must always backup all data and file. When you ready, click Continue.
flash Sony Xperia E4 - On the next step, give tick the box and press Next to continue.
- Now PC Companion is preparing.
flash Sony Xperia E4 - On the next screen, give tick on "I have read and understood ...." then click Continoue.
- Then click Next.
- Now select phone / tablet model. you can search it on search box by type your phone model (Sony Xperia E4).

flash Sony Xperia E4 - Then click Next.
- Following the instruction step to prepare the phone / tablet for the update.
flash Sony Xperia E4 - Disconnect the USB cable from your Sony Xperia E4 device and the computer.
- Turn Off your device and wait for 5 seconds.
- Connect the USB cable to the computer.
- Press and hold the volume down key on your device while connecting the USB cable.
- Wait until application automatically proceed to next step.
- Once your Sony Xperia E4 device detected by PC Companion downloading process will start automatically. then upload the new firmware to your Sony Xperia E4 device.
- When PC Companion finished with update process, disconnect the Sony Xperia E4 device and switch it on.
- Now your Sony Xperia E4 device is in factory condition,
- The custom data is erased and password protection is removed.
- Congratulation, your Sony Xperia E4 firmware is update now.


Guide Flash or Update Sony Xperia M4 Aqua Using Sony PC Companion
[Guide] Flash or Update Sony Xperia M4 Aqua Using Sony PC Companion.
Flash or Update Sony Xperia M4 Aqua. This guide will show you how to flash or Update Sony Xperia M4 Aqua using Sony PC Companion. Sony Xperia M4 Aqua released on 2015, March, This device comes with 5,0 Inches IPS capacitive touchscreen, 16M colors LCD , Run on Android OS, v5.0 (Lollipop), planned upgrade to v6.0 (Marshmallow), and supported with Qualcomm MSM8939 Snapdragon 615 chipset, Quad-core 1.5 GHz Cortex-A53 & quad-core 1.0 GHz Cortex-A53 CPU, GPU Adreno 405, combined with 2 GB of RAM as their engine. And you can enjoy exciting 13 MP on main camera, and 5 MP on secondary camera.
By using Sony PC Companion you can do the following task below on your Sony Xperia Smartphone.
- Change the firmware on your Xperia Device
- Remove forgot Password, PIN, Pattern, Screen Lock.
- Performing Hard Reset or Factory Reset.
- Install the latest firmware.
Please always backup all data stored on your Xperia device. Now following this guide below.
- Download the latest Sony PC Companion Here.
- To run this software, your PC must meet a minimum requirements.
- Microsoft® Windows XP™ SP3 (32 bit),
- Vista (32/64 bit),Windows 7 (32/64 bit),
- Windows 8/8.1 (32/64 bit) or
- Windows 10*
- At least 2 GB of RAM
- 5 GB of free hard disk space.
- Intel® Pentium® 4, 3.6 GHz or equivalent AMD processor.
- Stabil internet connection or Internet broadband connection.
- One available USB 2.0 or USB 3.0 port and USB cable.
- Not password locked phone.
- Best tips to flash or update Sony Xperia M4 Aqua
- Use the original USB cable that came with your device.
- Connect your device directly to the computer without USB hubs in between.
- Dont disconnect your device during the update process.
- Dont connect or disconnect any other USB device during the update process.
- Dont transfer files between the computer and other USB device during the update process.
- Dont use or move your device during the update process.
- Close any program on your computer that youre not currently using.
Guide Flash or Upgrade Sony Xperia M4 Aqua.
- Install Sony PC Companion in your computer.
- Then launch this program.
- Actually, From here you can update your firmware, but when you connect the Sony Xperia M4 Aqua, it must be switched on and not in security or password screen.
- Then at the support zone click Start.
flash Sony Xperia M4 Aqua - If this is the first run, PC Companion will download some files.
- Once step 2 passed, your window will appear like this picture shown below.
flash Sony Xperia M4 Aqua - On this window, select Phone / Tablet Software Update. then click Start.
flash Sony Xperia M4 Aqua - On the pop up window, select repair my phone/ tablet.
flash Sony Xperia M4 Aqua - If you using laptop or notebook, Connect your laptop to power supply since the update process.
- On the next screen, give tick on "I Understand that I need to know....", then click Next.
flash Sony Xperia M4 Aqua - A warning window appears on screen, that say Data (Contact, Messages, Bookmarks,Calendar events, and setting) stored on Internal storage will be lost. So you must always backup all data and file. When you ready, click Continue.
flash Sony Xperia M4 Aqua - On the next step, give tick the box and press Next to continue.
- Now PC Companion is preparing.
flash Sony Xperia M4 Aqua - On the next screen, give tick on "I have read and understood ...." then click Continoue.
- Then click Next.
- Now select phone / tablet model. you can search it on search box by type your phone model (Sony Xperia M4 Aqua).

flash Sony Xperia M4 Aqua - Then click Next.
- Following the instruction step to prepare the phone / tablet for the update.
flash Sony Xperia M4 Aqua - Disconnect the USB cable from your Sony Xperia M4 Aqua device and the computer.
- Turn Off your device and wait for 5 seconds.
- Connect the USB cable to the computer.
- Press and hold the volume down key on your device while connecting the USB cable.
- Wait until application automatically proceed to next step.
- Once your Sony Xperia M4 Aqua device detected by PC Companion downloading process will start automatically. then upload the new firmware to your Sony Xperia M4 Aqua device.
- When PC Companion finished with update process, disconnect the Sony Xperia M4 Aqua device and switch it on.
- Now your Sony Xperia M4 Aqua device is in factory condition,
- The custom data is erased and password protection is removed.
- Congratulation, your Sony Xperia M4 Aqua firmware is update now.

Tuesday, July 26, 2016
Guide Flash or Update Sony Xperia M5 Using Sony PC Companion
[Guide] Flash or Update Sony Xperia M5 Using Sony PC Companion.
Flash or Update Sony Xperia M5. This guide will show you how to flash or Update Sony Xperia M5 using Sony PC Companion. Sony Xperia M5 released on 2015, September, This device comes with 5.0 Inches IPS capacitive touchscreen, 16M colors LCD , Run on Android OS, v5.0 (Lollipop), upgradable to v5.1 (Lollipop), and supported with Mediatek MT6795 Helio X10, Octa-core 2.0 GHz Cortex-A53 CPU, GPU PowerVR G6200, combined with 3 GB of RAM as their engine. And you can enjoy exciting 21,2 MP on main camera, and 13 MP on secondary.
By using Sony PC Companion you can do the following task below on your Sony Xperia Smartphone.
- Change the firmware on your Xperia Device
- Remove forgot Password, PIN, Pattern, Screen Lock.
- Performing Hard Reset or Factory Reset.
- Install the latest firmware.
Please always backup all data stored on your Xperia device. Now following this guide below.
- Download the latest Sony PC Companion Here.
- To run this software, your PC must meet a minimum requirements.
- Microsoft® Windows XP™ SP3 (32 bit),
- Vista (32/64 bit),Windows 7 (32/64 bit),
- Windows 8/8.1 (32/64 bit) or
- Windows 10*
- At least 2 GB of RAM
- 5 GB of free hard disk space.
- Intel® Pentium® 4, 3.6 GHz or equivalent AMD processor.
- Stabil internet connection or Internet broadband connection.
- One available USB 2.0 or USB 3.0 port and USB cable.
- Not password locked phone.
- Best tips to flash or update Sony Xperia M5
- Use the original USB cable that came with your device.
- Connect your device directly to the computer without USB hubs in between.
- Dont disconnect your device during the update process.
- Dont connect or disconnect any other USB device during the update process.
- Dont transfer files between the computer and other USB device during the update process.
- Dont use or move your device during the update process.
- Close any program on your computer that youre not currently using.
Guide Flash or Upgrade Sony Xperia M5.
- Install Sony PC Companion in your computer.
- Then launch this program.
- Actually, From here you can update your firmware, but when you connect the Sony Xperia M5, it must be switched on and not in security or password screen.
- Then at the support zone click Start.
flash Sony Xperia M5 - If this is the first run, PC Companion will download some files.
- Once step 2 passed, your window will appear like this picture shown below.
flash Sony Xperia M5 - On this window, select Phone / Tablet Software Update. then click Start.
flash Sony Xperia M5 - On the pop up window, select repair my phone/ tablet.
flash Sony Xperia M5 - If you using laptop or notebook, Connect your laptop to power supply since the update process.
- On the next screen, give tick on "I Understand that I need to know....", then click Next
flash Sony Xperia M5 - A warning window appears on screen, that say Data (Contact, Messages, Bookmarks,Calendar events, and setting) stored on Internal storage will be lost. So you must always backup all data and file. When you ready, click Continue.
flash Sony Xperia M5 - On the next step, give tick the box and press Next to continue.
- Now PC Companion is preparing.
flash Sony Xperia M5 - On the next screen, give tick on "I have read and understood ...." then click Continoue.
- Then click Next.
- Now select phone / tablet model. you can search it on search box by type your phone model (Sony Xperia M5).

flash Sony Xperia M5 - Then click Next.
- Following the instruction step to prepare the phone / tablet for the update.
flash Sony Xperia M5 - Disconnect the USB cable from your Sony Xperia M5 device and the computer.
- Turn Off your device and wait for 5 seconds.
- Connect the USB cable to the computer.
- Press and hold the volume down key on your device while connecting the USB cable.
- Wait until application automatically proceed to next step.
- Once your Sony Xperia M5 device detected by PC Companion downloading process will start automatically. then upload the new firmware to your Sony Xperia M5 device.
- When PC Companion finished with update process, disconnect the Sony Xperia M5 device and switch it on.
- Now your Sony Xperia M5 device is in factory condition,
- The custom data is erased and password protection is removed.
- Congratulation, your Sony Xperia M5 firmware is update now.

Guide Flash or Update Sony Xperia E3 Dual Using Sony PC Companion
[Guide] Flash or Update Sony Xperia E3 Dual Using Sony PC Companion.
Flash or Update Sony Xperia E3 Dual. This guide will show you how to flash or Update Sony Xperia E3 Dual using Sony PC Companion. Sony Xperia E3 released on 2015, September, This device comes with 4,5 Inches IPS capacitive touchscreen, 16M colors LCD , Run on Android OS, v4.4.2 (KitKat), and supported with Qualcomm MSM8926-2 Snapdragon 400 chipset, Quad-core 1.2 GHz Cortex-A7 CPU, GPU Adreno 305, combined with 1 GB of RAM as their engine. And you can enjoy exciting 5 MP on main camera, and VGA on secondary camera. This version has Dual SIM (Nano-SIM, dual stand-by).
By using Sony PC Companion you can do the following task below on your Sony Xperia Smartphone.
- Change the firmware on your Xperia Device
- Remove forgot Password, PIN, Pattern, Screen Lock.
- Performing Hard Reset or Factory Reset.
- Install the latest firmware.
Please always backup all data stored on your Xperia device. Now following this guide below.
- Download the latest Sony PC Companion Here.
- To run this software, your PC must meet a minimum requirements.
- Microsoft® Windows XP™ SP3 (32 bit),
- Vista (32/64 bit),Windows 7 (32/64 bit),
- Windows 8/8.1 (32/64 bit) or
- Windows 10*
- At least 2 GB of RAM
- 5 GB of free hard disk space.
- Intel® Pentium® 4, 3.6 GHz or equivalent AMD processor.
- Stabil internet connection or Internet broadband connection.
- One available USB 2.0 or USB 3.0 port and USB cable.
- Not password locked phone.
- Best tips to flash or update Sony Xperia E3 Dual
- Use the original USB cable that came with your device.
- Connect your device directly to the computer without USB hubs in between.
- Dont disconnect your device during the update process.
- Dont connect or disconnect any other USB device during the update process.
- Dont transfer files between the computer and other USB device during the update process.
- Dont use or move your device during the update process.
- Close any program on your computer that youre not currently using.
Guide Flash or Upgrade Sony Xperia E3 Dual.
- Install Sony PC Companion in your computer.
- Then launch this program.
- Actually, From here you can update your firmware, but when you connect the Sony Xperia E3 Dual, it must be switched on and not in security or password screen.
- Then at the support zone click Start.
flash Sony Xperia E3 Dual - If this is the first run, PC Companion will download some files.
- Once step 2 passed, your window will appear like this picture shown below.
flash Sony Xperia E3 Dual - On this window, select Phone / Tablet Software Update. then click Start.
flash Sony Xperia E3 Dual - On the pop up window, select repair my phone/ tablet.
flash Sony Xperia E3 Dual - If you using laptop or notebook, Connect your laptop to power supply since the update process.
- On the next screen, give tick on "I Understand that I need to know....", then click Next
flash Sony Xperia E3 Dual - A warning window appears on screen, that say Data (Contact, Messages, Bookmarks,Calendar events, and setting) stored on Internal storage will be lost. So you must always backup all data and file. When you ready, click Continue.
flash Sony Xperia E3 Dual - On the next step, give tick the box and press Next to continue.
- Now PC Companion is preparing.
flash Sony Xperia E3 Dual - On the next screen, give tick on "I have read and understood ...." then click Continoue.
- Then click Next.
- Now select phone / tablet model. you can search it on search box by type your phone model (Sony Xperia E3 Dual).

flash Sony Xperia E3 Dual - Then click Next.
- Following the instruction step to prepare the phone / tablet for the update.
flash Sony Xperia E3 Dual - Disconnect the USB cable from your Sony Xperia E3 Dual device and the computer.
- Turn Off your device and wait for 5 seconds.
- Connect the USB cable to the computer.
- Press and hold the volume down key on your device while connecting the USB cable.
- Wait until application automatically proceed to next step.
- Once your Sony Xperia E3 Dual device detected by PC Companion downloading process will start automatically. then upload the new firmware to your Sony Xperia E3 Dual device.
- When PC Companion finished with update process, disconnect the Sony Xperia E3 Dual device and switch it on.
- Now your Sony Xperia E3 Dual device is in factory condition,
- The custom data is erased and password protection is removed.
- Congratulation, your Sony Xperia E3 Dual firmware is update now.

Flash or Update Sony Xperia Z5 Premium Dual Using Sony PC Companion
Flash or Update Sony Xperia Z5 Premium Dual Using Sony PC Companion.
Flash or Update Sony Xperia Z5 Premium Dual. This guide will show you how to flash or Update Sony Xperia Z5 Premium Dual using Sony PC Companion. Sony Xperia Z5 Premium released on 2015, November, This device comes with 5,5 Inches IPS capacitive touchscreen, 16M colors LCD , Run on Android OS, v5.1.1 (Lollipop), upgradable to v6.0 (Marshmallow), and supported with Qualcomm MSM8994 Snapdragon 810 chipset, Quad-core 1.5 GHz Cortex-A53 & Quad-core 2.0 GHz Cortex-A57 CPU, GPU Adreno 430, combined with 3 GB of RAM as their engine. And you can enjoy exciting 23 MP on main camera, and 5,1 MP on secondary camera.
By using Sony PC Companion you can do the following task below on your Sony Xperia Smartphone.
- Change the firmware on your Xperia Device
- Remove forgot Password, PIN, Pattern, Screen Lock.
- Performing Hard Reset or Factory Reset.
- Install the latest firmware.
Please always backup all data stored on your Xperia device. Now following this guide below.
- Download the latest Sony PC Companion Here.
- To run this software, your PC must meet a minimum requirements.
- Microsoft® Windows XP™ SP3 (32 bit),
- Vista (32/64 bit),Windows 7 (32/64 bit),
- Windows 8/8.1 (32/64 bit) or
- Windows 10*
- At least 2 GB of RAM
- 5 GB of free hard disk space.
- Intel® Pentium® 4, 3.6 GHz or equivalent AMD processor.
- Stabil internet connection or Internet broadband connection.
- One available USB 2.0 or USB 3.0 port and USB cable.
- Not password locked phone.
- Best tips to flash or update Sony Xperia Z5 Premium Dual
- Use the original USB cable that came with your device.
- Connect your device directly to the computer without USB hubs in between.
- Dont disconnect your device during the update process.
- Dont connect or disconnect any other USB device during the update process.
- Dont transfer files between the computer and other USB device during the update process.
- Dont use or move your device during the update process.
- Close any program on your computer that youre not currently using.
Guide Flash or Upgrade Sony Xperia Z5 Premium Dual.
- Install Sony PC Companion in your computer.
- Then launch this program.
- Actually, From here you can update your firmware, but when you connect the Sony Xperia Z5 Premium Dual, it must be switched on and not in security or password screen.
- Then at the support zone click Start.
flash Sony Xperia Z5 Premium Dual - If this is the first run, PC Companion will download some files.
- Once step 2 passed, your window will appear like this picture shown below.
flash Sony Xperia Z5 Premium Dual - On this window, select Phone / Tablet Software Update. then click Start.
flash Sony Xperia Z5 Premium Dual - On the pop up window, select repair my phone/ tablet.
flash Sony Xperia Z5 Premium Dual - If you using laptop or notebook, Connect your laptop to power supply since the update process.
- On the next screen, give tick on "I Understand that I need to know....", then click Next
flash Sony Xperia Z5 Premium Dual - A warning window appears on screen, that say Data (Contact, Messages, Bookmarks,Calendar events, and setting) stored on Internal storage will be lost. So you must always backup all data and file. When you ready, click Continue.
flash Sony Xperia Z5 Premium Dual - On the next step, give tick the box and press Next to continue.
- Now PC Companion is preparing.
flash Sony Xperia Z5 Premium Dual - On the next screen, give tick on "I have read and understood ...." then click Continoue.
- Then click Next.
- Now select phone / tablet model. you can search it on search box by type your phone model (Sony Xperia Z5 Premium Dual)

flash Sony Xperia Z5 Premium Dual - Then click Next.
- Following the instruction step to prepare the phone / tablet for the update.
flash Sony Xperia Z5 Premium - Disconnect the USB cable from your Sony Xperia Z5 Premium Dual device and the computer.
- Turn Off your device and wait for 5 seconds.
- Connect the USB cable to the computer.
- Press and hold the volume down key on your device while connecting the USB cable.
- Wait until application automatically proceed to next step.
- Once your Sony Xperia Z5 Premium Dual device detected by PC Companion downloading process will start automatically. then upload the new firmware to your Sony Xperia Z5 Premium Dual device.
- When PC Companion finished with update process, disconnect the Sony Xperia Z5 Premium Dual device and switch it on.
- Now your Sony Xperia Z5 Premium Dual device is in factory condition,
- The custom data is erased and password protection is removed.
- Congratulation, your Sony Xperia Z5 Premium Dual firmware is update now.

Subscribe to:
Posts (Atom)