Showing posts with label max. Show all posts
Showing posts with label max. Show all posts
Sunday, July 24, 2016
How to Update Asus ZenFone Max ZC550KL to Android 6 0 1 Marshmallow Beta OTA V13 8 26 15
Asus has started rolling out Android Marshmallow 6.0.1 OTA Update for Asus ZenFone 2 Laser ZE500KL and the Zenfone Max ZC550KL.We have the OTA update file.You can download the OTA update file from the download section.After downloading the OTA Firmware, you can simply flash it using ADB & Fastboot commands.

Now follow the guide to Download & Install Asus ZenFone Max ZC550KL Android 6.0.1 Marshmallow Beta Update.
The Update comes with loads of extra features.You will also get the DOZE Mode resulting in good battery life.This update comes with loads of bug fixes.It comes with Build number V13.8.26.15 and the File Size: Up to 1.1GB.
Before you begin the flashing process, first download Asus USB drivers on your computer, then enable USB debugging on your smartphone, go to settings >>developers option. If developer’s option isn’t visible on your galaxy device, simply go to about phoneunder settings and scroll down to build number, then tap build numberup to 7 times to make developers option visible.
Now follow the guide to Download & Install Asus ZenFone Max ZC550KL Android 6.0.1 Marshmallow Beta Update.
The Update comes with loads of extra features.You will also get the DOZE Mode resulting in good battery life.This update comes with loads of bug fixes.It comes with Build number V13.8.26.15 and the File Size: Up to 1.1GB.
Before you begin the flashing process, first download Asus USB drivers on your computer, then enable USB debugging on your smartphone, go to settings >>developers option. If developer’s option isn’t visible on your galaxy device, simply go to about phoneunder settings and scroll down to build number, then tap build numberup to 7 times to make developers option visible.
View my Flipboard Magazine.
÷ Prerequisites:
•This tutorial is only for installing Android 6.0.1 Marshmallow Beta OTA V13.8.26.15 on Asus ZenFone Max ZC550KL. Please do not try on any other Asus ZenFone variants.
•Make sure there is at least 80% battery left on your smartphone before begin…
*Disclaimer:
Android Custom ROM fix ® provide various Firmware Updates and Rooting process along with Custom ROM,Modes,file are all belong to their owners/developers. The autor of this site or the developers are not responsible, if you damage or brick your device.Do it on your own risk and follow the instruction properly.
* Important:
Backup important files stored on your device before proceeding with the steps below, so that in case something goes wrong you’ll have backup of all your important files.

÷ How to Update Asus ZenFone Max ZC550KL to Android 6.0.1 Marshmallow Beta OTA V13.8.26.15.
1- DownloadAAsus ZenFone Max ZC550KL to Android 6.0.1 Marshmallow Beta OTA V13.8.26.15.
2- Setup ADB & fast boot On Your Computer.Guide > Quickest Way To Install Android ADB and Fastboot (with drivers) on Windows .
3- Connect your device to Computer and Trust the connection by checking “Always allow from this computer”
4- Put the downloaded OTA Firmware file inside the Fastboot folder
5- Now open the command window from the ADB & Fastboot folder.hold the shift key on the keyboard and right-click on an empty space and select “Open command window here” option to launch a cmd window
6- Then boot your device into bootloader mode by issuing the following command
adb reboot bootloader
7- Now issue the following command to check ADB Connection
adb devices
8- Then go to Marshmallow beta ROM folder & open the S3V3N_cmd file.The command prompt will pop up.then issue the following command to Install the OTA Update Firmware file
flashall_AFT WW_ZC550KL_V 13.8.26.15 _M3.1.39_Phone-user.raw
9- Once the installation is completed, reboot your device by running below command
fastboot reboot.
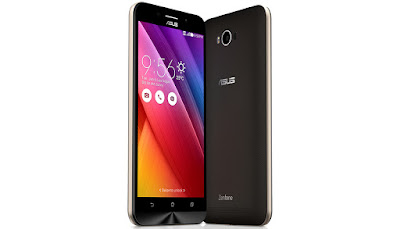
That’s it! Your Asus ZenFone Max ZC550KL now have Android 6.0.1 Marshmallow Beta OTA V13.8.26.15 installed on your phone! Go to Settings > About phone to verify.
Like this post? PLZ Hit the share buttons below to share this article with your friends on Facebook, Google + and Twitter.
PLZ Follow Us On Flipboard 4 More Asus ZenFone Latest Updates.
PLZ Use the comment box below to contribute more ideas & Suggestions .
Best Regards.
÷ Prerequisites:
•This tutorial is only for installing Android 6.0.1 Marshmallow Beta OTA V13.8.26.15 on Asus ZenFone Max ZC550KL. Please do not try on any other Asus ZenFone variants.
•Make sure there is at least 80% battery left on your smartphone before begin…
*Disclaimer:
Android Custom ROM fix ® provide various Firmware Updates and Rooting process along with Custom ROM,Modes,file are all belong to their owners/developers. The autor of this site or the developers are not responsible, if you damage or brick your device.Do it on your own risk and follow the instruction properly.
* Important:
Backup important files stored on your device before proceeding with the steps below, so that in case something goes wrong you’ll have backup of all your important files.
÷ How to Update Asus ZenFone Max ZC550KL to Android 6.0.1 Marshmallow Beta OTA V13.8.26.15.
1- DownloadAAsus ZenFone Max ZC550KL to Android 6.0.1 Marshmallow Beta OTA V13.8.26.15.
2- Setup ADB & fast boot On Your Computer.Guide > Quickest Way To Install Android ADB and Fastboot (with drivers) on Windows .
3- Connect your device to Computer and Trust the connection by checking “Always allow from this computer”
4- Put the downloaded OTA Firmware file inside the Fastboot folder
5- Now open the command window from the ADB & Fastboot folder.hold the shift key on the keyboard and right-click on an empty space and select “Open command window here” option to launch a cmd window
6- Then boot your device into bootloader mode by issuing the following command
adb reboot bootloader
7- Now issue the following command to check ADB Connection
adb devices
8- Then go to Marshmallow beta ROM folder & open the S3V3N_cmd file.The command prompt will pop up.then issue the following command to Install the OTA Update Firmware file
flashall_AFT WW_ZC550KL_V 13.8.26.15 _M3.1.39_Phone-user.raw
9- Once the installation is completed, reboot your device by running below command
fastboot reboot.
That’s it! Your Asus ZenFone Max ZC550KL now have Android 6.0.1 Marshmallow Beta OTA V13.8.26.15 installed on your phone! Go to Settings > About phone to verify.
Like this post? PLZ Hit the share buttons below to share this article with your friends on Facebook, Google + and Twitter.
PLZ Follow Us On Flipboard 4 More Asus ZenFone Latest Updates.
PLZ Use the comment box below to contribute more ideas & Suggestions .
Best Regards.

Thursday, July 21, 2016
How to Install TWRP Recovery 3 0 2 0 on Xiaomi Mi Max
Xiaomi Mi Max TWRP 3.0.2-0 is now available for download over at TeamWin’s official website. You can grab the recovery’s .img file from there and simply flash it via Fastboot.

Don’t worry we are going to share step by step guide to safely How to Install TWRP Recovery 3.0.2-0 on your Xiaomi Mi Max.
Don’t worry we are going to share step by step guide to safely How to Install TWRP Recovery 3.0.2-0 on your Xiaomi Mi Max.
View my Flipboard Magazine.
÷ Prerequisites:
•Make sure you’ve an unlocked bootloader on your Mi Max.
•This tutorial is only for installing TWRP Recovery 3.0.2-0 on Xiaomi Mi Max only.
*Disclaimer:
Android Custom ROM fix ® provide various Firmware Updates and Rooting process along with Custom ROM,Modes,file are all belong to their owners/developers. The autor of this site or the developers are not responsible, if you damage or brick your device.Do it on your own risk and follow the instruction properly.
* Important:
Backup important files stored on your device before proceeding with the steps below, so that in case something goes wrong you’ll have backup of all your important files.

÷ How to Install TWRP Recovery 3.0.2-0 on Xiaomi Mi Max:
1- Download Xiaomi Mi Max TWRP Recovery 3.0.2-0.
2- Setup ADB and Fastboot on your PC, follow this link .
3- Enable USB debugging on your device:
Open Settings on your device.
4- Go to About phone and tap seven times on Build number, this will enable Developer options.
5- Now go back to Settings and you’ll see “Developer options” there, open it.
6- Tick the USB Debugging checkbox.
7- Open the folder where your TWRP Recovery .img file is saved.
8- Now open a command window inside that folder. To do that, “Shift + Right click” on any empty white space inside the folder and then select “Open command window here” from the context menu.
9- Connect your device to the PC. And type the following into the command window we opened in step 4 above to boot your device into bootloader/fastboot mode:
adb reboot bootloader
? If your asks for permission to “Allow USB debugging”, tap OK.
10- Once your device boots into bootloader mode, issue the following command into command window to flash the TWRP recovery .img file:
fastboot flash twrp-3.0.2-0-hydrogen.img
? Here modify twrp.img with the name of your TWRP recovery .img file, OR change your TWRP recovery filename to twrp.img and use the command above.
11- Once TWRP is successfully flashed on your device, issue the following command to reboot:
fastboot reboot.

For More Xiaomi Mi Max Updates Keep Checking Android Custom ROM Fix™®
That’s all. We hope this guide serves you well. If there’s anything you’d like to be added/changed on this page, let us know about it in the comments section below
Like this post? PLZ Hit the share buttons below to share this article with your friends on Facebook, Google + and Twitter.
PLZ Follow Us On Flipboard 4 More Latest Updates.
PLZ Use the comment box below to contribute more ideas & Suggestions .
Best Regards.
÷ Prerequisites:
•Make sure you’ve an unlocked bootloader on your Mi Max.
•This tutorial is only for installing TWRP Recovery 3.0.2-0 on Xiaomi Mi Max only.
*Disclaimer:
Android Custom ROM fix ® provide various Firmware Updates and Rooting process along with Custom ROM,Modes,file are all belong to their owners/developers. The autor of this site or the developers are not responsible, if you damage or brick your device.Do it on your own risk and follow the instruction properly.
* Important:
Backup important files stored on your device before proceeding with the steps below, so that in case something goes wrong you’ll have backup of all your important files.
÷ How to Install TWRP Recovery 3.0.2-0 on Xiaomi Mi Max:
1- Download Xiaomi Mi Max TWRP Recovery 3.0.2-0.
2- Setup ADB and Fastboot on your PC, follow this link .
3- Enable USB debugging on your device:
Open Settings on your device.
4- Go to About phone and tap seven times on Build number, this will enable Developer options.
5- Now go back to Settings and you’ll see “Developer options” there, open it.
6- Tick the USB Debugging checkbox.
7- Open the folder where your TWRP Recovery .img file is saved.
8- Now open a command window inside that folder. To do that, “Shift + Right click” on any empty white space inside the folder and then select “Open command window here” from the context menu.
9- Connect your device to the PC. And type the following into the command window we opened in step 4 above to boot your device into bootloader/fastboot mode:
adb reboot bootloader
? If your asks for permission to “Allow USB debugging”, tap OK.
10- Once your device boots into bootloader mode, issue the following command into command window to flash the TWRP recovery .img file:
fastboot flash twrp-3.0.2-0-hydrogen.img
? Here modify twrp.img with the name of your TWRP recovery .img file, OR change your TWRP recovery filename to twrp.img and use the command above.
11- Once TWRP is successfully flashed on your device, issue the following command to reboot:
fastboot reboot.
For More Xiaomi Mi Max Updates Keep Checking Android Custom ROM Fix™®
That’s all. We hope this guide serves you well. If there’s anything you’d like to be added/changed on this page, let us know about it in the comments section below
Like this post? PLZ Hit the share buttons below to share this article with your friends on Facebook, Google + and Twitter.
PLZ Follow Us On Flipboard 4 More Latest Updates.
PLZ Use the comment box below to contribute more ideas & Suggestions .
Best Regards.
Tuesday, July 19, 2016
Download Android Lollipop 5 0 stock firmware for Asus Zenfone Max smartphone

Download Android Lollipop 5.0 stock firmware for Asus Zenfone Max smartphone from here or from here.
Firmware details
Archive: Zenfone Max Snapdragon MSM8916 Android 5.0 Smartphone Firmware 202635 160514
Image: Zenfone Max Snapdragon MSM8916 Android 5.0 Smartphone Firmware 202635 160514
Firmware: Android Lollipop 5.0 stock
Inside archive: firmware + Volume+ and Power Button To Read Devices.bat + scripts.bat + Flash.bat + fastboot.exe
Firmware details
Archive: Zenfone Max Snapdragon MSM8916 Android 5.0 Smartphone Firmware 202635 160514
Image: Zenfone Max Snapdragon MSM8916 Android 5.0 Smartphone Firmware 202635 160514
Firmware: Android Lollipop 5.0 stock
Model: Asus Zenfone Max smartphone
Image file size: 0.98 GB
Platform: Qualcomm Snapdragon MSM8916Image file size: 0.98 GB
Inside archive: firmware + Volume+ and Power Button To Read Devices.bat + scripts.bat + Flash.bat + fastboot.exe
Caution: Please do not update firmware unless you know what you are doing, you really want it or it is absolutely necessary. Firmware updates may occasionally have bad results, like bricking your device, temporarily or permanently. The firmware update process is done entirely at your own risk. Before attempting to update the firmware, back up your data.
Don’t miss any of our future video tutorials, follow us on Youtube. Like us on Facebook. Add us in your circles on Google+. Watch our photo albums on Flickr. Subscribe now to our newsletter.
Subscribe to:
Posts (Atom)