Showing posts with label asus. Show all posts
Showing posts with label asus. Show all posts
Thursday, July 28, 2016
How to Install Android 6 0 1 Marshmallow ResurrectionRemix MM 5 6 9 ROM on Asus Zenfone 5 A500CG T00F J
The ASUS Zenfone 5 is the middle child of ASUS’ low cost line of smartphones but for being a budget phone it comes packed with some very respectable hardware and specifications. The design is very simplistic with rounded corners, flat sides, and a curved back with a matte finish allowing the phone to sit very comfortably in the hand. It’s made entirely of plastic with the exception of the metal band along the bottom chin to give the phone a slightly more premium look.

If you are looking to install a new custom ROM then we have here as usual the best Custom ROMs for your Asus Zenfone 5.
According to XDA member tank0412, Android 6.0.1 Marshmallow ResurrectionRemix MM 5.6.9 ROM is now available for Asus Zenfone 5 A500CG [ T00F/J]
÷ Rom Features:
Based On Latest Google Android 6.0.1 Release
Based On Cyanogenmod 13 Sources
RR Customizations:-
-Navigation Bar
-Enable/Disable Navbar
-Navbar Button Customization
-Navbar Slim Dim
-Animate Dim
-Dim Timeout Duration
-Dim Alpha
-Double Tap To sleep navbar
-Navigation Bar left/Right handed mode Switch for landscape
÷ What NOT working:
GPS && FM
÷ NOTE:
This rom marked as nightly but it does not mean that it is unstable and etc.
It mean that i add something every day. Nothing else.
÷ Prerequisites:
•This tutorial is only for installing Android 6.0.1 Marshmallow ResurrectionRemix MM 5.6.9 ROM on Asus Zenfone 5 A500CG [ T00F/J]. Please do not try on any other Asus Zenfone 5 variants.
•Your phone should be rooted and haveClockworkMod recovery installed from before.
•This tutorial will wipe out all your data.Proceed at your own risk.Perform a Dalvik Cache wipe before proceeding from the recovery mode.
•Make sure you backup all your data in your phone before proceeding.
View my Flipboard Magazine.
*Disclaimer:
Android Custom ROM fix ® provide various Firmware Updates and Rooting process along with Custom ROM,Modes,file are all belong to their owners/developers. The autor of this site or the developers are not responsible, if you damage or brick your device.Do it on your own risk and follow the instruction properly.
* Important:
Backup important files stored on your device before proceeding with the steps below, so that in case something goes wrong you’ll have backup of all your important files.
ROM Download & Installation Instructions via XDA.

For More Asus Zenfone 5 latest updates Keep Checking Android Custom ROM Fix ™®
That’s all. We hope this guide serves you well. If there’s anything you’d like to be added/changed on this page, PLZ Use the comment box below to contribute more ideas & Suggestions .
Like this post? PLZ Hit the share buttons below to share this article with your friends on Facebook, Google + and Twitter.
PLZ Follow Us On Flipboard 4 More Latest Updates.
Best Regards.™
*Disclaimer:
Android Custom ROM fix ® provide various Firmware Updates and Rooting process along with Custom ROM,Modes,file are all belong to their owners/developers. The autor of this site or the developers are not responsible, if you damage or brick your device.Do it on your own risk and follow the instruction properly.
* Important:
Backup important files stored on your device before proceeding with the steps below, so that in case something goes wrong you’ll have backup of all your important files.
ROM Download & Installation Instructions via XDA.
For More Asus Zenfone 5 latest updates Keep Checking Android Custom ROM Fix ™®
That’s all. We hope this guide serves you well. If there’s anything you’d like to be added/changed on this page, PLZ Use the comment box below to contribute more ideas & Suggestions .
Like this post? PLZ Hit the share buttons below to share this article with your friends on Facebook, Google + and Twitter.
PLZ Follow Us On Flipboard 4 More Latest Updates.
Best Regards.™

Tuesday, July 26, 2016
ASUS ZenFone 3 Teaser
ASUS today (5/17) night released the first movie trailer support Computex 2016, the content is about ASUS ZenFone 3. In the film, in addition to some of the nature of the screen, and Clarity (clear), Desire (desire), Unlimited (no limit) and other symbolic words, but also clearly demonstrated the new machine body contour can be seen include a camera lens, side buttons design, and 2.5D glass beauty back. The end of the film, this can also be determined ASUS Computex 2016 are three new phones, ASUS ZenFone 3, ZenFone 3 Deluxe and ZenFone 3 Max.


Video Teaser:
ASUS ZenPouch Waterproof Case
At Computex 2016 ASUS introduced their new accessories for ZenFone ZenPouch. ZenPouch is a Waterproof bag which can handle smartphone up to 5.5inch device. ZenPouch features are IPX8 certified, up to 5.5 inch smartphone, Touchscreen capability and take photo via ZenPouch.


Inside retail package you will get manual instructions, strap, zenpouch, and tester paper.


ZenPouch when in use:


Source ePrice TW
How To Root Asus Zenfone 4 Without PC
Root/unroot in Asus Zenfone 4 without pc. On this occasion I will post the easy way to root the smartphone Asus Zenfone 4 with RootZenFone software. This application can make the Asus Zenfone 4 to root without a PC.
But keep in mind that the root can be smartphone you suffered damage, and therefore we are not responsible on any damage. This method has been tested on Asus Zenfone 4 A450CG and A400CG with OS Android Jelly bean.
Steps root Asus Zenfone 4 Jelly Bean.
1. Download RootZenFone-1.4.4r.apk or here
2. Before using this application, Turn off Wifi and Simcard 1 & 2
3. Install and open the application, and hit the "OK" button.
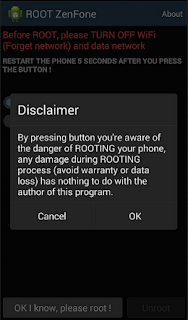
4. Choose "SuperSU (by Chainfire)"
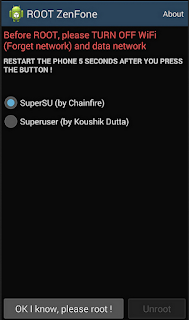
5. Press "OK I know, please root!"
6. Wait until the process is complete. then Reboot your Android.
Applications RootZenFone-1.4.4r this apk, not tested on Asus Zenfone 4 Kitkat, then you can try it yourself. If the process fails, try using the latest applications of RootZenFone is version 1.4.6.
Download Link1 or Link2
Monday, July 25, 2016
Sunday, July 24, 2016
Guide How to Enter Droitboot or Fastboot and Recovery Mode on Asus Zenfone Lollipop
[Guide] How to Enter Droitboot or Fastboot and Recovery Mode on Asus Zenfone Lollipop.
Enter Droitboot or Fastboot. On this guide we will show you how to Enter Droitboot or Fastboot and Recovery Mode on Asus Zenfone Lollipop. Actually this guide can be used for All Asus Zenfone type and series, so, If you have any problem to enter Droitboot or Fastboot and Recovery Mode on Asus Zenfone Lollipop, you can follow this guide below. There is little difference in the combination of button used to enter to droidboot on Asus Zenfone run Lollipop OS and Kitkat OS. For more details see guide below.
Method #1. Enter Droidboot on Asus Zenfone.
- Make sure your Asus Zenfone is turn off.
- Make sure your battery is fully charged, or minimum has 50% of battery power.
- Now, Turn On Asus Zenfone by press and hold Power Button and Volume UP.
- Release only Power Button when you see Asus Logo appear on screen. While Volume Up button still holded until your Asus Zenfone enter droidboot.

How to Enter Droitboot or Fastboot - After a few seconds your Asus Zenfone will enter Droidboot.

How to Enter Droitboot or Fastboot - Now, your position is on droidboot menu.
- Use Volume UP and Volume Down to select menu.
- Use Power Button to confirm your selection


Method #2. Enter Droidboot on Asus Zenfone. (active device)
If first method doesnt work to enter droitboot on your Asus Zenfone, you can try to use the second method below.
- You must prepare this tool.
- ADB Tool -> Download and extract it on your computer folder.
- Intel USB Driver -> Download and install it.
- Recovery.img -> you can download from support.asus.com
- Enable Developer Options.
- Settings
- About
- Build Numbers (tap it 7 times)
- Enable USB Debugging
- Connect your Asus Zenfone to the PC using USB cable.
- Now, open your ADB file on your computer folder.
- Open a command prompt from within your ADB/fastboot folder.
- To start this command prompt just hold shift + right click, select open command prompt here.
- Then on the command prompt window type : adb device and press enter

- If you see successfully message, Now check your Asus Zenfone there you will see Pop Ups menu appear on screen.
- Select Allow.
- Now back to the ADB command prompt then type : adb reboot-bootloader and press enter
- Now your Asus Zenfone device will reboot automatically, then enter droidboot.

Enter Recovery Mode on Asus Zenfone.
- Once you entering droidboot menu, now you can select recovery menu.

recovery mode asus zenfone lollipop - To select menu on Droidboot you can use volume down / volume up.
- To confirm your selection use Power button.
- Once you select recovery Mode, your Asus Zenfone will reboot.
- After reboot your Asus Zenfone turn on again, and now you can see Android logo and No command on screen.

no command asus zenfone lollipop - Now, press and hold power button and volume up button.
- Then release volume up button only,
- Now, you will enter Recovery Mode.

recovery mode asus zenfone lollipop - Finish.


What can you do in Recovery Mode ?
- Reboot system Now -> this menu will reboot your system, you can use it for Softbrick
- Apply Update From ADB. -> this menu used for flashing firmware or system via adb slideload.
- Wipe data/ Factory Reset -> This menu will return your device to factory setting.
- Cleasr Cache Partition. -> this menu will erase cache on partiton.
- Reboot to bootloader. -> this menu will reboot your zenfone into bootloader.
- Power Down. -> this menu will shut down asus zenfone.
- View Recovery Logs. -> This menu will show you system recovery logs.
Video Guide.
How to Root ASUS ZenFone 2 Laser ZE500KL Marshmallow

Today ASUS Zenfone Blog will teach you how to root ASUS Zenfone 2 Laser ZE550KL. Atention, only for for ZE500KL. DWYOR (Do it with your own risks). Thanks to gavrilla from 4pda.ru.
How to Root ASUS ZenFone 2 Laser ZE500KL (Android Marshmallow):
- Install TWRP Recovery (Tutorial)
- Download Patched boot boot_13.10.6.16_patch.img (Download)
- Enter fastboot by turn off device and press power+volume up
- Open cmd and type: fastboot boot boot_13.10.6.16_patch.img
- Download SuperSU.zip (Download) and copy to SD card
- Enter TWRP recovery and flash superSU.zip via recovery
How to Update Asus ZenFone Max ZC550KL to Android 6 0 1 Marshmallow Beta OTA V13 8 26 15
Asus has started rolling out Android Marshmallow 6.0.1 OTA Update for Asus ZenFone 2 Laser ZE500KL and the Zenfone Max ZC550KL.We have the OTA update file.You can download the OTA update file from the download section.After downloading the OTA Firmware, you can simply flash it using ADB & Fastboot commands.

Now follow the guide to Download & Install Asus ZenFone Max ZC550KL Android 6.0.1 Marshmallow Beta Update.
The Update comes with loads of extra features.You will also get the DOZE Mode resulting in good battery life.This update comes with loads of bug fixes.It comes with Build number V13.8.26.15 and the File Size: Up to 1.1GB.
Before you begin the flashing process, first download Asus USB drivers on your computer, then enable USB debugging on your smartphone, go to settings >>developers option. If developer’s option isn’t visible on your galaxy device, simply go to about phoneunder settings and scroll down to build number, then tap build numberup to 7 times to make developers option visible.
Now follow the guide to Download & Install Asus ZenFone Max ZC550KL Android 6.0.1 Marshmallow Beta Update.
The Update comes with loads of extra features.You will also get the DOZE Mode resulting in good battery life.This update comes with loads of bug fixes.It comes with Build number V13.8.26.15 and the File Size: Up to 1.1GB.
Before you begin the flashing process, first download Asus USB drivers on your computer, then enable USB debugging on your smartphone, go to settings >>developers option. If developer’s option isn’t visible on your galaxy device, simply go to about phoneunder settings and scroll down to build number, then tap build numberup to 7 times to make developers option visible.
View my Flipboard Magazine.
÷ Prerequisites:
•This tutorial is only for installing Android 6.0.1 Marshmallow Beta OTA V13.8.26.15 on Asus ZenFone Max ZC550KL. Please do not try on any other Asus ZenFone variants.
•Make sure there is at least 80% battery left on your smartphone before begin…
*Disclaimer:
Android Custom ROM fix ® provide various Firmware Updates and Rooting process along with Custom ROM,Modes,file are all belong to their owners/developers. The autor of this site or the developers are not responsible, if you damage or brick your device.Do it on your own risk and follow the instruction properly.
* Important:
Backup important files stored on your device before proceeding with the steps below, so that in case something goes wrong you’ll have backup of all your important files.

÷ How to Update Asus ZenFone Max ZC550KL to Android 6.0.1 Marshmallow Beta OTA V13.8.26.15.
1- DownloadAAsus ZenFone Max ZC550KL to Android 6.0.1 Marshmallow Beta OTA V13.8.26.15.
2- Setup ADB & fast boot On Your Computer.Guide > Quickest Way To Install Android ADB and Fastboot (with drivers) on Windows .
3- Connect your device to Computer and Trust the connection by checking “Always allow from this computer”
4- Put the downloaded OTA Firmware file inside the Fastboot folder
5- Now open the command window from the ADB & Fastboot folder.hold the shift key on the keyboard and right-click on an empty space and select “Open command window here” option to launch a cmd window
6- Then boot your device into bootloader mode by issuing the following command
adb reboot bootloader
7- Now issue the following command to check ADB Connection
adb devices
8- Then go to Marshmallow beta ROM folder & open the S3V3N_cmd file.The command prompt will pop up.then issue the following command to Install the OTA Update Firmware file
flashall_AFT WW_ZC550KL_V 13.8.26.15 _M3.1.39_Phone-user.raw
9- Once the installation is completed, reboot your device by running below command
fastboot reboot.
That’s it! Your Asus ZenFone Max ZC550KL now have Android 6.0.1 Marshmallow Beta OTA V13.8.26.15 installed on your phone! Go to Settings > About phone to verify.
Like this post? PLZ Hit the share buttons below to share this article with your friends on Facebook, Google + and Twitter.
PLZ Follow Us On Flipboard 4 More Asus ZenFone Latest Updates.
PLZ Use the comment box below to contribute more ideas & Suggestions .
Best Regards.
÷ Prerequisites:
•This tutorial is only for installing Android 6.0.1 Marshmallow Beta OTA V13.8.26.15 on Asus ZenFone Max ZC550KL. Please do not try on any other Asus ZenFone variants.
•Make sure there is at least 80% battery left on your smartphone before begin…
*Disclaimer:
Android Custom ROM fix ® provide various Firmware Updates and Rooting process along with Custom ROM,Modes,file are all belong to their owners/developers. The autor of this site or the developers are not responsible, if you damage or brick your device.Do it on your own risk and follow the instruction properly.
* Important:
Backup important files stored on your device before proceeding with the steps below, so that in case something goes wrong you’ll have backup of all your important files.
÷ How to Update Asus ZenFone Max ZC550KL to Android 6.0.1 Marshmallow Beta OTA V13.8.26.15.
1- DownloadAAsus ZenFone Max ZC550KL to Android 6.0.1 Marshmallow Beta OTA V13.8.26.15.
2- Setup ADB & fast boot On Your Computer.Guide > Quickest Way To Install Android ADB and Fastboot (with drivers) on Windows .
3- Connect your device to Computer and Trust the connection by checking “Always allow from this computer”
4- Put the downloaded OTA Firmware file inside the Fastboot folder
5- Now open the command window from the ADB & Fastboot folder.hold the shift key on the keyboard and right-click on an empty space and select “Open command window here” option to launch a cmd window
6- Then boot your device into bootloader mode by issuing the following command
adb reboot bootloader
7- Now issue the following command to check ADB Connection
adb devices
8- Then go to Marshmallow beta ROM folder & open the S3V3N_cmd file.The command prompt will pop up.then issue the following command to Install the OTA Update Firmware file
flashall_AFT WW_ZC550KL_V 13.8.26.15 _M3.1.39_Phone-user.raw
9- Once the installation is completed, reboot your device by running below command
fastboot reboot.
That’s it! Your Asus ZenFone Max ZC550KL now have Android 6.0.1 Marshmallow Beta OTA V13.8.26.15 installed on your phone! Go to Settings > About phone to verify.
Like this post? PLZ Hit the share buttons below to share this article with your friends on Facebook, Google + and Twitter.
PLZ Follow Us On Flipboard 4 More Asus ZenFone Latest Updates.
PLZ Use the comment box below to contribute more ideas & Suggestions .
Best Regards.
Thursday, July 21, 2016
How to Update Asus Zenfone 5 A501CG to Android 6 0 1 Marshmallow XOSP 6 1 ROM
If you are looking to install a new custom ROM for Zenfone 5 A501CG then we have here as usual the best Custom ROMs for you.
According to XDA member resk87, Android 6.0.1 Marshmallow XOSP 6.1 ROM is available now for your Asus Zenfone 5 A501CG.

÷ ROM Features:
Based on CM 13.0
Removed many unnecessary apps and stuff as well as CM ones
StatusBar Clock font style
StatusBar Clock font size
Added StatusBar Date & style options
Added option for date style/position, left-right of clock
Xperia Z5 inspired LockScreen style
Xperia Fonts
Xperia Battery Text prototype
Time Contextual Headers
XOSP Universal dialog for Shutdown/Reboot and Dexopting Process
XOSPOTA
Stock Kernel
Snap Camera
ViPER Audio Engine
Theme Chooser
Xperia based Bootanimation
Custom Framework and SystemUI Xperia drawables
XOSPFileManager
Xperia Z5 sounds
Xperia X Wallpapers
XOSPSetupWizard
Custom Materialized
Stock Browser is custom themed
Contacts is custom themed (Much more Xperia Style)

Dialer is custom themed (Much more Xperia Style)
Status bar logo
Navigation Bar ON/OFF
NavBar dimensions
SlimDim
HW Keys ON/OFF
SlimSeek Bar
Status bar Network Traffic indicator
RAM Bar in recents options
Toast Animations
Long Press back to kill in Development Settings
Ability to hide the Super SU status bar icon
Dashboard Columns
Dashboard double lines toggle
Double Tap to sleep anywhere on the lockscreen
On-the-go Mode
Double tap to sleep on navigation bar
SystemApp remover
Omni inbuilt SystemUI Screen recording
SuperSU
Xperia Apps
Xperia Z5 Home app
Album App
PhotoEditor
PhotoAnalyzer
Xperia Keyboard (aka textinput-tng)
Music (former WALKMAN)
Video
SemCalendar
AudioRecorder (Material Version)
ClockWidgets
Sketch
SmartConnect
WallpaperPicker (For Xperia X custom wallpapers)
Weather App
Wheater Widget
Walkman Widget
Track ID
SomcPodcast
SemcDLNA
÷ Bugs:
GPS
FM.
÷ Prerequisites:
•This tutorial is only for installing Android 6.0.1 Marshmallow XOSP 6.1 ROM on Asus Zenfone 5 A501CG. Please do not try on any other Asus Zenfone 5 variants.
•Your phone should be rooted and haveClockworkMod recovery installed from before.
•This tutorial will wipe out all your data.Proceed at your own risk.Perform a Dalvik Cache wipe before proceeding from the recovery mode.
Make sure you backup all your data in your phone before proceeding.
View my Flipboard Magazine.
*Disclaimer:
Android Custom ROM fix ® provide various Firmware Updates and Rooting process along with Custom ROM,Modes,file are all belong to their owners/developers. The autor of this site or the developers are not responsible, if you damage or brick your device.Do it on your own risk and follow the instruction properly.
* Important:
Backup important files stored on your device before proceeding with the steps below, so that in case something goes wrong you’ll have backup of all your important files.
ROM Download & Installation Instructions via XDA.

For More Asus Zenfone 5 A501CG. updates Keep Checking Android Custom ROM Fix™®
Like this post? PLZ Hit the share buttons below to share this article with your friends on Facebook, Google + and Twitter.
PLZ Follow Us On Flipboard 4 More Latest Updates.
PLZ Use the comment box below to contribute more ideas & Suggestions .
Best Regards.
*Disclaimer:
Android Custom ROM fix ® provide various Firmware Updates and Rooting process along with Custom ROM,Modes,file are all belong to their owners/developers. The autor of this site or the developers are not responsible, if you damage or brick your device.Do it on your own risk and follow the instruction properly.
* Important:
Backup important files stored on your device before proceeding with the steps below, so that in case something goes wrong you’ll have backup of all your important files.
ROM Download & Installation Instructions via XDA.
For More Asus Zenfone 5 A501CG. updates Keep Checking Android Custom ROM Fix™®
Like this post? PLZ Hit the share buttons below to share this article with your friends on Facebook, Google + and Twitter.
PLZ Follow Us On Flipboard 4 More Latest Updates.
PLZ Use the comment box below to contribute more ideas & Suggestions .
Best Regards.
Guide How to Unlock and Relock Bootloader on Asus Zenfone 2 ZE500CL
[Guide] How to Unlock and Relock Bootloader on Asus Zenfone 2 ZE500CL.
Unlock and Relock Bootloader Asus Zenfone. this guide will show you how to Unlock and Relock Bootloader on Asus Zenfone. This guide is an unofficial bootloader unlock tool, and you will not get any technical help or support for issues arising after unlocking the Asus Zenfone bootloader. If you understand what will you do to unlock the bootloader on your Asus Zenfone Android smartphone, now you can following ths guide below. Before we continoued this guide, I would like to say thanks to CHuvaCK21 for this awesome tool.
Prerequisite.
- Download the Unofficial Unlock Bootloader tool here.
- Extract and copy all file to the SD Card.
Guide to Unlock Bootloader Asus Zenfone.
- Makse sure your Asus Zenfone battery is fully charged, or at least has 75% of battery capacity.
- Now enter Droidboot. see this guide how to enter droidboot.
- Once you enter droidboot now run the bat file Unlock.bat. -> to unlock bootloader
- Or, run Relock.bat -> to relock bootloader.
- Wait the process untill finish
- Good luck
Wednesday, July 20, 2016
Asus Kembali Merilis Asus Transformer T100HA

Awal tahun ini Asus kembali meramaikan pasar Gaget dengan seri produk New di jajaran seri transformer T100HA, Pada Asus Transformer T100HA ini membawa perubahan dari seri Asus Transformer sebelumnya, Perlu diketahui Seri Asus Transformer ini pertama kali diperkenalkan di tanah air pada tahun 2013 lalu yang membawa nama Asus sebagai produsen utama pada perangkat Komuter 2 in 1.
Sistem operasi yang digunakana pada Asus T100HA adalah Windows 10 serta memiliki body yang tipis dan lebih ringan dari seri sebelumnya , sedangkan spesifikasi yang disematkan Asus pada T100HA ini diantaranya memiliki prosesor Intel Atom X5 Z8500 Quad Core yang menawarkan peforma 2 kali lebih baik dari sisi grafis dibandingkan dengan seri sebelumnya.
Asus T100HA memiliki lebar layar 10.1 inci Dengan dukungan USB 3.1 Type C, serta memiliki ketabalan 8.45 mm dan berat hanya 580 gram saja, untuk membantu kinerja prosesor Asus T100HA dibekali dengan RAM sebesar 4GB dan 128 GB pada penyimpanan internal.
Tuesday, July 19, 2016
How to Install Android 6 0 1 Marshmallow on AOKP ROM on Asus Zenfone 6 All Variants
According to XDA member Luccas Oliveira,
Android 6.0.1 Marshmallow AOKP ROM is now available for Asus Zenfone 6 A500CG (T00F)/
Android 6.0.1 Marshmallow AOKP ROM is now available for Asus Zenfone 6 A500CG (T00F)/
A501CG (T00J)/A600CG/A601CG (T00G)

÷ ROM Features:
Stable, clean, fast
Odexed, quicker boot
Latest Sources
Merge branch 6.0.1_r43
May 1 security update
No extra applications
÷ Supported Models:
A500CG (T00F)
A501CG (T00J)
A600CG/A601CG (T00G)
÷ Bugs:
Video recorded in 1080p lags
Workaround: Record videos in 720p quality
GPS does not work
Workaround: Try using A-GPS/Mobile Location
FM Radio does not work
Workaround: Try using TuneIn Radio, a lot of local radios are already there.

*Disclaimer:
Android Custom ROM fix ® provide various Firmware Updates and Rooting process along with Custom ROM,Modes,file are all belong to their owners/developers. The autor of this site or the developers are not responsible, if you damage or brick your device.Do it on your own risk and follow the instruction properly.
* Important:
Backup important files stored on your device before proceeding with the steps below, so that in case something goes wrong you’ll have backup of all your important files.
ROM Download & Installation Instructions via XDA

For More Asus Zenfone 6 Updates Keep Checking Android Custom ROM Fix™®
Like this post? PLZ Hit the share buttons below to share this article with your friends on Facebook, Google + and Twitter.
PLZ Follow Us On Flipboard 4 More Latest Updates.
PLZ Use the comment box below to contribute more ideas & Suggestions .
Best Regards.
Download Android Lollipop 5 0 stock firmware for Asus Zenfone Max smartphone

Download Android Lollipop 5.0 stock firmware for Asus Zenfone Max smartphone from here or from here.
Firmware details
Archive: Zenfone Max Snapdragon MSM8916 Android 5.0 Smartphone Firmware 202635 160514
Image: Zenfone Max Snapdragon MSM8916 Android 5.0 Smartphone Firmware 202635 160514
Firmware: Android Lollipop 5.0 stock
Inside archive: firmware + Volume+ and Power Button To Read Devices.bat + scripts.bat + Flash.bat + fastboot.exe
Firmware details
Archive: Zenfone Max Snapdragon MSM8916 Android 5.0 Smartphone Firmware 202635 160514
Image: Zenfone Max Snapdragon MSM8916 Android 5.0 Smartphone Firmware 202635 160514
Firmware: Android Lollipop 5.0 stock
Model: Asus Zenfone Max smartphone
Image file size: 0.98 GB
Platform: Qualcomm Snapdragon MSM8916Image file size: 0.98 GB
Inside archive: firmware + Volume+ and Power Button To Read Devices.bat + scripts.bat + Flash.bat + fastboot.exe
Caution: Please do not update firmware unless you know what you are doing, you really want it or it is absolutely necessary. Firmware updates may occasionally have bad results, like bricking your device, temporarily or permanently. The firmware update process is done entirely at your own risk. Before attempting to update the firmware, back up your data.
Don’t miss any of our future video tutorials, follow us on Youtube. Like us on Facebook. Add us in your circles on Google+. Watch our photo albums on Flickr. Subscribe now to our newsletter.
Subscribe to:
Posts (Atom)