Showing posts with label root. Show all posts

Friday, July 29, 2016

How to Root Galaxy Note 4 N910F on Official Marshmallow 6 0 1 XXU1DPD3 Update


Samsung Galaxy Note 4 N910F users can now Root XXU1DPD3 Android 6.0.1 Marshmallow firmware. Just recently we saw Samsung finally release the much awaited Marshmallow update to Note 4.


Don’t worry we are going to share step by step guide to safely How to Root your Galaxy Note 4 N910F on Official Marshmallow 6.0.1 XXU1DPD3 Update:

View my Flipboard Magazine.


 ÷ Prerequisites:

•This root method tutorial is only for Samsung Galaxy Note 4 SM-N910F. Please do not try on any other Galaxy Note 4 LTE variants.

•Make sure you backup all your data in your phone before proceeding as a precaution.

•Your Note 4 should be on an official firmware by Samsung, not a custom ROM.

•Your phone should be on XXU1DPD3 Android 6.0.1 firmware.


*Disclaimer:

Android Custom ROM fix ® provide various Firmware Updates and Rooting process along with Custom ROM,Modes,file are all belong  to their owners/developers. The autor of this site or the developers are not responsible,  if you damage or brick your device.Do it on your own risk and follow the instruction properly.

* Important:

Backup important files stored on your device before proceeding with the steps below, so that in case something goes wrong you’ll have backup of all your important files.


÷ How to Root Galaxy Note 4 N910F on Official Marshmallow 6.0.1 XXU1DPD3 Update:

Step 1 – Download CF-Auto-Root Android 6.0.1 Package for Samsung Note 4 to your computer and extract the zip file.

Step 2 – Download ODIN v3.09 which will help you to root Android 6.0.1 on Samsung Galaxy Note 4 N910F.

Step 3 – Switch OFF your phone. Now go to Download Mode. How? Press and hold the Volume Down + Home buttons together, and then press the Power button till you see the construction Android robot and a triangle. Press Power again to confirm to enter into Download Mode.

Step 4 – Make sure you have your Samsung Galaxy Note 4 USB drivers installed on your computer.

Step 5 – Open ODIN on your computer. Connect your phone to your computer while your phone is in the Download Mode.

Step 6 – If your phone is connected successfully, one of the ID:COM boxes will turn yellow with the COM port number. This step might take some time.

Step 7 – Now select the file that you have to flash/install on your phone. This file will be found from the extracted file in Step 1.


Click on ‘AP’ and select the file CF-Auto-Root-trlte-trltexx-smN910F.zip
Step 8 – In ODIN, check the Auto Reboot and F. Reset Time options, if not already.

Step 9 – Now click on the Start button in ODIN. Installation process will start and would take a few minutes to complete.

Step 10 – After the installation is completed, your phone will reboot into Recovery Mode automatically and install the root package / files. Your ID:COM box will also turn green.

Step 11 – After you see the home screen, unplug your phone from the computer.


NOTE: Sometimes the device does NOT boot into Recovery Mode automatically (as given in Step 10) and root your device. If that happens, do the entire procedure again.

OPTIONAL: Still not rooted? Once again perform the entire tutorial, but make sure in ODIN, the “Auto Reboot” option is NOT checked. Then after installation (Step 10), do the following:

Step 11 – Pull out the battery to turn OFF the phone forcefully.

Step 12 – Now boot (turn ON your phone) with Volume Up + Home + Power buttons to go directly into Recovery Mode manually. This will start the install process of rooting your phone.


That’s it. Your Galaxy Note 4 has now been rooted on Android 6.0.1 Marshmallow with CF-Auto-Root package. Check for the SuperSU app in your apps list to verify.


Like this post? PLZ Hit the share buttons below to share this article with your friends on Facebook, Google + and Twitter.

PLZ Follow Us On Flipboard 4 More Samsung Galaxy Note 4 latest updates.

PLZ Use the comment box below to contribute more ideas & Suggestions .

Best Regards.


Get

Read more »

Thursday, July 28, 2016

Guide How to Install TWRP Recovery and Root Android Lenovo Vibe K5 K5 Plus

[Guide] How to Install TWRP Recovery and Root Android Lenovo Vibe K5 | K5 Plus.

Install TWRP Recovery and Root Vibe Lenovo K5. This guide will show you how to  Install TWRP Recovery and Root Android Lenovo Vibe K5 | K5 Plus. If you want root the Lenovo Vibe K5 or K5 plus you must install TWRP Recovery first on this device. We know that TWRP is custom recovery image for Android-based devices, and this recovery provided GUI interface or with touchscreen enabled, by using TWRP we allows users to install third-party firmware and backup the current system. therefore, TWRP often installed when rooting Android smartphone devices.

Lenovo Vibe K5  is the smartphone released on February, 2016. with 5,0 Inchi IPS capacitive touchscreen, 16M colors, work on Android OS, v5.1 (Lollipop), and supported with Quad-core 1.5 GHz Cortex-A53 & quad-core 1.2 GHz Cortex-A53 CPU, Qualcomm MSM8929 Snapdragon 415 chipset, Adreno 405 GPU, combined with 2 GB of RAM, 13 MP on primary camera and 5 MP on secondary camera.

Install TWRP on Lenovo Vibe K5.

Here is the guide started. Now follow all step carefully.
  1. Make sure Minimal ADB and fastboot installed on your compuer. you can see this guide.
  2. Make sure your battery is not empty or at least has 70% of battery capacity.
  3. Now, switch on your Lenovo Vibe K5.
  4. Then enable the Developer Options.
    • Go to Setting -> About Phone -> Phone Information -> tap 7 times at Build Number,
  5. Then, Enable USB Debugging
    • Go to Settings -> Developer -> USB Debugging
  6. Now, Enable OEM unlock.
    • Go to Settings -> Developer -> Unlock OEM
  7. Make sure driver for Lenovo Vibe K5 installed correctly on your computer, you can find the driver that come on the CD cell partition
  8. Now, connect your Lenovo Vibe K5 to the computer using original USB cable.
  9. Then, Download the TWRP recovery, and copy it to the folder where adb is installed on your computer.
  10. Open a command prompt from within your fastboot folder.
  11. To start this command prompt just hold shift + right click, select open command prompt here.
    Run ADB on computer
    Run ADB on computer
  12. Now type,
    • adb devices
  13. This command used to confirm the connection between Lenovo Vibe K5 and the computer.
  14. Once the connection confirmed. Now type.
    • adb reboot bootloader
  15. If you want to temporarily boot this recovery type ,
    • fastboot boot TWRP-k5-3.0.2-r1_shreps.img
  16. If you want to permanently flash it, type ;
    • fastboot flash recovery TWRP-k5-3.0.2-r1_shreps.img
  17. Finish.

Root on Lenovo Vibe K5.

  1. This step will show you how to root Lenovo Vibe K5
  2. To start it, you must Download the ZIP file SuperSU v2.46 
  3. Then save it in the micro SD card.
  4. Now turn off your Lenovo Vibe K5.
  5. Then enter to recovery mode.
    • Press and hold Power Button and Volume Up button
  6. Then follow instruction appear on screen. 
  7. Select recovery to install SuperSu from SD Card.

Get

Read more »

How to Root Nexus 6 Easily on Android N Developer Preview 3 NPD35K


The latest Android N Developer Preview 3 NPD35K is the next upcoming major firmware release by Google available for Nexus 6 . It brings some new features like multi-window mode, an enhanced doze mode, a revamped Settings screen and a quick toggle in the notifications panel. Other changes include improved notifications, improved multitasking and app switching, dark mode etc.


Now you Can Root Your Nexus 6 on Android N Developer Preview 3 NPD35K factory Image.

View my Flipboard Magazine.

 ÷ Prerequisites:

•This root method is only for Android N (NPD35K) installed on Nexus 6 and I am not sure if it will work on the other variants of the Nexus 6 on other carriers.

•Your Nexus 6 bootloader should be unlocked.
Nexus 6 should be on Android N NPD35K software version.

•Make a Nandroid backup of your previous phone set up before proceeding – for just in case anything goes wrong.


*Disclaimer:

Android Custom ROM fix ® provide various Firmware Updates and Rooting process along with Custom ROM,Modes,file are all belong  to their owners/developers. The autor of this site or the developers are not responsible,  if you damage or brick your device.Do it on your own risk and follow the instruction properly.

* Important:

Backup important files stored on your device before proceeding with the steps below, so that in case something goes wrong you’ll have backup of all your important files.


÷ How to Root Nexus 6 Easily on Android N Developer Preview 3 NPD35K .


Step 1 – Download Android SDK from the Android Developers website and install. Also set it up with downloading platform-tools and USB drivers package in SDK.


Step 2 – Enable USB Debugging mode in your Nexus 6.

Step 3 – Download Fastboot from the following links depending on your OS and extract it in android-sdk-windowsplatform-tools directory. Create directory if not already there.

Windows: Download here!

Mac: Download here!

Linux: Download here!

NOTE: Skip Steps 1, 2, 3 if you already have them.

Step 4 – Download SuperSU v2.71  for Nexus 6 on your PC, if you haven’t already.

Step 5 – Connect and mount your Nexus 6 USB memory on your computer using the USB cable.

Step 6 – Now copy/paste the BETA-SuperSU-v2.71-20160331103524.zip file to your SD card. Make sure the file is in the SD card / internal storage root (not in any folder).

Step 7 – Then turn OFF your phone.

Step 8 – twrp-3.0.0-0-shamu.img and save it to your android-sdk-windowsplatform-tools directory on your computer.


Step 9 – Now go into Fastboot/Bootloader Mode on Nexus 6. How? Press Volume Down + Power keys for a few seconds till you see some text on the screen. This is Bootloader Mode.

Step 10 – Navigate to android-sdk-windowsplatform-tools directory and open Command Prompt (Shift + Right-click > Open Command Prompt).

Step 11 – Type in the following command and press Enter.

fastboot flash recovery twrp-3.0.0-0-shamu.img
Step 12 – Once completed, choose RECOVERY from the Fastboot menu and enter Recovery Mode.

Step 13 – In ClockworkMod recovery, scroll down to “flash zip from SD card” and press the power button to select it.

Step 14 – Press the Power button again and select “choose zip from sdcard”.

Step 15 – Now using your volume keys, navigate to BETA-SuperSU-v2.71-20160331103524.zip and select it using the Power button. Confirm the installation on the next screen and the installation procedure should start now.

Step 16 – After the installation completes, go to “+++++Go Back” and reboot the phone by selecting “reboot system now” from the Recovery menu. The phone will boot now and it might take about 5 minutes to boot on your first time. So, please wait.

That’s it! Your Nexus 6 is now rooted on Android N Developer Preview 3 firmware on your phone! Check for the SuperSU app in your apps list to verify.

For More Nexus 6 Firmware, Root & More Keep Checking AndroidCustomROMFix ™®

Like this post? PLZ Hit the share buttons below to share this article with your friends on Facebook, Google + and Twitter.

PLZ Follow Us On Flipboard 4 More Latest Updates.

PLZ Use the comment box below to contribute more ideas & Suggestions .

Best Regards.


Get

Read more »

How to Root Galaxy S6 SM G920F On Android 6 0 1 Marshmallow XXU3DPDP OTA


Samsung Galaxy S6 SM-G920F Gusers can easily be rooted whilst running any Android 6.0.1 Marshmallow XXU3DPDP OTA [Security Patches / Bug Fixes]. This guide is applicable on all Android 6.0.1 Marshmallow firmware available for the Samsung Galaxy S6.


Don’t worry we are going to share step by step guide to safely Root your Galaxy SM-G920F On Android 6.0.1 Marshmallow XXU3DPDP OTA.

View my Flipboard Magazine.


 ÷ Prerequisites:

•This root method tutorial is only for Galaxy S6. Please make sure you only download the root package for your own model number.

•Make sure you backup all your data in your phone before proceeding as a precaution.

•This root method works with Android 6.0.1 Marshmallow firmwares and all future Android updates as well.

•Your Galaxy S6 should be on an official firmware by Samsung, not a custom ROM.


*Disclaimer:

Android Custom ROM fix ® provide various Firmware Updates and Rooting process along with Custom ROM,Modes,file are all belong  to their owners/developers. The autor of this site or the developers are not responsible,  if you damage or brick your device.Do it on your own risk and follow the instruction properly.

* Important:

Backup important files stored on your device before proceeding with the steps below, so that in case something goes wrong you’ll have backup of all your important files.


÷ How to Root Galaxy SM-G920F On Android 6.0.1 Marshmallow XXU3DPDP OTA.

Step 1 – Download Auto-Root Package for Samsung Galaxy S6 to your computer and place the file on your desktop.

Step 2 – Download ODIN v3.09 which will help you to root Android 6.0.1 on Samsung Samsung Galaxy S6.

Step 3 – Switch OFF your phone. Now press and hold the Volume Down + Home buttons together, and then press the Power button till you see a warning screen (as shown below). Press Volume Up to confirm and proceed to the Download Mode.

Step 4 – Make sure you have your Samsung Galaxy S6 USB drivers installed on your computer.

Step 5 – Open ODIN on your computer. Connect your phone to your computer while your phone is in the Download Mode.

Step 6 – If your phone is connected successfully, one of the ID:COM boxes will turn yellow with the COM port number. This step might take some time.

Step 7 – Now select the file that you have to flash/install on your phone. This file will be found on the desktop like mentioned in Step 1.

Click on ‘PDA’ or ‘AP’ and select the file.
Step 8 – In ODIN, check the Auto Reboot and F. Reset Time options, if not already.

Step 9 – Now click on the Start button in ODIN. Installation process will start and would take a few minutes to complete.

Step 10 – After the installation is completed, your phone will reboot into Recovery Mode automatically and install the root package / files. Your ID:COM box will also turn green.

Step 11 – After you see the home screen, unplug your phone from the computer.


Step 11 – Pull out the battery to turn OFF the phone forcefully.

Step 12 – Now boot (turn ON your phone) with Volume Up + Home + Power buttons to go directly into Recovery Mode manually. This will start the install process of rooting your phone.


That’s it! Your Samsung Galaxy S6 has now been rooted on Android 6.0.1 official software update. Check for the SuperSU app in your apps list to verify.

For More Samsung Galaxy S6 Updates Keep Checking Android Custom ROM Fix ™®

Like this post? PLZ Hit the share buttons below to share this article with your friends on Facebook, Google + and Twitter.

PLZ Follow Us On Flipboard 4 More Latest Updates.

PLZ Use the comment box below to contribute more ideas & Suggestions .

Best Regards.


Get

Read more »

Tuesday, July 26, 2016

How to Root Galaxy S6 Edge SM G925F on Android 6 0 1 on XXU3DPDP Update


Samsung Galaxy S6 Edge SM- G925F Running on XXU3DPDP Android 6.0.1 Marshmallow firmware can be rooted through this quick and easy guide. To root Galaxy S6 Edge, the utilities involved will be Auto-Root from Chainfire as well as ODIN software.


Follow our guide below to Root your Samsung Galaxy S6 Edge Running on XXU3DPDP Android 6.0.1 Marshmallow update .

View my Flipboard Magazine.


 ÷ Prerequisites:

•This root method tutorial is only for Galaxy S6 Edge SM-G925F. Please do not try on any other Galaxy S6 Edge LTE variants.

•Make sure you backup all your data in your phone before proceeding as a precaution.

•Your Galaxy S6 Edge should be on an official firmware by Samsung, not a custom ROM.

•Your phone should be on XXU3DPDP Android 6.0.1 firmware.


*Disclaimer:

Android Custom ROM fix ® provide various Firmware Updates and Rooting process along with Custom ROM,Modes,file are all belong  to their owners/developers. The autor of this site or the developers are not responsible,  if you damage or brick your device.Do it on your own risk and follow the instruction properly.

* Important:

Backup important files stored on your device before proceeding with the steps below, so that in case something goes wrong you’ll have backup of all your important files.


÷ How to Root Galaxy S6 Edge G925F on Android 6.0.1 on XXU3DPDP Update.

Step 1 – Download CF-Auto-Root Android 6.0.1 Package for Samsung Galaxy S6 Edge LTE to your computer and extract the zip file.

Step 2 – Download ODIN v3.09 which will help you to root Android 6.0.1 on Samsung Samsung Galaxy S6 Edge LTE G925F.

Step 3 – Switch OFF your phone. Now go to Download Mode. How? Press and hold the Volume Down + Home buttons together, and then press the Power button till you see the construction Android robot and a triangle. Press Power again to confirm to enter into Download Mode.

Step 4 – Make sure you have your Samsung Galaxy S6 Edge LTE USB drivers installed on your computer.

Step 5 – Open ODIN on your computer. Connect your phone to your computer while your phone is in the Download Mode.

Step 6 – If your phone is connected successfully, one of the ID:COM boxes will turn yellow with the COM port number. This step might take some time.

Step 7 – Now select the file that you have to flash/install on your phone. This file will be found from the extracted file in Step 1.

Click on ‘PDA’ / ‘AP’ and select the file ‘CF-Auto-Root-zerolte-zeroltexx-smg925f.tar.md5‘.
Step 8 – In ODIN, check the Auto Reboot and F. Reset Time options, if not already.

Step 9 – Now click on the Start button in ODIN. Installation process will start and would take a few minutes to complete.

Step 10 – After the installation is completed, your phone will reboot into Recovery Mode automatically and install the root package / files. Your ID:COM box will also turn green.

Step 11 – After you see the home screen, unplug your phone from the computer.


That’s it! Your Samsung Galaxy S6 Edge has now been rooted on Android 6.0.1 official software update. Check for the SuperSU app in your apps list to verify.

Like this post? PLZ Hit the share buttons below to share this article with your friends on Facebook, Google + and Twitter.

PLZ Follow Us On Flipboard 4 More Latest Updates.

PLZ Use the comment box below to contribute more ideas & Suggestions .

Best Regards


Get

Read more »

How To Root Asus Zenfone 4 Without PC

Root/unroot in Asus Zenfone 4 without pc. On this occasion I will post the easy way to root the smartphone Asus Zenfone 4 with RootZenFone software. This application can make the Asus Zenfone 4 to root without a PC.
But keep in mind that the root can be smartphone you suffered damage, and therefore we are not responsible on any damage. This method has been tested on Asus Zenfone 4 A450CG and A400CG with OS Android Jelly bean.

Steps root Asus Zenfone 4 Jelly Bean.

1. Download RootZenFone-1.4.4r.apk or here
2. Before using this application,  Turn off Wifi and Simcard 1 & 2
3. Install and open the application, and hit the "OK" button.


4. Choose "SuperSU (by Chainfire)"


5. Press "OK I know, please root!"
6. Wait until the process is complete. then Reboot your Android.

Applications RootZenFone-1.4.4r this apk, not tested on Asus Zenfone 4 Kitkat, then you can try it yourself. If the process fails, try using the latest applications of RootZenFone is version 1.4.6.

Download Link1 or Link2

Get

Read more »

How To Samsung J500F Update Root File 100 Working

How To Root File Samsung Galaxy J500F 100% Tested File Download Now.Samsung Galaxy J500F Latest Root File without Password.Samsung J500F New Root File Full Free Download Now.Samsung J500F Official Root File 100% Tested File Download Now.Samsung Galaxy J500F Download Root.Samsung Galaxy J500F download certificates.Samsung Galaxy J500F Root phone download.Samsung Galaxy J500F root software.Samsung J500F rooting software.Samsung Galaxy J500F certificate authority.Samsung Galaxy J500F root free download.Samsung Galaxy J500F Update Root File Full Free


Download Link

File Free


Samsung Galaxy J500F Latest Root File 100% Tested.Samsung Galaxy J500F Root File 100% working File Download.Samsung Galaxy J500F New Root File Download.Samsung Galaxy J500F Root File Download.


Enjoy..........................

Get

Read more »

Monday, July 25, 2016

How To Calibrate Android Device Battery Stats Root No Root

What this procedure achieves is to rest the battery stats file so your battery should now be calibrated.
Battery problems are among the biggest concerns for smartphone users, which is why we offer so many useful tips for solving battery drain issues. If you notice that your battery performance and duration has decreased, it could be time to calibrate your battery. Today well explain what battery calibration is, how to tell if you need to do it and how to do it, with or without root access. 

The Android operating system has a feature called Battery Stats, which keeps track of battery capacity, when it is full or empty. The problem is that it sometimes becomes corrupted and starts displaying data that isn’t real, which, for example, causes the phone to turn off before it reaches 0 percent. Calibrating your Android battery simply means getting the Android OS to correct this information so it is reflective of your actual battery levels once again. 


How to calibrate an Android device battery without root access

The old fully charge and discharge approach stands as one of the simplest ways to recalibrate your Android battery. Weve warned you in the past about low voltage problems in lithium batteries and the negative impacts of fully draining a battery on its lifespan and the same holds true here. But if your phone battery is causing you real problems, its worth taking the risk.

Just follow the steps below:


  • Let your phone discharge until it goes off due to low battery.


  • Charger your battery until it reach 100%. Do not turn on your device while charging!.

  • Unplug your charger and turn your phone on.

  • Leave it lying for 30 minutes then charge it again for an hour. Dont use your device while it is plugged in.

  • Unplug your device and use normally until the battery is completely drained again.

  • Then charge it to 100% again.

How to calibrate Android device battery with root access

Even though Im not convinced that clearing the batterystats.bin file has any meaningful effect on how the Android system reports remaining battery charge, there are those who swear by this method.

So in the interests of fairness, weve included the process for you here (it is true that different manufacturers use the batterystats.bin file for different things). Its basically the same process as above but with the added step of a root-enabled app.

1. Discharge your phone fully until it turns itself off.

2. Turn it on and let it turn off again.

3. Plug your phone into a charger and, without turning it on, let it charge until the on-screen or LED indicator says 100 percent.

4. Unplug your charger.

5. Turn your phone on. Its likely that the battery indicator wont say 100 percent, so plug the charger back in (leave your phone on) and continue charging until it says 100 percent on the screen as well.

6. Unplug your phone and restart it. If it doesnt say 100 percent, plug the charger back in until it says 100 percent on screen.

7. You want to repeat this cycle until it says 100 percent (or as close as you think its going to get) when you start it up without being plugged in.

8. Now, install the Battery Calibration app and, before you launch it, make sure your battery is at 100 percent again, then restart.

https://play.google.com/store/apps/details?id=com.nema.batterycalibration&referrer=utm_source%3DAndroidPIT%26utm_medium%3DAndroidPIT%26utm_campaign%3DAndroidPIT


9. Immediately launch the app and recalibrate your battery.

10. Once youve calibrated your battery, discharge it all the way down to 0 percent and let your phone turn off again.

11. Fully charge the battery one more time without interruption while its switched off, and the Android systems battery percentage will be reset.


Remember that it is not recommended to perform this process all the time. Even when your battery is so dead your phone wont even turn on, your battery still has enough reserve charge to avoid system damage. But you dont want to poke the tiger with a stick. Perform this process once every three months at the most. If it is required more often than that you have bigger problems at hand.

Smartphone battery myths

Lithium-ion batteries dont have a memory so theres not much you need to do to keep them running as they should. The problem lies with how the Android system reads and displays the current capacity of the battery, not the battery itself.

The same goes for the myth that deleting the batterystats.bin file will magically recalibrate your battery. That file (on most devices anyway) simply stores data about what is using the battery when it is not being charged. It is also reset every time a battery is charged to over 80 percent and then disconnected.

The batterystats.bin file contains the info you see made prettier in the Battery section of your phone: its the Android system keeping track of your batterys usage, per charge cycle. When we talk about battery calibration, its the percentage meter that gets out of whack, and that is what we need to fix.


Conclusion:
Put plainly: fully discharging a battery is bad for it. Trying to overload a battery is also bad for it. The good news is that charging batteries automatically shut off when their safe limit is reached and theres always a little in reserve even if your phone wont start. But again: do this only when really necessary, because it does have a negative impact on battery life.


Get

Read more »

Sunday, July 24, 2016

How to Root ASUS ZenFone 2 Laser ZE500KL Marshmallow


Today ASUS Zenfone Blog will teach you how to root ASUS Zenfone 2 Laser ZE550KL. Atention, only for for ZE500KL. DWYOR (Do it with your own risks). Thanks to gavrilla from 4pda.ru.

How to Root ASUS ZenFone 2 Laser ZE500KL (Android Marshmallow):

  1. Install TWRP Recovery (Tutorial)
  2. Download Patched boot boot_13.10.6.16_patch.img (Download)
  3. Enter fastboot by turn off device and press power+volume up
  4. Open cmd and type:
  5. fastboot boot boot_13.10.6.16_patch.img
  6. Download SuperSU.zip (Download) and copy to SD card
  7. Enter TWRP recovery and flash superSU.zip via recovery

Get

Read more »

Saturday, July 23, 2016

How to Root Tecno W4 All Firmwares

This tutorial gives detail insights on how to root Tecno W4. To root Tecno W4, you need to use a slightly different approach since it is shipped with android 6.0 Marshmallow.

android root

Here, you have all the tools and files needed to root your Tecno W4, meanwhile, you should make a complete backup of your ROM and other important files before you proceed.
Disclaimer:
OlassTech, TeamWIN Recovery or any other parties relating to the development of the Recovery.img and other files that are used in this tutorial are not responsible for your actions, thus; if your device is damaged, got bricked or any other loss you may suffer as a result of this upgrade. Upgrade at your own discretion and endeavor to follow the instructions for rooting your Tecno W4 carefully.

Since the method discussed here is a little lengthy, you might want to try the latest Kingroot version which can be download from here: All Kingroot Versions Download Link

Kingroot is a one-click root application for most android devices. Its procedures are simple. You only have to install the app and then, lunch it on the phone. Follow the on-screen commands from Kingroot until your phone is rooted.

In case Kingeoot fails to root your Tecno W4, you may follow the guides given below;

How to Root Tecno W4

If Kingroot could not root your Tecno W4 because of the firmware, your next available option is to flash SU Script via the recovery. I mean custom recovery.

Below here is the step by step guide on how to do that.

1. Download and Install VCOM drivers on your PC. See here: How to Install VCOM Drivers 
2. Download flashable SuperSU script zip from here.

3. Copy SuperSU.zip you have downloaded to the phone’s SD card or internal storage. Better yet, you may copy it on both storage.

4. Download and flash TWRP for Tecno W4 on your phone. See here: TWRP for Tecno W4.

5. Boot the phone into recovery mode by presaing Volume up + Power buttons.
 From TWRP, if you get a prompt asking you to swipe to allow TWRP modify the system partition then go ahead and swipe.

6. From TWRP recovery, tap Install then, Navigate to the location of the SuperSU.zip you downloaded and select it.
Swipe to confirm flashing of the SuperSU.zip and wait till flashing is complete.

7. Reboot your Tecno W4. Wait few seconds for the phone to initialize.
By now, SuperSU should be visible on your App Drawer and you can also confirm that your Tecno W4 is rooted using Root checker from the Play Store.

If this piece of info was useful to you, please share to help others.

Get

Read more »

How to root the cloudfone excite 350g and update custom cwm plus roms

How to root the cloudfone excite 350g and update custom cwm plus roms
Tools You Needed:
ROOTED PHONE
MOBILE UNCLE TOOLS
CWM RECOVERY
CLOUDFONE EXCITE 350g CUSTOM ROM
STEPS and PROCEDURE:
CLOUDFONE EXCITE 350g (USB) Cable
Software Unlockroot: Download HERE
STEP 1. Plug (usb) cable to connect your phone to PC
On the phone select Settings> Developer Options then enable USB        DEBBUGING.
STEP 2. Run-Unlockroot software after installation and wait for confirmation of detected devices.Select your device.
Click Root and wait 3 seconds, then confirm the root Cloudfone excite 350g
A notification will appear ask if you want to install Power Saver not, installation is also not installed okay, I select No.
Once rooting is done.Reboot your phone to finish the job, Choose Yes.
Wait 1-2 minutes and then the phone will restart and finish the root.
Check-in icon menu if Superuser appeared on your mobile, that mean your cloudfone excite 350g is rooted

Download Again this Tools Below: for cwm plus roms
Mobile uncle tools
Kem 350 CWM
KEM 350 MIUI ROM
KEM350 V16.2
Update 10-8-13
C17 rom 
JB9 rom
Now copy or move KEM350 CWM recovery.img and as well as custom rom to sdcard.
Step 1. Installing CWM recovery
Install mobile uncle tools
After installing app
Click open
Hit the get started button
Select flashing recovery from  sd card and
Select KEM350 CWM recovery.img and click ok
Boot into recovery and done!
Now you have CWM recovery installed
Step2. Flashing custom roms
Turn off your phone
Hold power button+volume up to enter the recovery mode.
Note:
search / power button is select button
Volume up and down is scroll
menu and back is also scroll
back button is back

Now you have entered the recovery, First you must wipe data/factory reset, Then wipe cache partition.done
Choose apply update from sdcard
Then locate the rom you want to install(.zip file extn name)
Select Yes
After flashing rom select reboot system now.
Note:
Default language is vietnamesse but you can change in systemsettings-language and input.use english as default.

Get

Read more »

How To Root Install CWM Recovery On Lenovo A6000 Plus

We had talked about how to Root and Install Custom Rom/Stock Rom On lenovo A536,This Time I Am Sharing With You To Root And Install Cwm Recovery On Lenovo A6000 Or A6000 Plus. Lenovo A6000 Plus Has Good Configuration Smartphone. This Device Comes With 2 GB RAM And 16 GB Internal Memory That Is Good. Internal Specification And Sufficient Battery Life. Lenovo A6000 Plus Based On Android KitKat 4.4.4 And Lenovo’s Custom UI. We Have Found Out How To Root Lenovo A6000 Plus Without PC.
If You Have Purchased This Smartphone And Looking For A Way ToRoot The Device, So That You Can Install Custom ROM Firmware’s Of Your Choice, Or Upgrade The Android Version In The Device To Android Lollipop, Or Remove The Unwanted Pre-Installed Apps In Your Device, Then You Are In The Right Place. Here, I Have Given A Step By Step Tutorial To Root Lenovo A600 And Install CWM Recovery In It.

Pre-Requsite To Root Lenovo A6000/Plus:

  • Download Lenovo A6000/Plus USB Drivers And Install It In Your Computer. Only By Doing This, You Will Be Able To Connect Your Smartphone With The Computer.
  • Lenovo A6000/Plus Should Have More Than 80% Of Battery In It. If Not Please Charge And Then Try.
  • Create Backup Of Your Device Before You Start The Rooting Process.
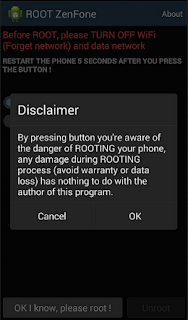
  • Installation Via Unknown Sources Should Be Enabled On Your Device. To Enable It Go To Settings > Security > Tick Unknown Sources.

Downloads:

  1. Download | Rooting
  2. Download | Minimal ADB And Fastboot
  3. Download | Recovery.Img

Method To Install CWM Recovery On Lenovo A6000/Plus:

  • Connect Lenovo A6000/Plus To The Computer Using The Original USB Data Cable.
  • Now Go To The Folder Where The Minimal ADB And Fastboot Program Is Installed (C:Program Files (X86)Minimal ADB And Fastboot).
  • Hold Shift And Right-Click On An Empty Space And Select “Open Command Window Here” Option. A Command Window Will Open Up.
  • Now, Enter The Following Command To Check Whether Your Device Is Recognized By The Computer:
ADB DEVICES
If You See A Device ID, Then Your Device Is Connected Successfully.
  • Now, Enter The Following Command To Boot Into Your Device Bootloader:
ADB REBOOT BOOTLOADER
  • Once You See Your Device Boot Into The Fastboot Mode, Enter The Following Command To Flash The CWM Recovery (Recovery.Img):
FASTBOOT FLASH RECOVERY RECOVERY.IMG
  • Once The Recovery Image Is Flashed, Enter The Following Command To Reboot:
FASTBOOT REBOOT
That’s It. Now You Have Successfully Finished Flashing CWM Recovery In Lenovo A6000. Once Your Device Reboots, Switch It Off And Press The Volume Down And Power Button Simultaneously To Boot Into The CWM Recovery Mode. Now, Let’s Find Out How To Root Lenovo A6000 Smartphone.

Time To Root Lenovo A6000/Plus:

  • Transfer The Rooting Kit To Your Lenovo A6000/Plus SD Card. After Successfully Transferring The File, Disconnect Your Smartphone From The Computer.
  • Now, Switch Off Your Lenovo A6000/Plus And Press The Volume Down And Power Button Simultaneously To Boot Into The CWM Recovery Mode.
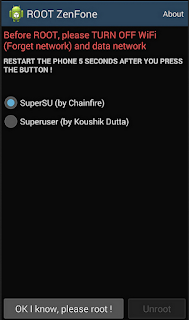
  • Once You Are In The CWM Recovery Mode, Select “Install Zip From SD Card” And Choose The Rooting Kit (Root-SuperSU-V2.37.Zip). This Will Start The Flashing Process.
  • Now You Have Successfully Rooted Lenovo A6000/Plus Android Device. To Confirm The Rooting Process, Go To Your Apps Menu And Look For SuperSU App. If It Is Located There.


Get

Read more »

How to root Lenovo A269i android

Tools needed Volcano Box, a third party tools you can check out there site HERE. how to root your Lenovo A269i, you can follow the arrow red picture below. or you can check the help manual on software tab area.
(note) after root is done phone rebooting on lenovo welcome logo. just removed the battery and put it again and turn your phone. with the root is done.


Get

Read more »

Friday, July 22, 2016

How to Root HTC 10 Easily on Marshmallow 6 0 1


SuperSU is one of our favourite rooting package as it comes with all the binaries needed to gain root access on your HTC 10 Android phone. Even the SuperSU app has more features than SuperUser. Other than this rooting tutorial, you might also want to install a custom recovery for installing custom ROMs on your phone.


Don’t worry we are going to share step by step guide to safely How to Root your HTC 10 Easily on Marshmallow 6.0.1.

View my Flipboard Magazine.


 ÷ Prerequisites:

• HTC 10 bootloader should be unlocked.

•TWRP Recovery should already be installed on your HTC 10.

•As mentioned previously, all firmwares are supported.

•Make a Nandroid backup of your previous phone set up before proceeding – for just in case anything goes wrong.


*Disclaimer:

Android Custom ROM fix ® provide various Firmware Updates and Rooting process along with Custom ROM,Modes,file are all belong  to their owners/developers. The autor of this site or the developers are not responsible,  if you damage or brick your device.Do it on your own risk and follow the instruction properly.

* Important:

Backup important files stored on your device before proceeding with the steps below, so that in case something goes wrong you’ll have backup of all your important files.


÷ How to Root HTC 10 Easily on Marshmallow 6.0.1:

Step 1 – Download SuperSU v2.74 (BETA-SuperSU-v2.74-2-20160519174328.zip) for HTC 10 on your PC.

Step 2 – Connect and mount your HTC 10 USB memory on your computer using the USB cable.

Step 3 – Now copy/paste the BETA-SuperSU-v2.74-2-20160519174328.zip file to your SD card. Make sure the file is in the SD card root (not in any folder).

Step 4 – Enter TWRP Custom recovery by typing the following command. (Phone should be connected and USB debugging enabled.)

adb reboot recovery.

Step 5 – In TWRP recovery, scroll down to “flash zip from SD card” and press the power button to select it.

Step 6 – Press the Power button again and select “choose zip from sdcard”.

Step 7 – Now using your volume keys, navigate to BETA-SuperSU-v2.74-2-20160519174328.zip and select it using the Power button. Confirm the installation on the next screen and the installation procedure should start now.

Step 8 – After the installation completes, go to “+++++Go Back” and reboot the phone by selecting “reboot system now” from the Recovery menu. The phone will boot now and it might take about 5 minutes to boot on your first time. So, please wait.


That’s it! Your HTC 10 is now rooted! Check for the SuperSU app in your apps list to verify.

For More HTC 10 Firmware & UpdatesKeep Checking AndroidCustomROM Fix ™®

Like this post? PLZ Hit the share buttons below to share this article with your friends on Facebook, Google + and Twitter.

PLZ Follow Us On Flipboard 4 More Latest Updates.

PLZ Use the comment box below to contribute more ideas & Suggestions .

Best Regards.


Get

Read more »

How To Root Any Samsung Android


Rooting android devices has become so common that if anyone thinks of getting an android device today, he would think of rooting it.

There are so many ways to gain root access on any android device but one method is safer to another and, not all the methods work with all android phones.

Worst still, you could brick your android device while trying to root the phone -the reason why you should consider using the safest method.
Here, we discuss the safest way to permanently root any Samsung android device. Even the latest 4.4.4 Samsung androids.

Rooting your Samsung Android Device

To begin with, please note that this method works ONLY with Samsung android devices that has any custom recovery flashed. Check here for the step by step guides on how to flash custom recovery on Samsung android devices.

If you have flashed custom recovery on your Samsung android device, you can proceed with the methods as given below;
1- Download the latest SuperUser.zip file.

2- Copy and paste the downloaded SuperUser.zip file on the root of either your SD Card or the phones mass storage.

3- Reboot the phone to recovery by either using command lines or using the right key combinations. How? Switch off the phone, now press the Home + Volume Up + Power buttons together at once for few seconds until the phone comes up, wait for like 3 seconds (by timing) then; release the keys. The phone should boot to recovery by itself.

4- In either CM, TWRP or 4ext, whichever custom recovery you use, just select Install ZIP from SD Card.

5- Navigate to the SuperUser.zip file you just download above and select it. Confirm to flash the file and wait few seconds for the process to complete.

6- Reboot the phone and begin enjoying the use of the rooted android device!
Feel free to share this post

Get

Read more »

Wednesday, July 20, 2016

How to Root Huawei Honor Holly

If you are here, you have definitely been looking for a way to root your Huawei Holly which is exactly what I discuss here.

I will keep this guide as brief, simple and understandable as possible. Just make sure you carefully follow the step by step guides given so that you may be able to root your Huawei Holly successfully.

Huawei Holly

How to Root Huawei Holly: Step by Step Guide

1. Download the root tools whose download link is given below.
    Huawei Holly Root Tools Download Link
In the file, I have contained all the tools needed to root your Huawei Holly.

2. Extract the downloaded file into a folder on your PC.

3. Now, install the app and drivers contained in the folder in the following sequence. [ Important! ]
    1. ADB Installer 1.4.2
    2. Handset_WinDriver_1.00.00.31
    3. DriverAutoInstaller_v1.1236.00
    4. iRoot 1.7.9.10454
4. Connect your Huawei Holly via a compatible USB cable to the PC and choose to connect as USB Storage.
NOTE:
    1. It is very important that you use a compatible USB CABLE. In my case, I used a factory-cable by Samsung before I could get it to work. You may use Huawei own cable or any other USB 3.0 cable.

    2. Do not mount as storage else your SD Card will become inaccessible and the root operation will fail.
5. Enable USB Debugging on the device.

6. Open the iRoot app and let it detect your phone. Make sure you have an active internet connection on the PC, so that it can download the drivers and install it automatically.

7. After that, the iRoot will install 3 Chinese apps on your phone. Do not do anything with it, let it complete on its own.

8. All things being equal, you will see the green Root button appear on your PC. Click on it.

9. Make sure that your phone has enough battery charge to complete the rooting operation and that you have reliable power supply on your PC.
Any interruption after you click the Root button in iRoot can make your phone unusable. So take huge precautions during the process. (Youve been warned now)

10. This may last a few minutes depending on the speed of your Internet connection. The phone will restart as soon as the process is complete. The progress bar is also displayed on iRoot.

11. On successful operation, iRoot will display the success notification and by now, your Huawei Holly is rooted.

iRoot Root Success Notification

Congratulations! Your Huawei Holly has now been successfully rooted.

Extra Steps:

1. Although, iRoot has installed its own Root Manager, you may decide to install SuperSU or Super User from Play Store and replace iRoot root manager with it.

2. If you wish to uninstall the Apps installed on your Huawei Holly by iRoot, you may do so by installing Root Cleaner on your phone and use it to uninstall those apps.

3. Remember to update your SU Binaries when you install SuperSU or Super User to better help you manage the root privilege on the phone.

If this piece of info was useful to you, please share to help others.

Get

Read more »