Friday, July 29, 2016
Guide Hard Reset Samsung Galaxy S7 EDGE To Restore Factory Setting Remove Forgot Pattern Password PIN
[Guide] Hard Reset Samsung Galaxy S7 EDGE To Restore Factory Setting & Remove Forgot Pattern/Password/PIN.
Most of Android user say that Hard reset process is call with master reset or factory reset. Many people asking why shoud we perform hard reset to our phone. The logical answer that can I say for this asking is :
- We will give our Samsung Galaxy S7 EDGE away to some one else, and we dont want that one know everything about our secret data, so we have to erase all data before back up it.
- We have forgotten on PIN or Patern Lock at Samsung Galaxy S7 EDGE.
- Samsung Galaxy S7 EDGE has a persistent problem that cannot be solved.
- Because we will sell our Samsung Galaxy S7 EDGE Android phones.
- Our Samsung Galaxy S7 EDGE has been lagging and stuck on android logo, this call with bootloop
- There are many bug on Samsung Galaxy S7 EDGE.
- We want to remove all personal data and setting that was stored in Samsung Galaxy S7 EDGE.device.
- and many other reason.
1st Methode. Hard Reset Samsung Galaxy S7 EDGE Using Menu :
- Make sure your batery is fully charged, Recomended you have 80% of battery capacity
- Then Backup your Samsung Galaxy S7 EDGE. See This Guide
- Go to menu: System Setting >
- Select Backup and Reset >
- Factory Data Reset >
- Reset Phone
- Choose Erase everything to confirm that you already to perform hard reset on Samsung Galaxy S7 EDGE
- Samsung Galaxy S7 EDGE will continue to hard reset process to restore factory default.
2ndMethode. Hard Reset Samsung Galaxy S7 EDGE Using Hardware Keys:
- Make sure your battery is fully charged, we recomended that your battery has 80% power
- Always BackUp your important data that store in Samsung Galaxy S7 EDGE. see this guide
- Turn Off your Samsung Galaxy S7 EDGE by hold and press Power Button for a second.
- Release any SIM card and SD card that was installed on your Samsung Galaxy S7 EDGE smartphone.
- Then press and hold together a combination button Volume Up + Home Button + Power button at same time for a seconds.

Hard Reset Samsung Galaxy S7 EDGE - Release Power Button, and keep holding volume up and home button for a few minute. Then release All button.

samsung galaxy S7 Edge - android logo - And now you will enter, Android System Recovery.
- Scroll down using Power Down button, and you can select "wipe data/factory reset" and confirm it using Power Button.
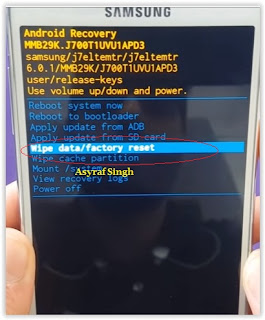
wipe data - Hard Reset - Then select "Yes". use volume down button to choice menu, and again confirm it using Power Button. Please be ware, on this this step you will be lost everything stored on your phone. So, make sure to always backup all data before performing hard reset.

- Now, wait the process untill you see data wipe complete appear on screen.

wipe data process - After a few minute hard reset process will finished, and your screen will be back to Android System recovery screen.
- Now, Select Reboot System Now to reboot your device.

Reboot System Now - You can wait a while for Samsung Galaxy S7 EDGE to reboot system
- Done, your hard reset process success now.


 |
| Android System Recovery |


Video Guide.

Guide Flash Update Firmware Samsung GALAXY S7 EDGE SM G935F Using ODIN v3 11 1
[Guide] Flash / Update Firmware Samsung GALAXY S7 EDGE SM-G935F Using ODIN v3.11.1.
This Samsung android device is released on 2016, March. and available on USA, Global and Southeast Asia. Samsung GALAXY S7 EDGE SM-G935F is the smartphone with 5,1 Inchi Super AMOLED capacitive touchscreen, 16M colors, work on Android OS, v6.0 (Marshmallow), with Quad-core 1.8 GHz CDual-core 2.15 GHz Kryo & dual-core 1.6 GHz Kryo CPU, Qualcomm MSM8996 Snapdragon 820 chipset, Adreno 530 GPU, combined with 4 GB of RAM and 12 MP of Main camera and 5 MP on secondary camera.
Initial Step To Flash Samsung GALAXY S7 EDGE SM-G935F
- Make sure your Samsung GALAXY S7 EDGE SM-G935F battery is not in a low battery state, a minimum of 80%. If the battery runs out in the middle of the Root, it can lead to failure
- Always perform backup your important data before flashing process, Cause this process will delete or erase the data in memory.
- Make sure you have installed a Latest of Driver Samsung that support with your Smartphone, If you dont have, please download here
- Original USB cable driver for your Samsung GALAXY S7 EDGE SM-G935F
- Download Samsung Smart Switch, Here
- Download Odin V3.11.1, Here
- Download Official firmware file for the model number of your device, download it from - SamMobile, or you can visit the other site, Here
Main Guide To Flash Samsung GALAXY S7 EDGE SM-G935F
- You must download all necessary file.(Samsung USB driver or Smart Switch and Odin)
- Then you must install all driver or samsung smart switch to your computer or PC.
- Extraxt Odin V3.11.1. file on the destination folder.
- To download Samsung firmware you must visit this link, you can download specific firmware file for your device model number. you must Log In with your registered account on this website.

sammobile website Log In - On the row menu at the top of page, you can select firmware.

sammobile website GALAXY S7 EDGE SM-G935F - Then you must enter in search bar with your phone model number.

Firmware Samsung GALAXY S7 EDGE SM-G935F - Then select your country/carrier.

select country or carrier for samsung firmware - Then you click on available country link.
- For Non-Premium member you can Select regular download.

sammobile download non premium member - And Donwload button again. Approximately file size is 1,9 GB
- Wait untill your file finish downloaded, after that you must extract all firmware file on specific folder on your computer.
- This is your file.

Flash Stock Firmware On Samsung GALAXY S7 EDGE SM-G935F - Switch Off your Samsung GALAXY S7 EDGE SM-G935F to start flashing process.
- Then, you must run Odin3 v3.11.1 by right click on Odin.exe and select Run as Administrator.

Flash Stock Firmware On Samsung GALAXY S7 EDGE SM-G935F - When program is running, now you can click AP, and navigate to the *.tar or *.tar.md5 firmware file.

Flash Stock Firmware On Samsung GALAXY S7 EDGE SM-G935F - Now your firmware file has been inserted in Odin3

Flash Stock Firmware On Samsung GALAXY S7 EDGE SM-G935F - Then, Enter download mode your Samsung GALAXY S7 EDGE SM-G935F by pressing and hold Volume Down Button + Home Button + Power Button. Hold and press all button untill your phone vibrate and LCD show menu.

download mode Samsung GALAXY S7 EDGE SM-G935F - And you will see picture like this on your LCD screen.
- On this mode, now you must connect your Samsung GALAXY S7 EDGE SM-G935F to your PC / laptop using a USB cable.
- After your phone connected, you will see a message appear that show your device added and there is info on the ID: COM at top left corner. Keep in mind for this COM vary depending on the PC / Laptop. Just Ignore all, in this picture you will see that your device is detected on (COM 5)
Port Com samsung GALAXY S7 EDGE SM-G935F - Make sure re-partition is NOT ticked
- When everything already you can click Start Button. at the bottom left corner
- Just wait for the process to run about 2-5 minutes, and make sure there is no interference in this process.
- When complete it will display a notification PASS and your smartphone Samsung GALAXY S7 EDGE SM-G935F will automatically restart.
- Wait your device to boot up, it will take a while.
- When your Samsung GALAXY S7 EDGE SM-G935F is ready to use, you can check your firmware update version by dial *#1234# on dial pad.

dial pad samsung GALAXY S7 EDGE SM-G935F - And you will see your new firmware version.

firmware version samsung GALAXY S7 EDGE SM-G935F - Finish.


 |
| Download Mode GALAXY S7 EDGE SM-G935F |


Never disconnect the USB cable while flashing process is running.
Install Samsung Mobile Driver or Samsung Smart Switch if you dont see a sign in Odin.
Flash your Samsung GALAXY S7 EDGE SM-G935F device at your own risk.
Flashing firmwares which contains more than one *.tar.md5 file will wipe all data on internal storage. Flashing official/stock firmware wont increase the binary flash nor KNOX WARRANTY VOID counter and wont cancel the Samsung GALAXY S7 EDGE SM-G935F devices warranty.
Tuesday, July 26, 2016
Guide Flash Update Firmware Samsung GALAXY S7 SM G930F Using ODIN v3 11 1
[Guide] Flash / Update Firmware Samsung GALAXY S7 SM-G930F Using ODIN v3.11.1.
This Samsung android device is released on 2016, February. and available on USA, Global and Southeast Asia. Samsung GALAXY S7 SM-G930F is the smartphone with 5,1 Inchi Super AMOLED capacitive touchscreen, 16M colors, work on Android OS, v6.0 (Marshmallow), with Quad-core 1.8 GHz CDual-core 2.15 GHz Kryo & dual-core 1.6 GHz Kryo CPU, Qualcomm MSM8996 Snapdragon 820 chipset, Adreno 530 GPU, combined with 4 GB of RAM and 12 MP of Main camera and 5 MP on secondary camera.
Initial Step To Flash Samsung GALAXY S7 SM-G930F
- Make sure your Samsung GALAXY S7 SM-G930F battery is not in a low battery state, a minimum of 80%. If the battery runs out in the middle of the Root, it can lead to failure
- Always perform backup your important data before flashing process, Cause this process will delete or erase the data in memory.
- Make sure you have installed a Latest of Driver Samsung that support with your Smartphone, If you dont have, please download here
- Original USB cable driver for your Samsung GALAXY S7 SM-G930F
- Download Samsung Smart Switch, Here
- Download Odin V3.11.1, Here
- Download Official firmware file for the model number of your device, download it from - SamMobile, or you can visit the other site, Here
Main Guide To Flash Samsung GALAXY S7 SM-G930F
- You must download all necessary file.(Samsung USB driver or Smart Switch and Odin)
- Then you must install all driver or samsung smart switch to your computer or PC.
- Extraxt Odin V3.11.1. file on the destination folder.
- To download Samsung firmware you must visit this link, you can download specific firmware file for your device model number. you must Log In with your registered account on this website.
sammobile website Log In - On the row menu at the top of page, you can select firmware.
sammobile website GALAXY S7 SM-G930F - Then you must enter in search bar with your phone model number.

Firmware Samsung GALAXY S7 SM-G930F - Then select your country/carrier.

select country or carrier for samsung firmware - Then you click on available country link.
- For Non-Premium member you can Select regular download.

sammobile download non premium member - And Donwload button again. Approximately file size is 1,5 GB
- Wait untill your file finish downloaded, after that you must extract all firmware file on specific folder on your computer.
- This is your file.
Flash Stock Firmware On Samsung GALAXY S7 SM-G930F - Switch Off your Samsung GALAXY S7 SM-G930F to start flashing process.
- Then, you must run Odin3 v3.11.1 by right click on Odin.exe and select Run as Administrator.
Flash Stock Firmware On Samsung GALAXY S7 SM-G930F - When program is running, now you can click AP, and navigate to the *.tar or *.tar.md5 firmware file.
Flash Stock Firmware On Samsung GALAXY S7 SM-G930F - Now your firmware file has been inserted in Odin3
Flash Stock Firmware On Samsung GALAXY S7 SM-G930F - Then, Enter download mode your Samsung GALAXY S7 SM-G930F by pressing and hold Volume Down Button + Home Button + Power Button. Hold and press all button untill your phone vibrate and LCD show menu.
download mode Samsung GALAXY S7 SM-G930F - And you will see picture like this on your LCD screen.
- On this mode, now you must connect your Samsung GALAXY S7 SM-G930F to your PC / laptop using a USB cable.
- After your phone connected, you will see a message appear that show your device added and there is info on the ID: COM at top left corner. Keep in mind for this COM vary depending on the PC / Laptop. Just Ignore all, in this picture you will see that your device is detected on (COM 5)
Port Com samsung GALAXY S7 SM-G930F - Make sure re-partition is NOT ticked
- When everything already you can click Start Button. at the bottom left corner
- Just wait for the process to run about 2-5 minutes, and make sure there is no interference in this process.
- When complete it will display a notification PASS and your smartphone Samsung GALAXY S7 SM-G930F will automatically restart.
- Wait your device to boot up, it will take a while.
- When your Samsung GALAXY S7 SM-G930F is ready to use, you can check your firmware update version by dial *#1234# on dial pad.
dial pad samsung GALAXY S7 SM-G930F - And you will see your new firmware version.
firmware version samsung GALAXY S7 SM-G930F - Finish.


|
| Download Mode GALAXY S7 SM-G930F |
Never disconnect the USB cable while flashing process is running.
Install Samsung Mobile Driver or Samsung Smart Switch if you dont see a sign in Odin.
Flash your Samsung GALAXY S7 SM-G930F device at your own risk.
Flashing firmwares which contains more than one *.tar.md5 file will wipe all data on internal storage. Flashing official/stock firmware wont increase the binary flash nor KNOX WARRANTY VOID counter and wont cancel the Samsung GALAXY S7 SM-G930F devices warranty.
Monday, July 25, 2016
Guide Hard Reset Samsung Galaxy S7 To Restore Factory Setting Remove Forgot Pattern PIN Password
[Guide] Hard Reset Samsung Galaxy S7 To Restore Factory Setting & Remove Forgot Pattern/PIN/Password.
Most of Android user say that Hard reset process is call with master reset or factory reset. Many people asking why shoud we perform hard reset to our phone. The logical answer that can I say for this asking is :
- We have forgotten on PIN or Patern Lock at Samsung Galaxy S7.
- We want to remove all personal data and setting that was stored in Samsung Galaxy S7.device.
- Samsung Galaxy S7 has a persistent problem that cannot be solved.
- Because we will sell our Samsung Galaxy S7 Android phones.
- Our Samsung Galaxy S7 has been lagging and stuck on android logo, this call with bootloop
- There are many bug on Samsung Galaxy S7.
- We will give our Samsung Galaxy S7 away to some one else, and we dont want that one know everything about our secret data, so we have to erase all data before back up it.
- and many other reason.
1st Methode. Hard Reset Samsung Galaxy S7 Using Menu :
- Make sure your batery is fully charged, Recomended you have 80% of battery capacity
- Then Backup your Samsung Galaxy S7. See This Guide
- Go to menu: System Setting >
- Select Backup and Reset >
- Factory Data Reset >
- Reset Phone
- Choose Erase everything to confirm that you already to perform hard reset on Samsung Galaxy S7
- Samsung Galaxy S7 will continue to hard reset process to restore factory default.
2ndMethode. Hard Reset Samsung Galaxy S7 Using Hardware Keys:
- Make sure your battery is fully charged, we recomended that your battery has 80% power
- Always BackUp your important data that store in Samsung Galaxy S7. see this guide
- Turn Off your Samsung Galaxy S7 by hold and press Power Button for a second.
- Release any SIM card and SD card that was installed on your Samsung Galaxy S7 smartphone.
- Then press and hold together a combination button Volume Up + Home Button + Power button at same time for a seconds.
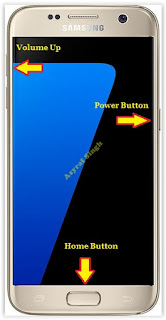
Hard Reset Samsung Galaxy S7 - Release Power Button, and keep holding volume up and home button for a few minute. Then release All button.

samsung galaxy s7 - android logo - Then you will see picture like shown on image below.
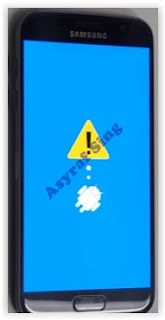
logo samsung galaxy s7 - And now you will enter, Android System Recovery.
- Scroll down using Power Down button, and you can select "wipe data/factory reset" and confirm it using Power Button.
wipe data - Hard Reset - Then select "Yes". use volume down button to choice menu, and again confirm it using Power Button. Please be ware, on this this step you will be lost everything stored on your phone. So, make sure to always backup all data before performing hard reset.
- Now, wait the process untill you see data wipe complete appear on screen.
wipe data process - After a few minute hard reset process will finished, and your screen will be back to Android System recovery screen.
- Now, Select Reboot System Now to reboot your device.
Reboot System Now - You can wait a while for Samsung Galaxy S7 to reboot system
- Done, your hard reset process success now.


|
| Android System Recovery |
Video Guide.
How to Install Android 6 0 1 Marshmallow Yoyo ROM on Galaxy Note 3 LTE N9005 Full Galaxy S7 Edge Features
Samsung Galaxy Note 3 LTE N9005 Yoyo custom ROM comes with tons of new features and is based on Android 6.0.1 Marshmallow. A quick list of the main features in Yoyo is given below and we are sure you’d love to use this on your Galaxy Note 3 LTE N9005:

base on Galaxy S7 edge G935FXXU1APD3
rooted / deodexed / zipaligned / busybox / deknoxed
multi languages
android 6.0.1
full Galaxy S7 edge features
full Galaxy Note5 features..
÷ Prerequisites:
•This tutorial is only for installing Yoyo Android 6.0.1 ROM on Samsung Galaxy Note 3 LTE N9005. Please do not try on any other Galaxy Note 3 variants.
•Your phone should be rooted and have ClockworkMod recovery installed from before.
This tutorial will wipe out all your data. Proceed at your own risk.
•Perform a Dalvik Cache wipe before proceeding from the recovery mode.
•Samsung KIES will NOT detect your phone after installing this ROM because it is a custom firmware.
•Make sure you backup all your data in your phone before proceeding.
*Disclaimer:
Android Custom ROM fix ® provide various Firmware Updates and Rooting process along with Custom ROM,Modes,file are all belong to their owners/developers. The autor of this site or the developers are not responsible, if you damage or brick your device.Do it on your own risk and follow the instruction properly.
* Important:
Backup important files stored on your device before proceeding with the steps below, so that in case something goes wrong you’ll have backup of all your important files.

÷ How to Install Android 6.0.1 Marshmallow Yoyo ROM on Galaxy Note 3 LTE N9005 [ Full Galaxy S7 Edge Features].
Step 1 – Download Yoyo Android 6.0.1 ROM for Galaxy Note 3 to your computer.
Step 2 – Connect and mount your Galaxy Note 3 USB memory on your computer using the USB cable.
Step 3 – Now copy/paste the downloaded Android 6.0.1 ROM zip file to your SD card. Make sure the file is in the SD card root (not in any folder).
Step 4 – Then turn OFF your phone and disconnect from the USB cable.
Step 5 – Now to get in the Recovery Mode. Switch ON the phone while pressing and holding Volume Up + Home + Power buttons together.
Step 6 – Once you are in ClockworkMod Recovery, select perform a full data wipe by selecting “wipe data/factory reset” . Use the Power button to select everything while in the Recovery Mode.
Step 7 – Then, perform a cache wipe by selecting “wipe cache partition”.
Step 8 – Now this is optional, but it is recommended to perform a wipe of your dalvik cache as well. You will not get into boot loops or any other errors. From CWM recovery, go to ‘advanced’ and then select “wipe dalvik cache”.
Step 9 – Then go back to the main recovery screen and select “install zip from SD card”.
Step 10 – Now select “choose zip from sdcard”. Using your volume keys, navigate to the Android 6.0.1 ROM zip file that you copied to your SD card and select it using the Power button. Confirm the installation on the next screen and the installation procedure should start now.
Step 11 – After the installation completes, go to “+++++Go Back+++++” and reboot the phone by selecting “reboot system now” from the recovery menu .

Your Galaxy Note 3 LTE N9005 will boot now and it might take about 5 minutes to boot on your first time. So, please wait.
That’s it! Your Galaxy Note 3 should now have Yoyo Android 6.0.1 Marshmallow custom ROM installed on your phone! Go to Settings > About phone to verify.
For More Samsung Galaxy Note 3 LTE N9005 keep checking AndroidCustomROM Fix™®
Like this post? PLZ Hit the share buttons below to share this article with your friends on Facebook, Google + and Twitter.
PLZ Follow Us On Flipboard 4 More Latest Updates.
PLZ Use the comment box below to contribute more ideas & Suggestions .
Best Regards.
Wednesday, July 20, 2016
Galaxy S7 Akan Menggunakan Chipset Exynos 8890 Dengan Resolusi 4K
Setelah sebelumnya samsung secara resmi mengumumkan chipset Newnya, kali ini tersiar kabar jika chipset Exynos 8890 akan digunakan pada flangship andalan mereka yakni Galaxy S7.
Seperti diketahui pada Exynos 8890 membawa peningkatan dari generasi sebelumnya Exynos 7420, seperti arsitektur baru dengan peningkatan mencapai 30%, selain itu chipset Exynos 8890 juga dilengkapi dengan GPU mali-T880 dengan support 4K yang menjanjikan tampilan display lebih memukau.
Pada handset Galaxy S7 juga dipastikan memiliki kualitas layar dengan resolusi 4K, seperti halnya Sony Xperia Z5 premium, Nantinya galaxy S7 akan memiliki beberapa versi layaknya Galaxy S6, pada beberapa negara juga dikabarkan akan menggunakan chipset yang berbeda seperti pasar Amerika Galaxy S7 akan menggunakan Chipset snapdragon 820.

How to Root Galaxy S7 Edge SM G935F On XXU1APE9 Update

Don’t worry we are going to share step by step guide to safely Root your Samsung Galaxy S7 Edge SM-G935F On XXU1APE9 Marshmallow 6.0.1 Update:
÷ Prerequisites:
•This root method tutorial is only for Samsung Galaxy S7 Edge SM-G935F. Please do not try on any other Galaxy S7 Edge LTE variants.
•Make sure you backup all your data in your phone before proceeding as a precaution.
•Your Galaxy S7 Edge should be on an official firmware by Samsung, not a custom ROM.
•Your phone should be on XXU1APE9 Android 6.0.1 firmware.
*Disclaimer:
Android Custom ROM fix ® provide various Firmware Updates and Rooting process along with Custom ROM,Modes,file are all belong to their owners/developers. The autor of this site or the developers are not responsible, if you damage or brick your device.Do it on your own risk and follow the instruction properly.
* Important:
Backup important files stored on your device before proceeding with the steps below, so that in case something goes wrong you’ll have backup of all your important files.

÷ How to Root Galaxy S7 Edge SM-G935F On XXU1APE9 Update:
Step 1 – Download CF-Auto-Root Android 6.0.1 Package for Samsung Galaxy S7 Edge to your computer and extract the zip file.
Step 2 – Download ODIN v3.09 which will help you to root Android 6.0.1 on Samsung Galaxy S7 Edge G935F.
Step 3 – Switch OFF your phone. Now go to Download Mode. How? Press and hold the Volume Down + Home buttons together, and then press the Power button till you see the construction Android robot and a triangle. Press Power again to confirm to enter into Download Mode.
Step 4 – Make sure you have your Samsung Galaxy S7 Edge USB drivers installed on your computer.
Step 5 – Open ODIN on your computer. Connect your phone to your computer while your phone is in the Download Mode.
Step 6 – If your phone is connected successfully, one of the ID:COM boxes will turn yellow with the COM port number. This step might take some time.
Step 7 – Now select the file that you have to flash/install on your phone. This file will be found from the extracted file in Step 1.
Click on ‘AP’ and select the file CF-Auto-Root-hero2lte-hero2ltexx-smg935f.zip
Step 8 – In ODIN, check the Auto Reboot and F. Reset Time options, if not already.
Step 9 – Now click on the Start button in ODIN. Installation process will start and would take a few minutes to complete.

Step 10 – After the installation is completed, your phone will reboot into Recovery Mode automatically and install the root package / files. Your ID:COM box will also turn green.
Step 11 – After you see the home screen, unplug your phone from the computer.
Step 11 – Pull out the battery to turn OFF the phone forcefully.
Step 12 – Now boot (turn ON your phone) with Volume Up + Home + Power buttons to go directly into Recovery Mode manually. This will start the install process of rooting your phone.
That’s it. Your Galaxy S7 Edge has now been rooted on Android 6.0.1 Marshmallow with CF-Auto-Root package. Check for the SuperSU app in your apps list to verify.
For More Samsung Galaxy S7 Edge updates Keep Checking Android Custom ROM Fix ™®
Like this post? PLZ Hit the share buttons below to share this article with your friends on Facebook, Google + and Twitter.
PLZ Follow Us On Flipboard 4 More Latest Updates.
PLZ Use the comment box below to contribute more ideas & Suggestions .
Best Regards.