Showing posts with label from. Show all posts
Showing posts with label from. Show all posts
Friday, July 29, 2016
How To Transfer MTN Megabytes From One MTN Sim To Another
So many have been looking for a way to transfer their Mb but do not how to do it,This simple tutorial will show you how to transfer Megabytes from one Mtn line to another just like the way Airtel users normally transfer their own.
How Can I Transfer Megabytes To Another MTN line?
Make sure you have enough Megabytes on your MTN line if not you will get an error message.
 Dial *131*2# then choose ‘Register Data Service’. by click on Answer then Press 1, Once you choose that, a text will be sent to you that you have successfully registered on Mtn services and your default pin is ‘0000’. Just follow the instruction their and change your pin.
 - Click on Data Share
- Add Beneficiary
- Enter Beneficiaries Number
- Enter the amount of Megabytes you want to transfer.
That’s it. [?]
NOTE: Should in case you get an invalid pin in the process of doing this, try it again as it may be a temporary network problem.Hope this information helps?
If it works for you, dont forget to Comment here and remember to Click Share/Like buttons for the benefit of others.
If you enjoyed this post and wish to be informed whenever a new post is published, then make sure you Subscribe to our regular Email Updates!

Wednesday, July 27, 2016
How to Buy on AliExpress com from China to Nigeria
Are looking for a way to start buying and importing goods from China to Nigeria, Ghana and other African countries? Did you know that you can start importation of goods from China without leaving your room in Nigeria, Ghana and other African countries? Yes or No. Today i decide to show you how you can start buying and importing goods from china without any worry about your money.

For more than five years now this is what i use to import a lot of things and i make a lot of money with it. Aliexpress is my no. 1 choice when it comes to buying and importing goods from China. In this post i will show you show you buy and import goods from Aliexpress.com.
Aliexpress.com is an online shopping mall owned by Chinas top online marketplace Alibaba.com
On Aliexpress, you will find thousands of top Chinese exporters and suppliers selling millions of products at low wholesale prices. Product such as mobile phones, tablet PCs, laptops, clothes, shoes, watches, and more at wholesale prices whether you buy one item for personal use or you buy in bulk to retail in your country.
There are five things you need to have before you can start buying goods from Aliexpress
1.Money: You must have enough money in your bank account to pay for the product or products you wish to buy as well as the cost for shipping if needed.
2.Means of Payment: Having money in the bank is not enough, but you need to be able to make payment online. Aliexpress accept Naira MasterCard and Visa debit/credit cards no need to worry about PayPal and other payment methods that will suffer you. Other payment methods include Wire Transfer, Western Union and Web Money. So if you dont have Naira MasterCard and Visa debit/credit cards just go straight to your bank and apply for it.
3.Internet Access: AliExpress.com is an online shopping mall, so you need internet access to shop on the website. And you can even download aliexpress android app for quick access everywhere you go.
4.AliExpress Account: You must have account with aliexpress before you can place order, To Create an Account go to AliExpress.com to create your free account. You can also signup during an order.
5.Means for receiving your Order: When you order a product online it will be delivered to a physical address or the nearest post office. Make sure you give your correct contact address.
Now i assume you all have all the requirement i mention above, and we can proceed on How to buy product on Aliexpress.com.
How to buy product on Aliexpress.com
1.Search and Identify the product(s) you want to buy: You can use Aliexpress search to look for any item you want to buy, Aliexpress has over 15 million products on their website, so is hardly to search for something and saw no result found. If you dont have an idea of what to buy in your mind just visit the site and go through the product categories.

2.Identify a Good Supplier: AliExpress has a rating system for suppliers to help buyers identify sellers with good reputation. Each product has rating star with percentage on how buyers enjoy the product, and you should consider reading feedback from other people who have bought products from the seller.


3.Check Product Features and Specs: Checking product description is very important before you place order. On the product page, you will see the product details and photos of the product. You will also see the price and possible discounts as well as the shipping method and shipping cost. You can even contact the seller for more details about the product.

4.Placing Order: Now you can place your order for the product. If you have multiple of products to buy, click Add to Cart button on the product page of each product. After adding all products to the cart, you can then click on the Buy Now button and feel all your payment details as provided.

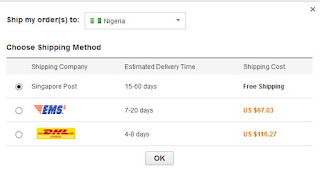
Note: Products ordered from different suppliers on AliExpress will be shipped separately hence separate shipping cost.
5.Track your Order: Tracking your Order if very important so that you will know the actual time you will receive your product. Now if your order was successful, the supplier will then make arrangement to ship the products. This can take from 1 to 5 days depending on the supplier. Once the supplier ships the product, a tracking number will appear under detail on the product you order on your Aliexpress account.

You can track your at 17track.net
6.Receive your Order: With the tracking details you will know when the products get into your city and the day you will receive you items. Mostly i you free shipping and it take 2 weeks before i receive my order and i collect my items through NIPOST. If you use services like DHL, EMS, or Fedex, the product will be delivered to your doorstep.
7.Confirm your Order: After receiving your order, you have to open the package check the product before you confirm the Order. Once you confirm your order the seller will now receive his payment from Escrow Company.


Click here to SUBSCRIBE to this Blog to Receive future updates..
Download DOCA Catalogue 2016 from here

Download DOCA Catalogue 2016 from here or from here.
Shenzhen Broad Science &Technology Co., Ltd. is a leading manufacturer and provider of rechargeable batteries and related products in China since2000 . It specialized in researching, developing, producing and selling rechargeable batteries for many years. We use advanced techniques and equipment for battery production and apply strict quality management. Its main products are Li-Ion, Li-Polymer batteries and chargers for Cellular phones, Video cameras, Digital cameras, PDA, Notebook,IPOD MP3, PSP/NDSL Game Console etc.
Shenzhen Broad Science &Technology Co., Ltd. possesses its own team of advanced management, engineer, technicians and professional marketing staff. We have over 500 skilled staffs in manufacturing, R&D, Quality control, marketing and service, which can help us to offer our customer with the best quality products at a good price, prompt delivery and excellent service.
Shenzhen Broad Science &Technology Co., Ltd. possesses its own team of advanced management, engineer, technicians and professional marketing staff. We have over 500 skilled staffs in manufacturing, R&D, Quality control, marketing and service, which can help us to offer our customer with the best quality products at a good price, prompt delivery and excellent service.
Shenzhen Broad Science &Technology Co., Ltd. possesses its own team of advanced management, engineer, technicians and professional marketing staff. We have over 500 skilled staffs in manufacturing, R&D, Quality control, marketing and service, which can help us to offer our customer with the best quality products at a good price, prompt delivery and excellent service.
Shenzhen Broad Science &Technology Co., Ltd. possesses its own team of advanced management, engineer, technicians and professional marketing staff. We have over 500 skilled staffs in manufacturing, R&D, Quality control, marketing and service, which can help us to offer our customer with the best quality products at a good price, prompt delivery and excellent service.
Some pictures from inside Doca factory.


Don’t miss any of our future video tutorials, follow us on Youtube. Like us on Facebook. Add us in your circles on Google+. Watch our photo albums on Flickr. Subscribe now to our newsletter.
Monday, July 25, 2016
Free 200MB Data Offer From OlassTECH
This is rocking fast and Hot.
Questions goes like this;
Note: First 100 Likes/Shares will benefit from this offer...Redeem yours now.Questions goes like this;
- How do I activate my own.
- Drop the number you want to use and Include the make of your phone.{e.g 08106847913, Tecno H6} Be accurate with the make of your phone as each setting and hacks for each phone differs.
- How can we reach you{eg 2go username, phone Number, Email Address, just drop any Info
- Also, Like/Share our Facebook page to enjoy this offer.
Sunday, July 24, 2016
First Run of Cube iWork10 Flagship tablet Download Windows 10 drivers from here

You can buy Cube iWork10 Flagship tablet from Gearbest.com for only 167.39 USD with free shipping world wide.
Cube iWork10 Flagship tablet came with Windows 10 Pro 64bit edition version 1511, build 10586.318. This version is activated and everything is just ok. All the drivers are correctly installed and untill now everything runs just great. On the first run, there were 25.4 GB free on C: partition, from 41.1 GB. The Intel Atom X5-Z8300 Cherry trail Processor is clocked at 1.44 GHz, according to Windows 10 OS.
Installed drivers for: Audio inputs and outputs, Batteries, Bluetooth, Computer, Disk drives, Display adapters, Firmware, Human Interface Devices, Imaging devices, Intel(R) Dynamic Platform and Thermal Framework, Keyboards, Monitors, Network adapters, Ports (COM & LPT), Print queues, Processors, SD host adapters, Security devices, Sensors, Software devices, Sound, video and game controllers, Storage controllers, System devices & Universal Serial Bus controllers.
You can download Cube iWork10 Flagship tablet Windows 10 Drivers from here, here or here. (166 MB) Use the provided Double Driver application (as Admin) to simply restore the missing drivers from your collection, just locate the extracted folder.
High resolution photo album here.


Don’t miss any of our future video tutorials, follow us on Youtube. Like us on Facebook. Add us in your circles on Google+. Watch our photo albums on Flickr. Subscribe now to our newsletter.
Saturday, July 23, 2016
Cheapest Android Smartphone from LG
Shocking news from LG. They provide the most inexpensive smartphone in the world, the LG Lucky LG16 only at 9,82 USD or around Rp134.000. Is it good?
Not bad actually. For that extrimely cheap price for a smartphone, you can get an Android 4.4 KitKat device complete with Wi-Fi and 3G conenctivity.
The screen size is rather small, only at 3,8 inch and only have 3MP main camera on the back. But that is not bad considering the price.
The bad part is, the device only sold at Walmart. One of the biggest retail store in the US. Not here. Damn! No wonder. To be that cheap, this model is sponsored by TracFone Wireless, a prepaid wireless service provider in the country.
Interested? Chek it out, here.
Read more »
 |
| walmart.com |
The screen size is rather small, only at 3,8 inch and only have 3MP main camera on the back. But that is not bad considering the price.
The bad part is, the device only sold at Walmart. One of the biggest retail store in the US. Not here. Damn! No wonder. To be that cheap, this model is sponsored by TracFone Wireless, a prepaid wireless service provider in the country.
Interested? Chek it out, here.
How to Recover Deleted or Lost Files from iPhone iPad and iPod Touch Using EaseUS MobiSaver
Did you mistakenly delete your files, especially pictures from your iPhone device? No worries! Ill walk you through a detailed step by step guide to recover them back easily with a software called EaseUs MobiSaver.
How I Recover My Files With EaseUs MobiSaver?
How I Recover My Files With EaseUs MobiSaver?
With EaseUS MobiSaver, you can easily recover deleted files on your iPhone, iPad and iPod touch. The procedures for recovering the deleted files on iOS devices with EaseUS is simple, secured and guaranteed.
If you have recently lost any data on your iPhone, iPad or iPod touch, either intentionally or mistakenly, you can simply download EaseUS MobiSaver Free. This simple iOS tool/software lets you easily recover the lost data on your iOS device. You can either recover the lost data directly from your iPhone, iPad, or iPod Touch or, alternatively, you can recover from iTunes Backup or iCloud Backup.
EaseUS MobiSaver can help you recover deleted contacts, pictures, videos, audio, notes and other files you may have lost on your iPhone, iPad and iPod Touch
Available Recovery Options
1. Recover Data from iOS Device
2. Recover Data from iTunes Backup
3. Recover Data from iCloud Backup
2. Recover Data from iTunes Backup
3. Recover Data from iCloud Backup
How to Recover Deleted/Lost Data from iOS Device Using Option 1 Above
To recover lost/deleted data from iOS device using this option: Recover from iOS, you are required to connect the device in either Normal Mode or DFU Mode. Most preferrable connection mode is Normal Mode.
To recover lost/deleted data from your iOS device using this method, follow the step by step instructions below here:
1. Download and install the latest version of iTunes on your PC. You may download iTunes from here.
2. Download and Install EaseUS MobiSaver on your PC. You may Download MobiSaver from here
3. Run/Lunch EaseUS MobiSaver on your PC and then, Connect your device to the PC.Wait few seconds until EaseUS detects your iOS device and then, choose Recover from iOS Device and Scan.

4. When you click Scan, EaseUS MobiSaver will scan your connected iOS device for existing and deleted/lost data including all media files.

NOTE:
1. The time required to scan the files depends on the volume of files you have on the device and the speed of your PC.
2. You can click STOP while EaseUS MobiSaver scans and select the deleted/lost files from the list.
5. When scanning is completed or stopped, EaseUS MobiSaver will display the list of the already found Deleted/Lost files on the iOS device in an organised form.
6. Now, Recover your files! You can now recover your files by hovering/mousing over any of the files you wish to recover, Right Click and then, click Recover. Remember to select the folder you wish to save the files on the phone.

1. The time required to scan the files depends on the volume of files you have on the device and the speed of your PC.
2. You can click STOP while EaseUS MobiSaver scans and select the deleted/lost files from the list.
How to Recover Deleted/Lost Data from iOS Device Using Option 2 Above
To recover lost/deleted data from iOS device using this option: Recover from iTunes Backup, you are required to have backed up your data using iTunes Backup on the PC you wish to use for this operation.
To recover lost/deleted data from your iOS device using this method, follow the step by step instructions below here:
1. Download and install the latest version of iTunes on your PC. You may download iTunes from here.
2. Download and Install EaseUS MobiSaver on your PC. You may Download MobiSaver from here
3. Run/Lunch EaseUS MobiSaver on your PC and then, Connect your device to the PC.Wait few seconds until EaseUS detects your iOS device and then, choose Recover from iTunes Backup. EaseUS MobiSaver should display a list of iTunes Backup you have on the PC. Choose one and click Scan.
4. When you click Scan, EaseUS MobiSaver will scan the selected iTunes Backup for existing and deleted/lost data including all media files.NOTE:
1. The time required to scan the files depends on the volume of files you have in the iTunes Backup and the speed of your PC.
2. You can click STOP while EaseUS MobiSaver scans and select the deleted/lost files from the list.
3. The files that will recovered depends on the ones you have as at the time the backup was made.
.
5. When scanning is completed or stopped, EaseUS MobiSaver will display the list of the already found Deleted/Lost files on the iOS device in an organised form.
6. Now, Recover your files! You can now recover your files by hovering/mousing over any of the files you wish to recover, Right Click and then, click Recover. Remember to select the folder you wish to save the files on the phone.
1. The time required to scan the files depends on the volume of files you have in the iTunes Backup and the speed of your PC.
2. You can click STOP while EaseUS MobiSaver scans and select the deleted/lost files from the list.
3. The files that will recovered depends on the ones you have as at the time the backup was made.
.
How to Recover Deleted/Lost Data from iOS Device Using Option 3 Above
To recover lost/deleted data from iOS device using this option: Recover from iCloud Backup, you are required to have internet connection on your PC and have backed up your device on iCloud using your iCloud account.
To recover lost/deleted data from your iOS device using this method, follow the step by step instructions below here:
1. Download and install the latest version of iTunes on your PC from the download section below
2. Download and Install EaseUS MobiSaver on your PC from the download section below.
3. Run/Lunch EaseUS MobiSaver on your PC and then, Connect your device to the PC.Wait few seconds until EaseUS detects your iOS device and then, choose Recover from iCloud Backup. You will be required to login your iCloud account with your login details.
4. Once you have successfully logged your iCloud account, EaseUS MobiSaver will display the list of iCloud Backup in your account. Choose the one you want and clickScan, EaseUS MobiSaver will now downnload the selected iCloud backup on your PC and then, extract and scan it for existing and deleted/lost data including all media files.NOTE:
1. The time required to scan the files depends on the volume of files you have on the iCloud backed, your internet connection speed and the speed of your PC.
2. You can click STOP while EaseUS MobiSaver scans and select the deleted/lost files from the list.
5. When scanning is completed or stopped, EaseUS MobiSaver will display the list of the already found Deleted/Lost files on the iCloud backup in an organised form.
6. Now, Recover your files! You can now recover your files by hovering/mousing over any of the files you wish to recover, Right Click and then, click Recover. Remember to select the folder you wish to save the files on the phone.
1. The time required to scan the files depends on the volume of files you have on the iCloud backed, your internet connection speed and the speed of your PC.
2. You can click STOP while EaseUS MobiSaver scans and select the deleted/lost files from the list.
Download Section:
1. Download iTunes from Here
2. Download EaseUS MobiSaver from here
2. Download EaseUS MobiSaver from here
Supported PC/OS for EaseUS MobiSaver:
You can install and use EaseUS MobiSaver on the PC/OS listed below:1. Windows XP
2. Windows Vista
3. Windows 7
4. Windows 8
5. Windows 8.1
6. Windows 10
2. Windows Vista
3. Windows 7
4. Windows 8
5. Windows 8.1
6. Windows 10
Supported iOS Devices
You can use EaseUS MobiSaver for almost all iPhone models, iPad models and iPod touch models.
Supported File Types
EaseUS MobiSaver can help you recover all the file types listed below (and more) from your iPhone, iPad and iPod Touch models.1. Photo Files
2. Video Files
3. Messages (Native)
4. Whatsapp Messages
5. Contacts
6. Call History/Logs
7. Notes
8. Calender
9. Reminders
10. Safari Bookmarks
11. Message Attachments
12. Camera Roll
2. Video Files
3. Messages (Native)
4. Whatsapp Messages
5. Contacts
6. Call History/Logs
7. Notes
8. Calender
9. Reminders
10. Safari Bookmarks
11. Message Attachments
12. Camera Roll
Thursday, July 21, 2016
How to Downgrade to iOS 9 0 2 from iOS 9 1
Its been a while now that iOS 9.1 was been released, and if you updated to the latest version, but want to go back to iOS 9.0.2, here’s how to downgrade to iOS 9.0.2 from iOS 9.1.
iOS 9.1 isn’t a huge update by any means, but it comes with a handful of bug fixes and improvements, as well as few new features. Most notably, iOS 9.1 comes with 150 new emoji, including the middle finger emoji that users have been looking forward to for a while.

Here are some of the other big fixes in iOS 9.1:
- Improved stability including CarPlay, Music, Photos, Safari, and Search
- Improved performance while in Multitasking UI
- Fixes an issue that could cause Calendar to become unresponsive in Month view
- Fixes an issue that prevented Game Center from launching for some users
- Resolves an issue that zoomed the content of some apps
- Resolves an issue that could cause an incorrect unread mail count for POP mail accounts
- Fixes an issue that prevented users from removing recent contacts from new mail or messages
- Fixes an issue that caused some messages to not appear in Mail search results
- Resolves an issue that left a gray bar in the body of an Audio Message
- Fixes an issue that caused activation errors on some carriers
- Fixes an issue that prevented some apps from updating from the App Store
If you updated to iOS 9.1, but aren’t enjoying the new update, or you want to jailbreak your iPhone (iOS 9.1 isn’t jailbreakable), then you can still downgrade to iOS 9.0.2.
Apple usually doesn’t allow you to downgrade back to an older version of iOS, but the first week or so after a new update releases, Apple keeps signing the previous iOS version, making downgrading possible for a short while.
Here’s how to downgrade to iOS 9.0.2 from iOS 9.1 on your iPhone or iPad.
Before You Begin
It’s crucial that you back up your iPhone before you downgrade to iOS 9.0.2, because the only method available to downgrade forces you to factory wipe your device completely, and the only way to get back all of your apps and settings is to restore from a backup after you downgrade.

You’ll want to back up through iTunes and we have a great guide that takes you through the process on Mac. It shouldn’t take too long — maybe 10-20 minutes depending on how much stuff needs backed up.
Even if you don’t care about losing your apps or settings, it never hurts to back up anyway just in case something should go wrong, that way you don’t end up with a bricked device. This is pretty rare, but it can happen at random times.
Downgrade to iOS 9.0.2
Now you’re ready to downgrade your iPhone or iPad back to iOS 9.0.2. The process for downgrading is a bit different than how you’d update to a newer version of iOS through iTunes, but it’s still really easy to do.
The first thing you’ll need to do is go to this website and download the right IPSW file for your specific iOS device. It may take a while to download, as the file can be as large as 2.2GB, so be patient while this happens.

After the IPSW file is downloaded, note its location on your computer and then open up iTunes and plug your iPhone or iPad into your computer.
Next, go to your device’s summary page by clicking on the iPhone or iPad icon near the upper-left corner of the iTunes window.

From there, hold down the Option/Alt key on your keyboard (Shift key on Windows) and click on Restore iPhoneas you hold down the key. A file explorer window will pop up and this is where you’ll locate the IPSW file and open it.
iTunes will begin downgrading your device to iOS 9.0.2. The process will take around 10-20 minutes to complete, so sit back and relax as it does its thing.
After it’s complete, iTunes will ask you if you want to set up your iPhone as a new iPhone or restore a backup to it. Choose the second option if you want to restore all of your apps and settings to your device.
After the backup restores itself, you’ll now be running iOS 9.0.2 with all of your apps and settings still intact.
Tuesday, July 19, 2016
Get Free 500MB Daily From MTN Using Master VPN
Master VPN is another VPN application for android devices just like TroidVPN, Tweakware, PSiphon and Simple Server. With Master VPN, you can unlock censored data subscription and browse unlimitedly and anonymously on your android devices. So, if you are looking for a way to browse unlimitedly on your android device using your MTN line, bypass the MTN network settings or access any site that does not accept Nigerian, Master VPN is likely your best guess for android device.
?
Unlike other VPN applications, Master VPN is simple to setup and use. The only flop in this is that it does not work with hotspot although, HTC Android phone users can use USB Tether or Internet Passthrough to make it work with PC.
?
HOW TO USE MASTER VPN FOR MTN NETWORK
1. Make sure that you have an active data on your MTN line. It could be the daily MTN BIS, MTN Free MB or normal subscription.
2. Download Master VPN from here and install it on your android device.
3. On your android device, modify your APN or setup another APN using the settings given below;
APN: web.gprs.mtnnigeria.net
Password: gprs
Username: web
Proxy: 127.0.0.1
Port: 8080
4. Now, enable Data Connect on your android device.
5. Lunch Master VPN application on your android device and Click "GO". Wait about 5 seconds for Master VPN to initiate and connect the phone to the internet. Once connected, you may begin browsing the internet and downloading as you wish.
6. Select the Apps you wish to connect through Master VPN by swapping up until you see the "+" in the circle. Tap it and add all your apps by marking them.
?
NOTE:
Remember to always add newly installed apps to the list by following the same procedure as given above.
WHY USE MASTER VPN FOR UNLIMITED BROWSING USING MTN NETWORK SIM?
1. Master VPN is FREE
2. Master VPN is faster for browsing with MTN BIS, MTN Free MB, MTN normal data plan than most other VPN apps I have used.
3. Master VPN does not require root access at all.
4. Master VPN starts automatically. Meaning, once your phone is on, Master VPN ons with it.
NOTE:
Master VPN requires root access to work with any android devices with android version below 4.2.
Do you like this? Have Issues connecting? Add your Comment below. Remember to share with your friends!
?
?
Unlike other VPN applications, Master VPN is simple to setup and use. The only flop in this is that it does not work with hotspot although, HTC Android phone users can use USB Tether or Internet Passthrough to make it work with PC.
?
HOW TO USE MASTER VPN FOR MTN NETWORK
1. Make sure that you have an active data on your MTN line. It could be the daily MTN BIS, MTN Free MB or normal subscription.
2. Download Master VPN from here and install it on your android device.
3. On your android device, modify your APN or setup another APN using the settings given below;
APN: web.gprs.mtnnigeria.net
Password: gprs
Username: web
Proxy: 127.0.0.1
Port: 8080
4. Now, enable Data Connect on your android device.
5. Lunch Master VPN application on your android device and Click "GO". Wait about 5 seconds for Master VPN to initiate and connect the phone to the internet. Once connected, you may begin browsing the internet and downloading as you wish.
6. Select the Apps you wish to connect through Master VPN by swapping up until you see the "+" in the circle. Tap it and add all your apps by marking them.
?
NOTE:
Remember to always add newly installed apps to the list by following the same procedure as given above.
WHY USE MASTER VPN FOR UNLIMITED BROWSING USING MTN NETWORK SIM?
1. Master VPN is FREE
2. Master VPN is faster for browsing with MTN BIS, MTN Free MB, MTN normal data plan than most other VPN apps I have used.
3. Master VPN does not require root access at all.
4. Master VPN starts automatically. Meaning, once your phone is on, Master VPN ons with it.
NOTE:
Master VPN requires root access to work with any android devices with android version below 4.2.
Do you like this? Have Issues connecting? Add your Comment below. Remember to share with your friends!
?
Monday, July 18, 2016
How to Share VPN Network from Mobile to PC Using DF Tethering Fix App
Hi there! Today I will show you guys how to VPN from Mobile to PC Network using DF Tethering Fix App.It is another another super-fast tethering app that works perfect without any limitation,
DF Tethering Fix allows you to remove limitation on tethering imposed by android and let you use your mobile Vpn networks such as Psiphon, OpenVpn, Tweakware etc. You can share the network using your mobile hotspot.
Advantage of DF Tethering Fix app
1. You dont need to install any apps on the device you want to share the network to
2. It has no limitation
Note: This app works on rooted device only not like pdanet+. To enjoy this app you need to root your mobile device.
If you want to root your android device click HERE
How it Works.
Click HERE to download DF Tethering Fix app on your android device
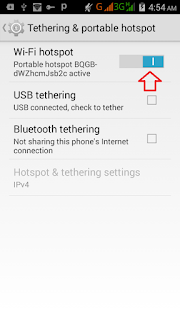
Now go to your Mobile settings, under Tethering and portable hotspots turn your Wi-Fi hotspot ON
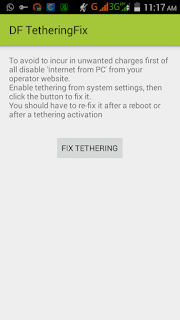
Click on FIX TETHERING until Tethering Fixed show up
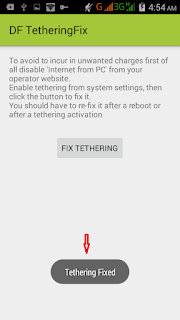
Now go to your pc and turn on you Wi-Fi and search for the network and click your pc with it
Note: Make sure your vpn software is connected
Thats all
Enjoy.
How To Share Psiphon Tweakware OpenVpn and JWP Internet Network From Your Mobile Device To PC
In our previous post, I showed you guys how to share your Mobile VPN connection with PC using DF Tethering Fix App. Today am going to show you how to power your pc with internet connection from your mobile device using great software called PdaNET+.

PdaNet+ is one of the top Android applications of all time. PdaNet+ shares the Internet access of your Android phone with your computer or tablet. PdaNet+ works on all Android phones without rooting.
PdaNet+ allows your laptop to go online wirelessly through your VPNS network on your Android devices. No need to set any proxy and port on your Pc browsers is a direct internet connection from your mobile device. Now follow the steps below to get started.
Requirement
1. Android Mobile device
2. USB Cable
3. PC
Software’s Needed
1. PdaNET+ for android device Click HERE to download
2. PdaNET+ for PC Click HERE to download
How To Share Your Mobile Vpn network to Pc using PdaNET+
1. Install PdaNET+ for android device on your phone
2. Lunch PdaNET+ on your phone and Activate USB TENDER

Note: Make sure you enable USB debugging
3. Now install PdaNET+ for PC on your PC
4. Connect your mobile device via USB cable to your PC
Note: Make sure your Vpns software such as Psiphon, openVpn, Tweakware or JWP is already connected on your mobile device.
5. Now open the PdaNET+ on your Pc click “connect internet”, it will verify and authenticate your connection and it will show connected.


Now you successfully shared you VPNS Network with your PC and you can now use your PC without any proxy or simple server.
Subscribe to:
Posts (Atom)