There are a few different Android apps for scanning QR codes, and QR Code Reader is one of our favorites: it’s both simple and free, it works quickly, and it doesn’t blast you with advertising (unlike many rival apps: one typical review of a rival says “pelts you non-stop with ads… way more advertising presented in a way more obtrusive way than is justified”). It’s also compatible with stacks of Android devices and versions: if you’ve got Android 2.3.3 or later you’re good to go - provided, of course, that your device has a camera. QR Code Reader is good, but it isn’t a miracle worker. If the code you’re scanning is designed to take you to a website, you’ll also need a data signal or wireless connection. QR Code Reader To actually scan a QR Code, all you need to do is load the app, start scanning and point your camera at the QR code. Line it up inside the guide arrows and that’s it: QR Code Reader recognises it and provides the appropriate information, carries out the appropriate task or in the case of phone numbers and other contact information, asks you what action to take. It also records your scan history so you can see what codes you’ve been pointing your phone at.
No ads, no money. What’s in it for the developers?
Yes! There are stacks and stacks of code-creating Android apps, although going through the reviews it seems like they all have flaws. It’s probably easier to go to the Scan developers’ website where you can create QR codes for social media, Wi-Fi access, contact information and many more kinds of data for free in your web browser.
Are there any risks to scanning QR codes?
Actually, yes. A scam known as “attagging” involves pasting new QR codes over existing ones, for example by pasting a label over the QR code on a poster. The new code could link to malicious software that might then access your camera or your personal data. In Russia, a QR code scam made phones send premium-rate texts at $6 per text. Such malware is very, very unusual, but it does exist and has done for several years. Do you use a QR code reader on your Android device? Is it a must-have app that delivers daily, or is it gathering virtual dust in your Apps screen? Have you ever been a victim of “attagging”? Let us know in the comments below.
Heavy games like GTA, PES, NBA among others usually have separate cache files needed to run them on android devices. Usually, these games would prompt you to install the cache files at first lunch however, downloading them directly is not always advisable because of the unstable signal strength that may interrupt your downloads halfway through.
Since you can simply download the cache file and move it onto your android device and then, enjoy your game, you do not need to waste your data needlessly.
In this tutorial, I discuss how to locate the cache file folder for games developed by most popular game developers like Gameloft, Electronic Art also known as EA, Glu and others and then, install the games successfully on your android devices.
DEFINITION OF TERMS: 1- Cache File for Games: this is where the graphics like the images, arts, sounds and other files of most 3D and other HD games are parked. It is usually contained in another folder.
ISSUE TO BE SOLVED: 1- How to Locate and Install Cache Files of Android Games.
SOLUTIONS: 1- Download and Install the Game: supposing you want to install GTA III on your android device, simply download the APK file and install it on your android device.
2- Lunch the Game: now, run the game on your android device. Usually, it will prompt you to install the files on your android device, press "OK or Yes" and wait few seconds (10 - 15 seconds) and then; stop it.
3- Locate the Games OBB Folder: the OBB folder is where the cache file should be placed or extracted. To locate this folder, install any file explorer like ES File Explorer and locate the appropriate folder for your android version as listed below.
For Android 4.0 Upward i- Gameloft Cache Game Folder is: sdcard/gameloft/games/(game name*) or sdcard/Android/data/(game name*) -if you have installed the Game directly from Play Store.
ii- Electronic Arts (EA) games – sdcard/Android/data/(game name*) iii- Glu games – sdcard/glu/(game name*) iv- Games by other developers – sdcard/data/data/(game name *) or sdcard/(game name *)
For Android 2.3 - 3.8 Every games cache file should be placed or extracted in the path below: /sdcard/android/obb
4- Extract and Place the Cache File In the Folder: now, extract the cache file either with your PC or your phone and place it (without any modification) in the exact folder as indicated above.
5- Enjoy Gaming! You can now lunch the game and enjoy!
Hello guys, I hope you had a great weekend? ??d?? i will write a tut?r??l on how t? Hide Drives with CMD w?thout any th?rd ??rt? ???k?g?. ?h?r? ?r?? s?v?r?l fr?? ?nd du? s?ftw?r?’s ????ss?bl? t? hide local dr?v?s, h?w?v?r ? ?m n?t g?nn? m?nt??n to h?d? ? local dr?v? ?m?l???ng ? ???k?g?. In th?s tut?r??l ? w?ll sh?w ??u an ??s??st m?th?d t? hide n?t?v? dr?v? with CMD. th?s m?? s?v? ??ur ???h ??sh ?nd t?m?.
??w t? Hide Drives with CMD ?
Step 1. ?l??k ?n Start – Run , if you are Using Windows 8, Then Click on start and search for Run, or just hold down windows key and press ” R “.
Step 2. Run b?? will appear, k?ndly type ” ?md ” ?nd h?t ?nt?r. Step 3. Now you will see Command promt windows, Type ” D?sk??rt ” ?nd h?t ?nt?r. Note : In Windows 8 i was asked to confirm if i want to allow this program to make changes to this computer. Just click on yes and another Window will open up shortly. Step 4. Now you have to type ” l?st v?lum? ” ?nd Hit Enter to see the list of all drives details Step 5. Now i have some personal data in my drive E which i dont want any other person to peep in, So i want to hide it, For that i will type ” Select volume E ” and hit Enter. ?f ??u w?sh t? hide v?lum? D , Then you will type ” Select v?lum? D ” ?nd h?t ?nt?r. Now you can see something like below picture. By now you have selected the Drive successfully which you want to hide. But the last part which is to Hide the Drive is still remaining. Step 6. To hide the drive you have to type “ Remove letter E ” and hit enter. Congrats you have successfully Hidden the drive.
How do i get the Drive Back ?
Alright Now the only question you want me to ask is ” Hey. How do i get my drive back “
Let me tell you thats easy as well. Just follow the below simple steps. Step 1. Scroll Back up and perform steps 1,2,3,4 and 5 again. Step 2. ok Now you have Completed the 5 steps listed above. Just make sure you have completed till ” Select volume E ” Step 3. Earlier in the article to Hide the drive we typed ” Remove letter E ” , Now to unhide it we will Type ” Assign letter E ” and hit Enter. Thats it Step 4. Check if you have successfully got the drive back. Now Just Restart your Computer if you wish to. Note : This is for Educational Purpose only, Perform the Trick at your Own Risk, OlassTECH is not liable for any damage you cause to your Computer.
I have been getting series of messages from Iphone users because they are unable to use the etisalat smart pack cheat.Here is a good news to iphone users, Openvpn has fix the issue of import file and you can now enjoy etisalat unlimited browsing on your iphon/ipad the way we enjoy it on our android phone. No long story, the steps are straight forward just follow them and rock on your iphone with Etisalat social pack browsing no expiring date
Dial *200*3*3*2*1*1# to subscribe and N100 or N50 will be deducted
How to Use Open VPN on iPhone/iPad with Etisalat Unlimited Browsing
1. Click HERE to download and install OpenVpn on your iphone/ipad
2. Click HERE to download config file and extract the config file to .ovpn file
3. Then Import the files to your Openvpn
4. Now input the username and password below
Username: vpnbook
Password: binbd5ar
Note: New password is generating after some days so you have to get new one.
Any time you try to connect and you saw authentication failed it means you need to use new password.
Visit www.vpnbook.com/freevpn to get the latest password for free
5. Then click connect and start enjoying etisalat social pack with your iphone.
BlackBerry is on their way out of the smartphone business. In terms of market share, at least. But recently, they released their latest one, and its quite interesting. Even for the current standard.
cnet.com
For your information, almost every Android smartphone are plain smartphone with touchscreen and virtual keyboard. This is where Priv stands out. They provide physical keyboard. And its BlackBerry keyboard.
For your information (again), BlackBerry keyboard is the best compared to other smartphones physical keyboard. Virtual keyboard? Not a chance.
So, with the availability of physical keyboard on Priv, I think this will make other manufacturers to think a little bit about it. Or not?
Jika ditutorial sebelumnya kita update y28 menggunakan file update OTA dan banyak problems/isue yang menyebabkan vivo y28 menjadi bootloop/ gagal update bisa dicoba tutorial ini.
Solusi terakhir jika terjadi bootloop atau tidak bisa masuk sistem.
Flash dengan menggunakan flashtool v5 download disni dan download fimrware y28 disni.
Untuk cara flashingnya
Extract kedua file yang kita download tadi
Jalankan flash_tool.exe. Pilih scatter file dari folder firmware Y28.
Setelah loading scatter selesai, pilih opsi Firmware Upgrade.
Setelah itu tekan tombol Download, dan sambungkan HH ke laptop.
Proses flasing akan berjalan. Tunggu proses selesai ditandai munculnya tanda centang.
Finally,Nigeria adopts the use of the Mobile Number Portability method -a method thats being used in the telecommunication industry of most advanced countries of the world. This is a method that makes it easier for subscribers to switch between telecom service carriers seamlessly and easily having no fear for the lost of contacts or whatever.
Just like before, the Nigerian Communication Commission introduces another method of collaboration into the Nigeria Communication Industry. The Mobile Number Portability method which was strongly discussed earlier this month is said to begin later this month.
Dont Know What MNP is?
MNP, Mobile Number Portability method is introduced to enable a subscriber of any telecom service carrier switch from one telecom service provider to another whilest still retaining his or her SIM bearing the same phone number it was before.
For example: A subscriber that uses MTN line with the phone number 0803 333 3333 can now switch to Glo service whilest still bearing the same mobile phone number which is: 0803 333 3333.
Using this method, no fear of loosing contacts or your contacts loosing you. You can always switch to telecom service provider whose service is readily available at your area or community even, if there is change of location.
If Need be, How Do I Change My Telecom Service Provider?
In case you need to change your telecom service provider, you will have to visit the receiving service provider, also called the recipient to make your request. To do this, you will have to visit one of their authorised dealer shops, Outlets. Point of Sales or customer Care Centres.
For example: If you wish to change from MTN to Glo. in this regard, Glo is the recipient therefore; you will have to visit any of the Gloworlds, Glo Zones, Point of Sales, or Dealer Shops to request for MNP.
Before you can do this, you must have a valid form of identity such as your ID cRADS, with a visible photograph. Also note that the line to be switched must have being registered by you, the line must be active and that you must know the lines serial number.
Having filled the MNP form which will be given to you at that point, you will be issued a new SIM Card bearing your original mobile phone number and the SIM would be registered at that point in time. You should be informed to send "PORT" in a text message to 3232.
Once you send the message to 3232, the recipient service provider would forward your request to NPC where validation is being done.
All things being equal, the SIM will be activated and you will be informed of the changes. Please note that once activated, any airtime left on your previous SIM will be wiped off and calls you make hence forth would be billed as per the default tariff plan of your new service provider. Click here to SUBSCRIBE to this Blog to Receive future updates..
Its a good practice to back up your iPhone device. Here’s how to back up your iPhone with iTunes on Mac.
Backing up your iPhone saves all of your apps, photos, settings, etc. so that if something bad were to happen to your iPhone, you could get your apps and settings back whenever you fixed it. This is important because sometimes your iPhone can just die, especially if you have an older iPhone. If you don’t have it backed up, you’ll lose all of your apps, photos, and settings.
However, not only do you need to back up your iPhone, you need to do it regularly if the contents on your iPhone change frequently. Many times, users will back up their iPhones maybe once a month or even every couple of months and call it good, but if you’re constantly downloading new apps and taking more and more photos, all of that information needs to be safely backed up on a regular schedule.
Backing Up Your iPhone
The process for backing up your iPhone is really easy and anyone can learn how to do it. There are no prerequisite steps to take either — just plug in your iPhone, fire up iTunes, and back it up.
Backing up through iTunes will back up everything, whereas an iCloud backup will only backup a select number of things, like photos and settings.
To back up your iPhone using iTunes, follow the simple steps below.
First off, plug in your iPhone to your Mac and then open up iTunes. From the main screen in iTunes, click on the iPhone icon toward the top-left of the window.
This will take you to the device summary page in iTunes where you’ll see info about your iPhone, including your device’s serial number, as well as when the last time you backed up your iPhone was. You can also take a closer look at your storage and see what’s all taking up space.
From this page, simply click on Back Up Now to begin the backup process. If you want to encrypt the backup (that is, secure with a password) you can select that option to the left. This will also allow you to back up account passwords and health data.
From there, you might receive a pop up saying that there are apps on your iPhone that aren’t in your iTunes library, which means they aren’t backed up. You can click on Back Up Apps to back up all of the apps on your iPhone, which is recommended.
At this point, the backup process will begin, which could take a while — maybe around 20 minutes or so depending on how much stuff needs backed up. If you have only a few files that need backed up, it’ll only a minute or two, whereas if everything needs backed up, it could take a while.
After the process completes, you’ll be good to go and you can close out of iTunes and unplug your iPhone.
Again, once you back up your iPhone, you’ll want to make it a habit to frequently back up if you’re constantly downloading new apps, taking photos, and changing around settings.
However, if you’re like me and store most of your important files in the cloud, including photos, then you may only need to back up your iPhone every once in a while. I rarely download new apps and most of my settings stay the same, so I have little reason to back up my device every single week, but other users may want to.
OpenVPN is still working very well for MTN Unlimited Surfing With N0.0kobo, but here is another alternative for the PC users to enjoy this tweak to the fullest.
For The PC Users To Browse With MTN Unlimited Free Surfing Via SimpleServer
» Download and extract this customized SS-for-Mtn-N0.0kobo Surfing to a new folder on your desktop background.
Connect Your Modem With:
» APN: web.gprs.mtnnigeria.net.
» Proxy: leave it empty
» Port: leave it empty
» Open the file you extracted, double-click "SimpleServer.exe"and make sure is always on open. » Configure your Browsers and IDM to 127.0.0.1 Port 8080 » Remember to tick: "Use this proxy server for all protocols" if you want it to open all secured sites.
Soonest the Chrome we know will be getting much faster. This upcoming development could be traced to a fresh out of the block compression algorithm compression algorithm tagged Brotli. This algorithm was introduced by Google last September. This Chrome have the capacity execute the compression of data up to 26 percent more as regards its existing compression engine, Zopfli, it is true to say this is a very commendable leap.
Google chrome getting faster
Going by what Google’s web performance engineer Ilya Grigorik disclosed, Brotli is ready to roll out, so Chrome users could have expectations of a cute leap in load times the moment the next version of Chrome is released. Google announce the Brotli will play a big role in making mobile Chrome users experience “lower data transfer fees and reduced battery use.”
The company is making bold claims that Brotli will occupy the position of “a new data format” that Google prospectively looks to be adopted by other web browsers soonest as apparently Firefox is next in line to jump on the technology. As at the moment though, you could expect to notice your web pages loading at a relatively faster rate in the coming weeks.
For those who wish to buy New Infinix Hot2, it is now available back in Jumia Stock, rush in and get yours at Jumia before it out of their stock. Price: N19,500 (Also comes with 1GB data @500 for 12 months) Grab the Infinix Hot2 at Jumia here
The new Infinix Hot2 attached with MTN offer of 1GB data with N500 for 12 months. For those who can sacrifice N500 for MTN 1GB, simply tweak your Smartphone IMEI with the Infinix Hot2 IMEI below.
» Tweak your Android IMEI with: 359869060006361 » Remember to change the last 2 or 3 digits to your choice. » After succeeding in tweaking IMEI, recharge your MTN SIM with N500, and text A1 to 131 » MTN 1GB will be smile to you then. Hope this makes sense than buying 1GB with N1, 200 and you can continuously get 1GB on that same MTN SIM with N500 for 12 months.
The Samsung Galaxy S6 and S6 edge are inarguably beautiful smartphones with stunning looks and feel accompanied by wonderful features. However, virtually every user of the Samsung Galaxy S6 and S6 Edge complains of the phones battery issues.
Unlike most other Samsung android devices, the Samsung Galaxy S6 and S6 Edge are bundled with fairly small battery as against the functionalities of these devices. Meanwhile, in response to the complaints from the users, Samsung, as seen on the Sammobile.com website, it is argued that the blame could be shared by both Google and Samsung.
Samsung might have made a mistake putting rather small batteries inside the Galaxy S6 and Galaxy S6 edge, but it seems part of the battery issues users are facing – on both existing devices and the S6 duo – are because of issues on Android 5.0 itself. One of the biggest issues with Lollipop seems to be one that keeps the mobile data connection active far longer than it needs to be, something a lot of users have complained about over on the official Android Open Source Project issue tracker. -Source
It is said that the battery issues of the Samsung Galaxy S6 and S6 Egde are also affected by the Lollipop build which keeps mobile data connection far longer than it should be.
Also Check: How to Root Any Samsung Android
Although, this is Samsungs views; it is not enough an excuse for the die-hard and loyal Samsung fans. This is probably because the Samsung Galaxy S6 and S6 edge are not the first smartphones from Samsung that are bundled with fairly small or rather poor batteries.
Samsung Grand and perhaps, the Galaxy Grand 2 are bundled with disappointing batteries, too.
Related Article: How to Change Samsung Android IMEI
On the other hand, on Lollipop androids, there have been reports that some apps are continuing to keep the mobile data connection active even when they are done communicating which is not supposed to be.
Google Play services and Google Now probably contribute mostly to the poor battery performance and power management of the android Lollipop devices.
Since the battery issues are supposedly from the Lollipop, Google is hopefully working on sorting things out, perhaps; the effect might be seen on the Android M, which might arrive later this year.
Noticed any issues with your battery? Have you noticed some other apps consuming more battery than usual on your Android Lollipop device? Do let us know in the comment. We might be able to proffer solutions to minimising the battery span.
There are four (4) VPN softwares working with Etisalat social pack unlimited browsing,Psiphon vpn, OpenVPN, Simple Server and JWP. Today another VPN software join the race and is a user friendly software.For those that dont like too much configuration this is the best option for them.
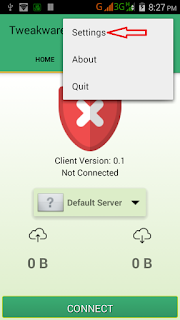
Tweakware app is available on Pc and mobile devices. The mobile version seems to be Unlimited unlike the PC version which is demo and you need to upgrade your account to premium account to enjoy full access, You dont need to put any host address or IP proxy on tweaking so let’s get started on how to use it with etisalat social pack or mtn bis....I have made the guide simple so that you wont have any trouble.
To Subscribe for Etisalat Social pack dial *200*3*3*2*1*1#
How To use Etisalat social pack with Tweakware on android devices
For Mobile Settings use Use your Etisalat default mobile internet settings Make sure your APN is etisalat
Or use
Apn: Etisalat Proxy: 127.0.0.1 Port: 8080
On Tweakware app
Click HERE to download and install Tweakware on your android device.
Now launch the tweakware and click option and settings.
Then click on Bundled Settings
Mark Use Bundled Setting
Click on Select Bundled Setting and choose ETI CHAT PACK
Now go back to your tweakware app home and click connect and wait for the tweakware to show connected.
Then minimize and enjoy your unlimited browsing with tweakware app.
According to XDA member LeeDroid, Android 6.0.1 Marshmallow LeeDroid V1.0.1 [ 1.30.401.1] ROM Is now available for HTC 10.
LeeDroid V1.0.1 Custom ROM will let HTC 10 users taste the sweetness of Marshmallow 6.0.1 on HTC 10 [pme].
÷ ROM Features:
Android 6.0.1 . HTC Sense 8 . Rooted with the latest SuperSU 2.71 thanks to @Chainfire . De-odexed . Zip-aligned . i nit.d & su.d support . Disable error reporting . Cleaned up bloat . BusyBox installed . SQlite3 support . Bash and Nano shell support . External SD write permissions . Removed lots of HTC logging junk . Package Signature Checking Disabled . Clear cache at boot time . Lots of configuration changes and speed enhancements . Improved battery vs. Stock builds . Android Logo font pack (Selectable in settings) . Ambient display / Doze Support . Advanced Power Menu - Reboot, Recovery, Bootloader & Safe Mode . Improved battery stats . SystemUI Tuner - long press settings icon in pull down to enable . LeeDrOiD custom build trickery . LeeDrOiD wallpapers . System clean-ups . Custom LeeDrOiD Locales & Language support . And lots more........
Aroma Exchange mail admin hack . Remove Google & misc apps . Center status-bar clock . Default Tweaks toggles
÷ LeeDrOiD Tweaks:
. Prism landscape . Infinite apps in folders . China Sense . Quick settings quick pull-down from top right corner . Dual Traffic Indicator (Data) . Traffic Indicator colour wheel selection . China Sense Recent Apps . Display 4G for LTE . Double tap status bar to sleep . Long press power for flashlight shortcut when screen off . Toggle boot audio . Set default app installation location . Toggle fast dormancy . Optional Nav Bar to replace soft keys . Custom Nav Bar Size . Volume keys to control keyboard cursor . Toggle boot audio . Toggle HTC Pnp manager . Launch Marshmallow Land (Hidden MM Game) . Notification toggles - MTP, ADB, Heads Up, Power Save, HTC Sync . flash LED while charging . AM/PM large, small or hidden . Launch SystemUI Tuner . Squared caller photo . Ambient display & tunables . Haptic feedback intensity . Fix Permissions . Zipalign apks . mount system RO/RW . Wipe battery stats . Wipe Cache . Wipe Dalvik Cache . Trim Partitions and more!
Android Custom ROM fix ® provide various Firmware Updates and Rooting process along with Custom ROM,Modes,file are all belong to their owners/developers. The autor of this site or the developers are not responsible, if you damage or brick your device.Do it on your own risk and follow the instruction properly.
* Important:
Backup important files stored on your device before proceeding with the steps below, so that in case something goes wrong you’ll have backup of all your important files.
Installation instructions & more Via here.
Like this post? PLZ Hit the share buttons below to share this article with your friends on Facebook, Google + and Twitter.
PLZ Follow Us On Flipboard 4 More HTC 10 latest updates.
PLZ Use the comment box below to contribute more ideas & Suggestions .
Morning guys, today Im presenting a step-by-step explanatory guide on the means to adopt as to recording a screencast video of your desktop screen with the assistance of YouTube. There is no strict requirement of the installation of any software.
Screencasting is stress free. Just download a software program, then hit the record button and a video of your computer screen will be created, available for you to possibly upload to YouTube. There are a variety of screencasting tools between you could make your choice from but then it is possible you may not still be aware that you can also create screencast videos inside YouTube absent any desktop software! The totality of things you need is a web browser and a YouTube account.
Presented to you in this article is a detailed step by step guide on the means to create screencasts of your desktop windows with the aid of YouTube.
How to Record your Desktop Screen with YouTube
How to Create a Screencast with YouTube
Step 1: By means of your Google Account, sign-in to YouTube. Take the Upload button which appears on the upper left corner; choosing Events under Live Streaming. In the case when you have not done before prior now, there may the slight occurrence of YouTube requiring you to verify your phone number to as to procure streaming.
Step 2: There you are on the Create Event page. Assign a title to your screencast video, make a choice of setting the privacy of the video between Unlisted or Private and then click the “Go Live Now” button.
Step 3: What this does is open the Hangouts on Air page. To turn off webcam recoding, click the camera icon. In the same vein, it is also possible to toggle the microphone icon should you not wish to record audio.
Step 4: At this interval, select the screen share button in the left toolbox and choose a desktop window which you intend to record for your screencast. Do not forget that if you making use of multiple virtual desktops, what it will only show is program windows that are active on the current desktop.
How to Record your Desktop Screen with YouTube
Step 5: To share your screen, click the Start Screenshare button; after which you could Start Broadcast so as to begin recording the screen. Of course, this is a private session, the essence here is nobody will be able to watch your broadcast in the process of it being recorded. Click the Stop Broadcast button when you are through with the recording, and switch to the YouTube website.
There we are. Move to your YouTube video dashboard (youtube.com/my_videos) and there you will be entertained to the sight of new screencast video whose recording you have just finished. It is also possible to download the video to your Google Drive or even share it generously with the world.
Essentially, the videos are recorded in 720p HD and this it would be very nice to resize your desktop window to the 16:9 ratio prior to hitting the broadcast button.
Etisalat Internet trick rocks again with Psiphon app. This time around, the trick works with no IP address and port. Just few setups away and you’re done. Note: more cheats to be dropped on our facebook page..Click here to like our facebook page so that you will not be left out. How to Setup the NO IP & Port Etisalat free Internet trick?
1. Firstly, download the Psiphon Pro Lite handler here.
2. After that, install and launch the application.
3. On the handler menu, config using the following details…
Tick Reverse Proxy box
Proxy type: Reverse Proxy Proxy Server: www.twitter.com Real Proxy Type: Inject Real Proxy Server: Real Proxy Port: 80 …. Save…
Once you’ve done the above settings, make sure you swipe to “options” go to “more options” and leave all field blank…. Remember to go to mobile network and set APN: etisalat and leave other fields blank...
Now connect and start surfing without limits……………
This trick works perfectly once you’re on Etisalat Socialme or Chat pack plan… it also works with 0.0k, but if you’re not subscribed to any of those plans, then it might take time to connect… so I advise you remain on Etisalat Socialme or chat pack plan to enjoy the trick to the fullest.
Further assistance? Do let me know via comment section…
Hey guys, earlier on this blog we discussed on how to use MTN MusicPlus 150MB with Android Simple server but so few people sent me a message that it didnt work for them. Here, I will show you how to use this Free MB with Psiphon App. This method has been tested by me and it is confirmed working. To get this Free 150MB, send I to 5900. Downloads: Search Google and Download Psiphon Handler Configurations:Configure your Psiphon Handler as follows Proxy Type: HTTP Custom Header: X-online-Host Proxy server: http://musicplus.mtnonline.com Proxy type: Default Real proxy server: musicplus.mtnonline.com Real proxy port: 8080 Click on SAVE. After that, the App will ask you whether to Psiphon Browser only or Tunnel whole device, Simple click on "Tunnel whole device" Thats all..You can now click on "START" to start connection. After successful connection, minimize Psiphon and start browsing. Enjoy it while it lasts and dont forget to make your comments below and also share this post with your friends.